> ## Documentation Index
> Fetch the complete documentation index at: https://docs.jelou.ai/llms.txt
> Use this file to discover all available pages before exploring further.
# Genesys Integration
> Connect Jelou with Genesys to manage conversations and enable interoperability between both platforms.
Jelou integrates communication channels with Genesys, enabling users to:
* Manage conversations from Genesys using communication channels connected in Jelou.
* Transfer conversations and interaction context between Jelou and Genesys to ensure seamless and efficient support.
* Escalate conversations to Genesys agents when needed.
* Centralize conversation management in an integrated ecosystem between both platforms.
## Prerequisites
To use the Genesys integration, you need:
* An active **Enterprise** account on Jelou.
* The **Genesys** node enabled on your account.
* An active **Genesys Cloud** account with administrative permissions.
* An **OAuth** client with permissions to consume Genesys Cloud APIs.
* The channels and flows participating in the interoperability previously defined.
***
## Install the app
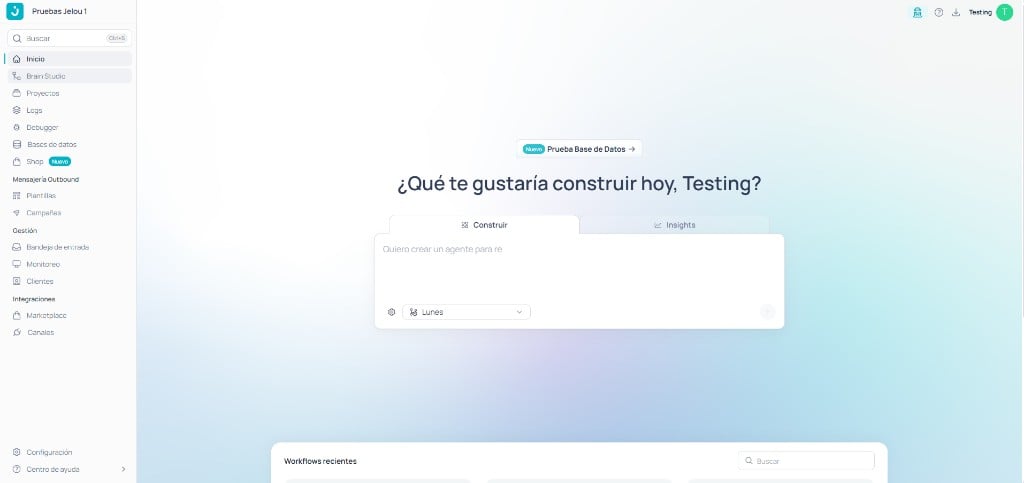
Log in to Jelou. Navigate to the **Brain** module and select the **Canvas** section.
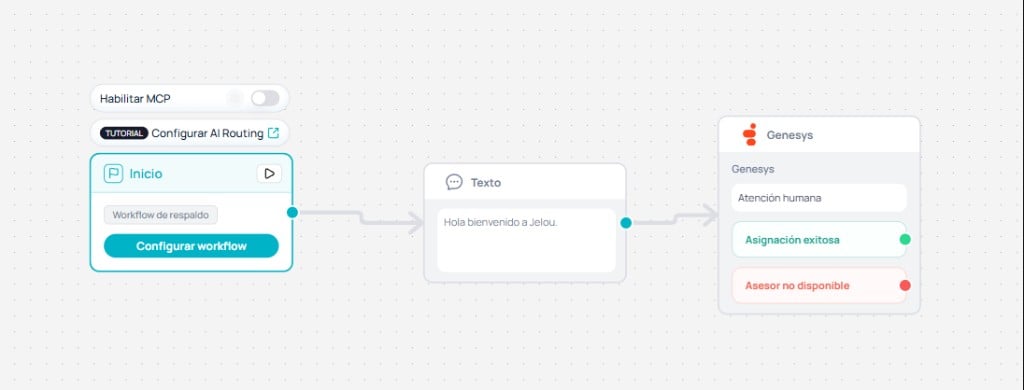
 Inside the Canvas, create a new flow according to your needs. For this example:
1. Add a **text node** and configure a welcome message for the bot.
2. From the node sidebar, drag the **Genesys node** into the flow.
It is recommended to add:
* A confirmation message for successful transfers.
* An error handling message in case of integration failure.
Inside the Canvas, create a new flow according to your needs. For this example:
1. Add a **text node** and configure a welcome message for the bot.
2. From the node sidebar, drag the **Genesys node** into the flow.
It is recommended to add:
* A confirmation message for successful transfers.
* An error handling message in case of integration failure.
 Before configuring the integration, verify that the required roles for the OAuth client exist.
Path: **Menu > User Management > Roles and Permissions**
The roles will allow the OAuth client to access the resources and APIs used by the integration.
Before configuring the integration, verify that the required roles for the OAuth client exist.
Path: **Menu > User Management > Roles and Permissions**
The roles will allow the OAuth client to access the resources and APIs used by the integration.
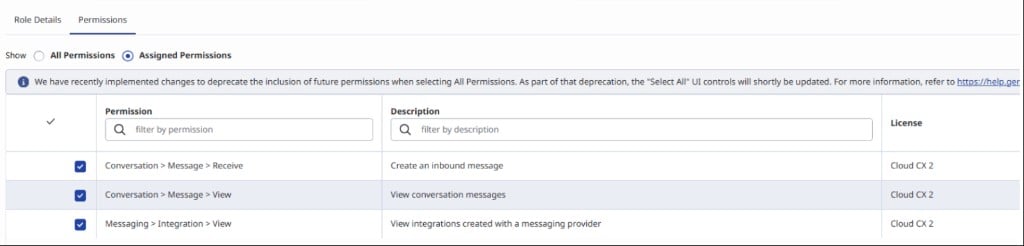
 Select the corresponding role to review the enabled permissions.
Path: **Menu > User Management > Roles and Permissions > \[Role] > Edit Role**
The **Developer** role can be used with Genesys Cloud's default permissions.
Select the corresponding role to review the enabled permissions.
Path: **Menu > User Management > Roles and Permissions > \[Role] > Edit Role**
The **Developer** role can be used with Genesys Cloud's default permissions.
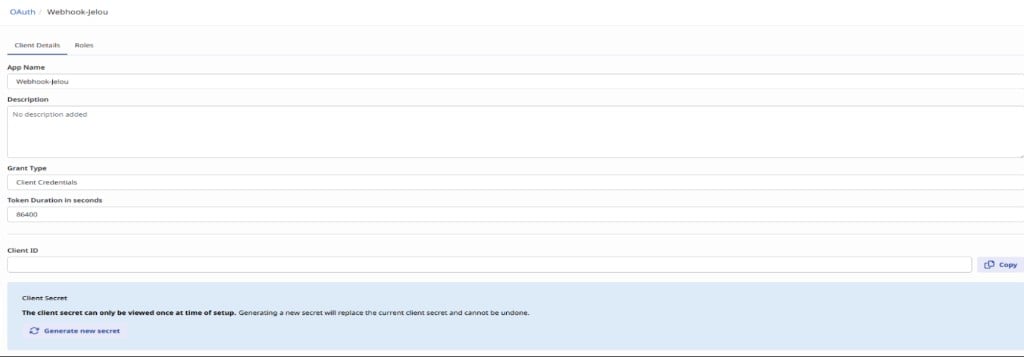
 Navigate to: **Menu > IT and Integrations > OAuth**
Create an OAuth client to authenticate the middleware or external service responsible for the interoperability with Genesys Cloud.
Navigate to: **Menu > IT and Integrations > OAuth**
Create an OAuth client to authenticate the middleware or external service responsible for the interoperability with Genesys Cloud.
 Once created, open the application to review its configuration.
Path: **Menu > IT and Integrations > OAuth > \[OAuth Client] > Edit Application**
Verify the following information:
* Application name.
* Authentication type.
* Grant Type.
* General configuration.
Once created, open the application to review its configuration.
Path: **Menu > IT and Integrations > OAuth > \[OAuth Client] > Edit Application**
Verify the following information:
* Application name.
* Authentication type.
* Grant Type.
* General configuration.
 Select the **Roles** tab of the OAuth client.
Path: **Menu > IT and Integrations > OAuth > \[OAuth Client] > Roles**
Assign the previously configured roles so the OAuth client can consume the APIs required by the integration.
Verify that the divisions associated with the roles correspond to all interactions that the connector will use. Incorrect configuration can cause permission errors during operation.
Select the **Roles** tab of the OAuth client.
Path: **Menu > IT and Integrations > OAuth > \[OAuth Client] > Roles**
Assign the previously configured roles so the OAuth client can consume the APIs required by the integration.
Verify that the divisions associated with the roles correspond to all interactions that the connector will use. Incorrect configuration can cause permission errors during operation.
 Navigate to: **Menu > Digital and Telephony > Message > Platform Integrations**
Create an **Open Messaging** integration to enable message exchange between Genesys Cloud and Jelou.
Navigate to: **Menu > Digital and Telephony > Message > Platform Integrations**
Create an **Open Messaging** integration to enable message exchange between Genesys Cloud and Jelou.
 Open the created integration to review its configuration.
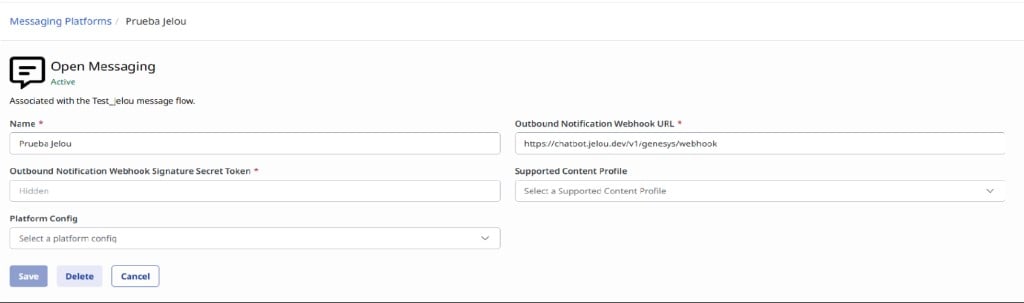 Once the Open Messaging integration is created, identify the **Integration ID**.
This identifier is the unique value of the integration and will be used later to configure the Trigger.
The **Integration ID** is found at the end of the URL when you access the Open Messaging integration details.
Navigate to: **Menu > Orchestration > Triggers**
Create a Trigger that listens for events associated with Open Messaging conversations. This Trigger will automatically execute the Workflow when the configured event occurs.
Once the Open Messaging integration is created, identify the **Integration ID**.
This identifier is the unique value of the integration and will be used later to configure the Trigger.
The **Integration ID** is found at the end of the URL when you access the Open Messaging integration details.
Navigate to: **Menu > Orchestration > Triggers**
Create a Trigger that listens for events associated with Open Messaging conversations. This Trigger will automatically execute the Workflow when the configured event occurs.
 Open the created Trigger and configure a condition using the **Integration ID** obtained earlier.
This condition ensures that only events corresponding to the configured integration are executed.
Open the created Trigger and configure a condition using the **Integration ID** obtained earlier.
This condition ensures that only events corresponding to the configured integration are executed.
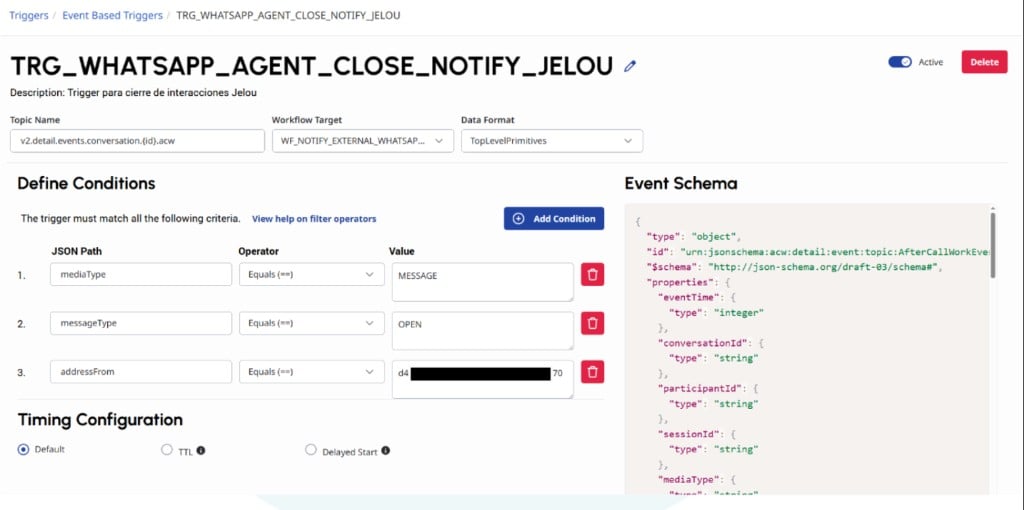 The Trigger must execute the Architect Workflow responsible for processing the conversation information and performing the corresponding closure.
Navigate to: **Menu > Orchestration > Architect > Flows**
Create a Workflow that receives the information sent by the Trigger. This Workflow will be responsible for processing the conversation data and executing the configured actions.
The Trigger must execute the Architect Workflow responsible for processing the conversation information and performing the corresponding closure.
Navigate to: **Menu > Orchestration > Architect > Flows**
Create a Workflow that receives the information sent by the Trigger. This Workflow will be responsible for processing the conversation data and executing the configured actions.
 Inside the Workflow, configure the variables that will receive the information sent from the Trigger.
These variables will allow you to identify the conversation and build the request to the Data Action.
Inside the Workflow, configure the variables that will receive the information sent from the Trigger.
These variables will allow you to identify the conversation and build the request to the Data Action.
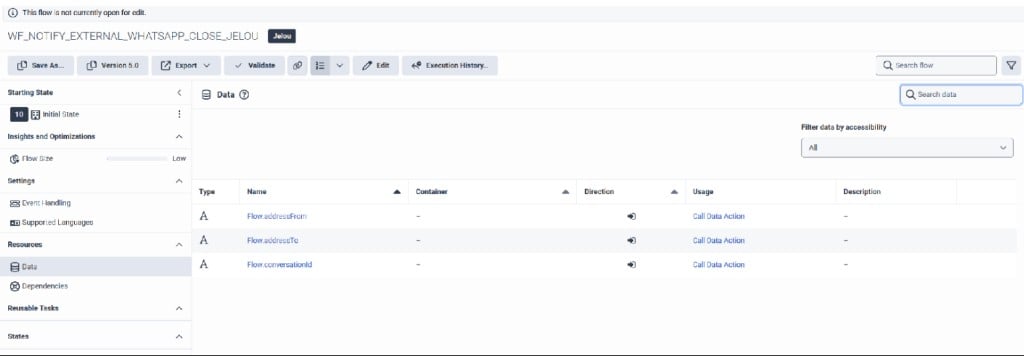 Inside the Workflow, add a task to execute the **Data Action** responsible for closing the conversation.
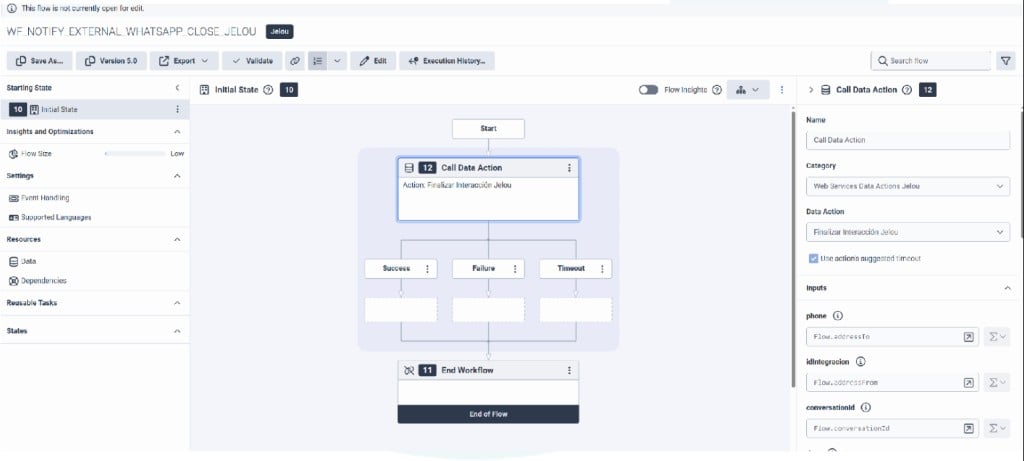 Navigate to: **Menu > IT and Integrations > Data Actions**
Create a new Data Action that will be used by the Workflow.
Navigate to: **Menu > IT and Integrations > Data Actions**
Create a new Data Action that will be used by the Workflow.
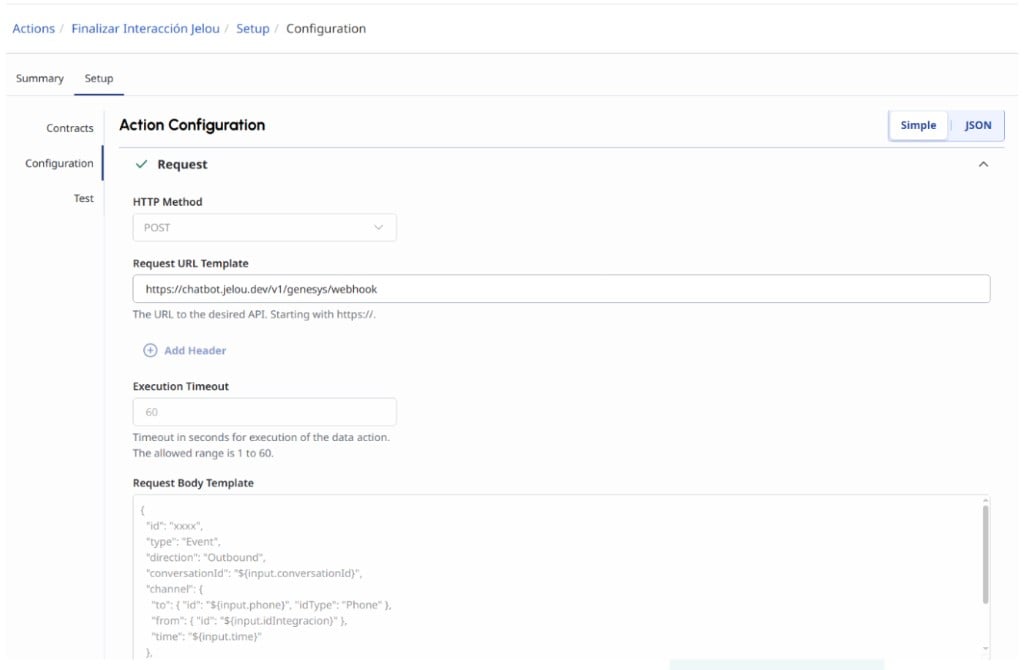
 Open the created Data Action and configure:
* HTTP method.
* Endpoint.
* Headers.
* Request body.
* Variable mapping.
Path: **Menu > IT and Integrations > Data Actions > \[Data Action] > Configuration**
Open the created Data Action and configure:
* HTTP method.
* Endpoint.
* Headers.
* Request body.
* Variable mapping.
Path: **Menu > IT and Integrations > Data Actions > \[Data Action] > Configuration**
 ***
## Configure the app
After completing the configuration in Genesys Cloud:
Go back to the **Brain** module and select the **Genesys** node within the flow.
Complete the node configuration with the corresponding integration parameters.
Verify that the connection to Genesys Cloud is successful before continuing.
When the configuration is ready, **save and publish** the flow.
***
## Use the app
Once the integration is configured:
* Conversations can be automatically transferred between Jelou and Genesys Cloud.
* Bots created in Jelou will automate initial customer support.
* Agents can continue the conversation directly from Genesys Cloud.
* Conversation events will be automatically processed through Open Messaging, Trigger, Workflow, and Data Actions.
No additional manual actions are required once the automation is published.
***
## Configure the app
After completing the configuration in Genesys Cloud:
Go back to the **Brain** module and select the **Genesys** node within the flow.
Complete the node configuration with the corresponding integration parameters.
Verify that the connection to Genesys Cloud is successful before continuing.
When the configuration is ready, **save and publish** the flow.
***
## Use the app
Once the integration is configured:
* Conversations can be automatically transferred between Jelou and Genesys Cloud.
* Bots created in Jelou will automate initial customer support.
* Agents can continue the conversation directly from Genesys Cloud.
* Conversation events will be automatically processed through Open Messaging, Trigger, Workflow, and Data Actions.
No additional manual actions are required once the automation is published.