> ## Documentation Index
> Fetch the complete documentation index at: https://docs.jelou.ai/llms.txt
> Use this file to discover all available pages before exploring further.
# Authorize sending from your domain
> Add the DKIM and Return-Path records to your domain's DNS so Jelou can send emails on your behalf.
When Jelou sends emails on behalf of your company, email providers need to verify that you authorized it. To do this, you must add two records to your **domain's DNS**:
* **DKIM** — signs your emails to prove they are legitimate.
* **Return-Path** — defines where undeliverable emails bounce back to.
This setup is performed by the team that manages your domain's DNS. The exact steps depend on your provider (Namecheap, GoDaddy, Cloudflare, Route 53, among others).
## Step 1: Share your domain with Jelou
Tell Jelou which domain you will be sending emails from.
* **Format:** `.com`
* **Example:** `google.com`
## Step 2: Receive the DNS records
Jelou will provide the DKIM and Return-Path values you need to add. They will look similar to this:
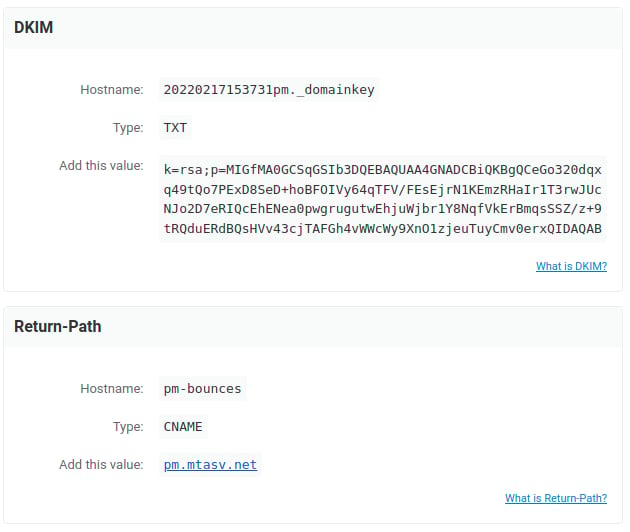 Each record includes three pieces of information: **Hostname**, **Type**, and the **value** you need to copy.
Copy the values exactly as provided, without extra spaces or line breaks. The DKIM value is a long string: make sure it was copied in full.
## Step 3: Add the records in your provider
Below is an example using **Namecheap**.
### Open your domain management
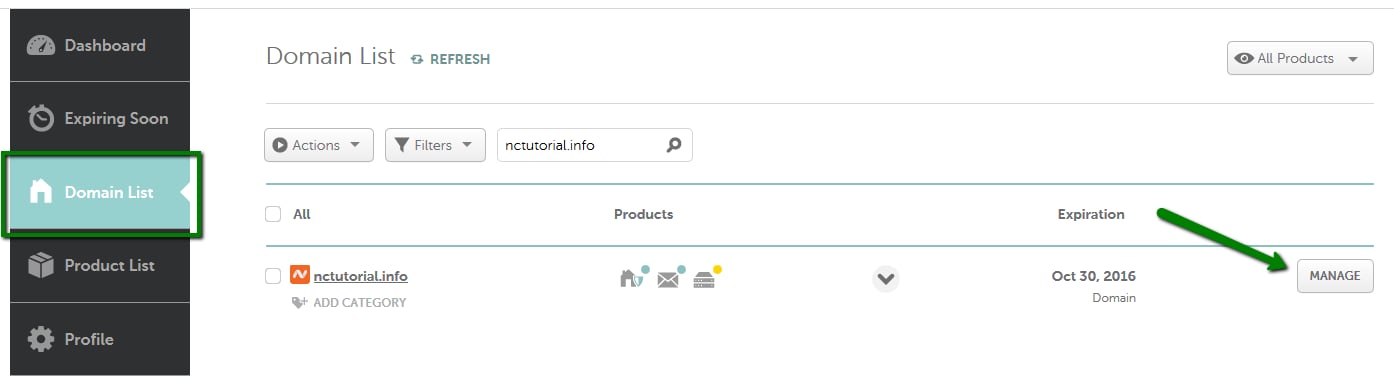
Sign in to your account, choose **Domain List** in the left menu and click **Manage** next to your domain:
Each record includes three pieces of information: **Hostname**, **Type**, and the **value** you need to copy.
Copy the values exactly as provided, without extra spaces or line breaks. The DKIM value is a long string: make sure it was copied in full.
## Step 3: Add the records in your provider
Below is an example using **Namecheap**.
### Open your domain management
Sign in to your account, choose **Domain List** in the left menu and click **Manage** next to your domain:
 ### Open Advanced DNS
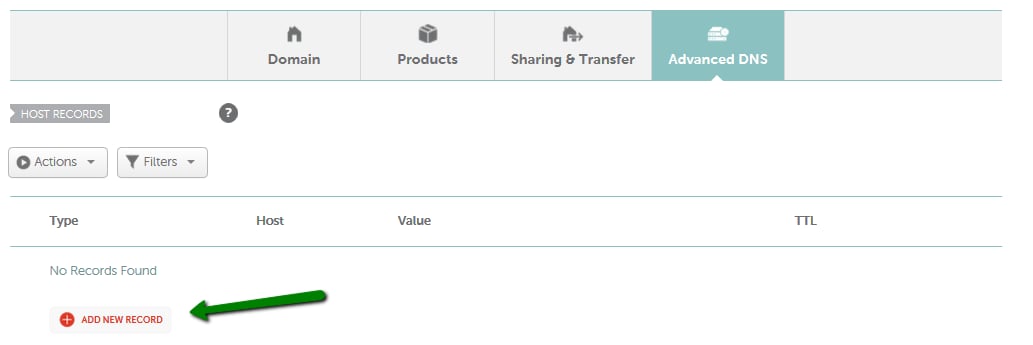
Go to the **Advanced DNS** tab from the top menu and click **Add New Record**:
### Open Advanced DNS
Go to the **Advanced DNS** tab from the top menu and click **Add New Record**:
 If the **Host Records** section does not appear under Advanced DNS, your domain is not using
Namecheap's BasicDNS — it is delegated to another provider (your own nameservers, Cloudflare,
Route 53, or Namecheap's hosting nameservers). In that case create both records at whichever
provider answers for your domain, not here. You can confirm who that is by looking up the
nameservers for your domain.
### Create both records
Add one record for each value Jelou provided:
| Record | Type | Host | Value |
| ----------- | ------- | ------------------------------------ | ------------------------ |
| DKIM | `TXT` | The hostname ending in `._domainkey` | The `k=rsa;p=...` string |
| Return-Path | `CNAME` | `pm-bounces` | `pm.mtasv.net` |
Once finished, the records should look like this:
If the **Host Records** section does not appear under Advanced DNS, your domain is not using
Namecheap's BasicDNS — it is delegated to another provider (your own nameservers, Cloudflare,
Route 53, or Namecheap's hosting nameservers). In that case create both records at whichever
provider answers for your domain, not here. You can confirm who that is by looking up the
nameservers for your domain.
### Create both records
Add one record for each value Jelou provided:
| Record | Type | Host | Value |
| ----------- | ------- | ------------------------------------ | ------------------------ |
| DKIM | `TXT` | The hostname ending in `._domainkey` | The `k=rsa;p=...` string |
| Return-Path | `CNAME` | `pm-bounces` | `pm.mtasv.net` |
Once finished, the records should look like this:

 ## Step 4: Save and wait for propagation
Click **Save All Changes**. Newly created records usually take about **30 minutes** to take effect, though propagation can take longer depending on your provider.
## Step 5: Notify Jelou
Once you have saved the records, **let Jelou know** so the configuration can be verified and sending from your domain activated.
## Troubleshooting
DNS propagation takes time. Wait at least 30 minutes and request another verification. Also confirm the records were created on the same domain you reported in Step 1.
Some DNS panels visually truncate long strings, which is normal. If you suspect the value is incomplete, edit the record and paste the full value again.
Several providers complete the domain for you. Enter only the hostname portion (for example `pm-bounces`), without repeating your domain at the end.
## Next step
To **receive** the emails arriving in your mailboxes in Jelou, set up automatic forwarding:
Set up automatic forwarding from your mailboxes to Jelou.
## Step 4: Save and wait for propagation
Click **Save All Changes**. Newly created records usually take about **30 minutes** to take effect, though propagation can take longer depending on your provider.
## Step 5: Notify Jelou
Once you have saved the records, **let Jelou know** so the configuration can be verified and sending from your domain activated.
## Troubleshooting
DNS propagation takes time. Wait at least 30 minutes and request another verification. Also confirm the records were created on the same domain you reported in Step 1.
Some DNS panels visually truncate long strings, which is normal. If you suspect the value is incomplete, edit the record and paste the full value again.
Several providers complete the domain for you. Enter only the hostname portion (for example `pm-bounces`), without repeating your domain at the end.
## Next step
To **receive** the emails arriving in your mailboxes in Jelou, set up automatic forwarding:
Set up automatic forwarding from your mailboxes to Jelou.