> ## Documentation Index
> Fetch the complete documentation index at: https://docs.jelou.ai/llms.txt
> Use this file to discover all available pages before exploring further.
# AI Routing
> Configure intelligent conversation routing so every message reaches the right workflow automatically.
When a project has multiple workflows, **AI Routing** automatically decides which one to run for each incoming message. Instead of routing by exact keywords, the system semantically compares the message against the name and description of every workflow and picks the best match — similar to a coordinator who reads the full context before assigning a task.
## How it works
Incoming messages are automatically compared against the name and description of all workflows in the project. The system picks the workflow whose purpose best matches what the user is asking and runs it. If no workflow is a good fit, the **fallback workflow** is executed.
AI Routing is configured at two levels: at the project level (general strategy and enabling) and at the workflow level (name, description, and individual execution rules).
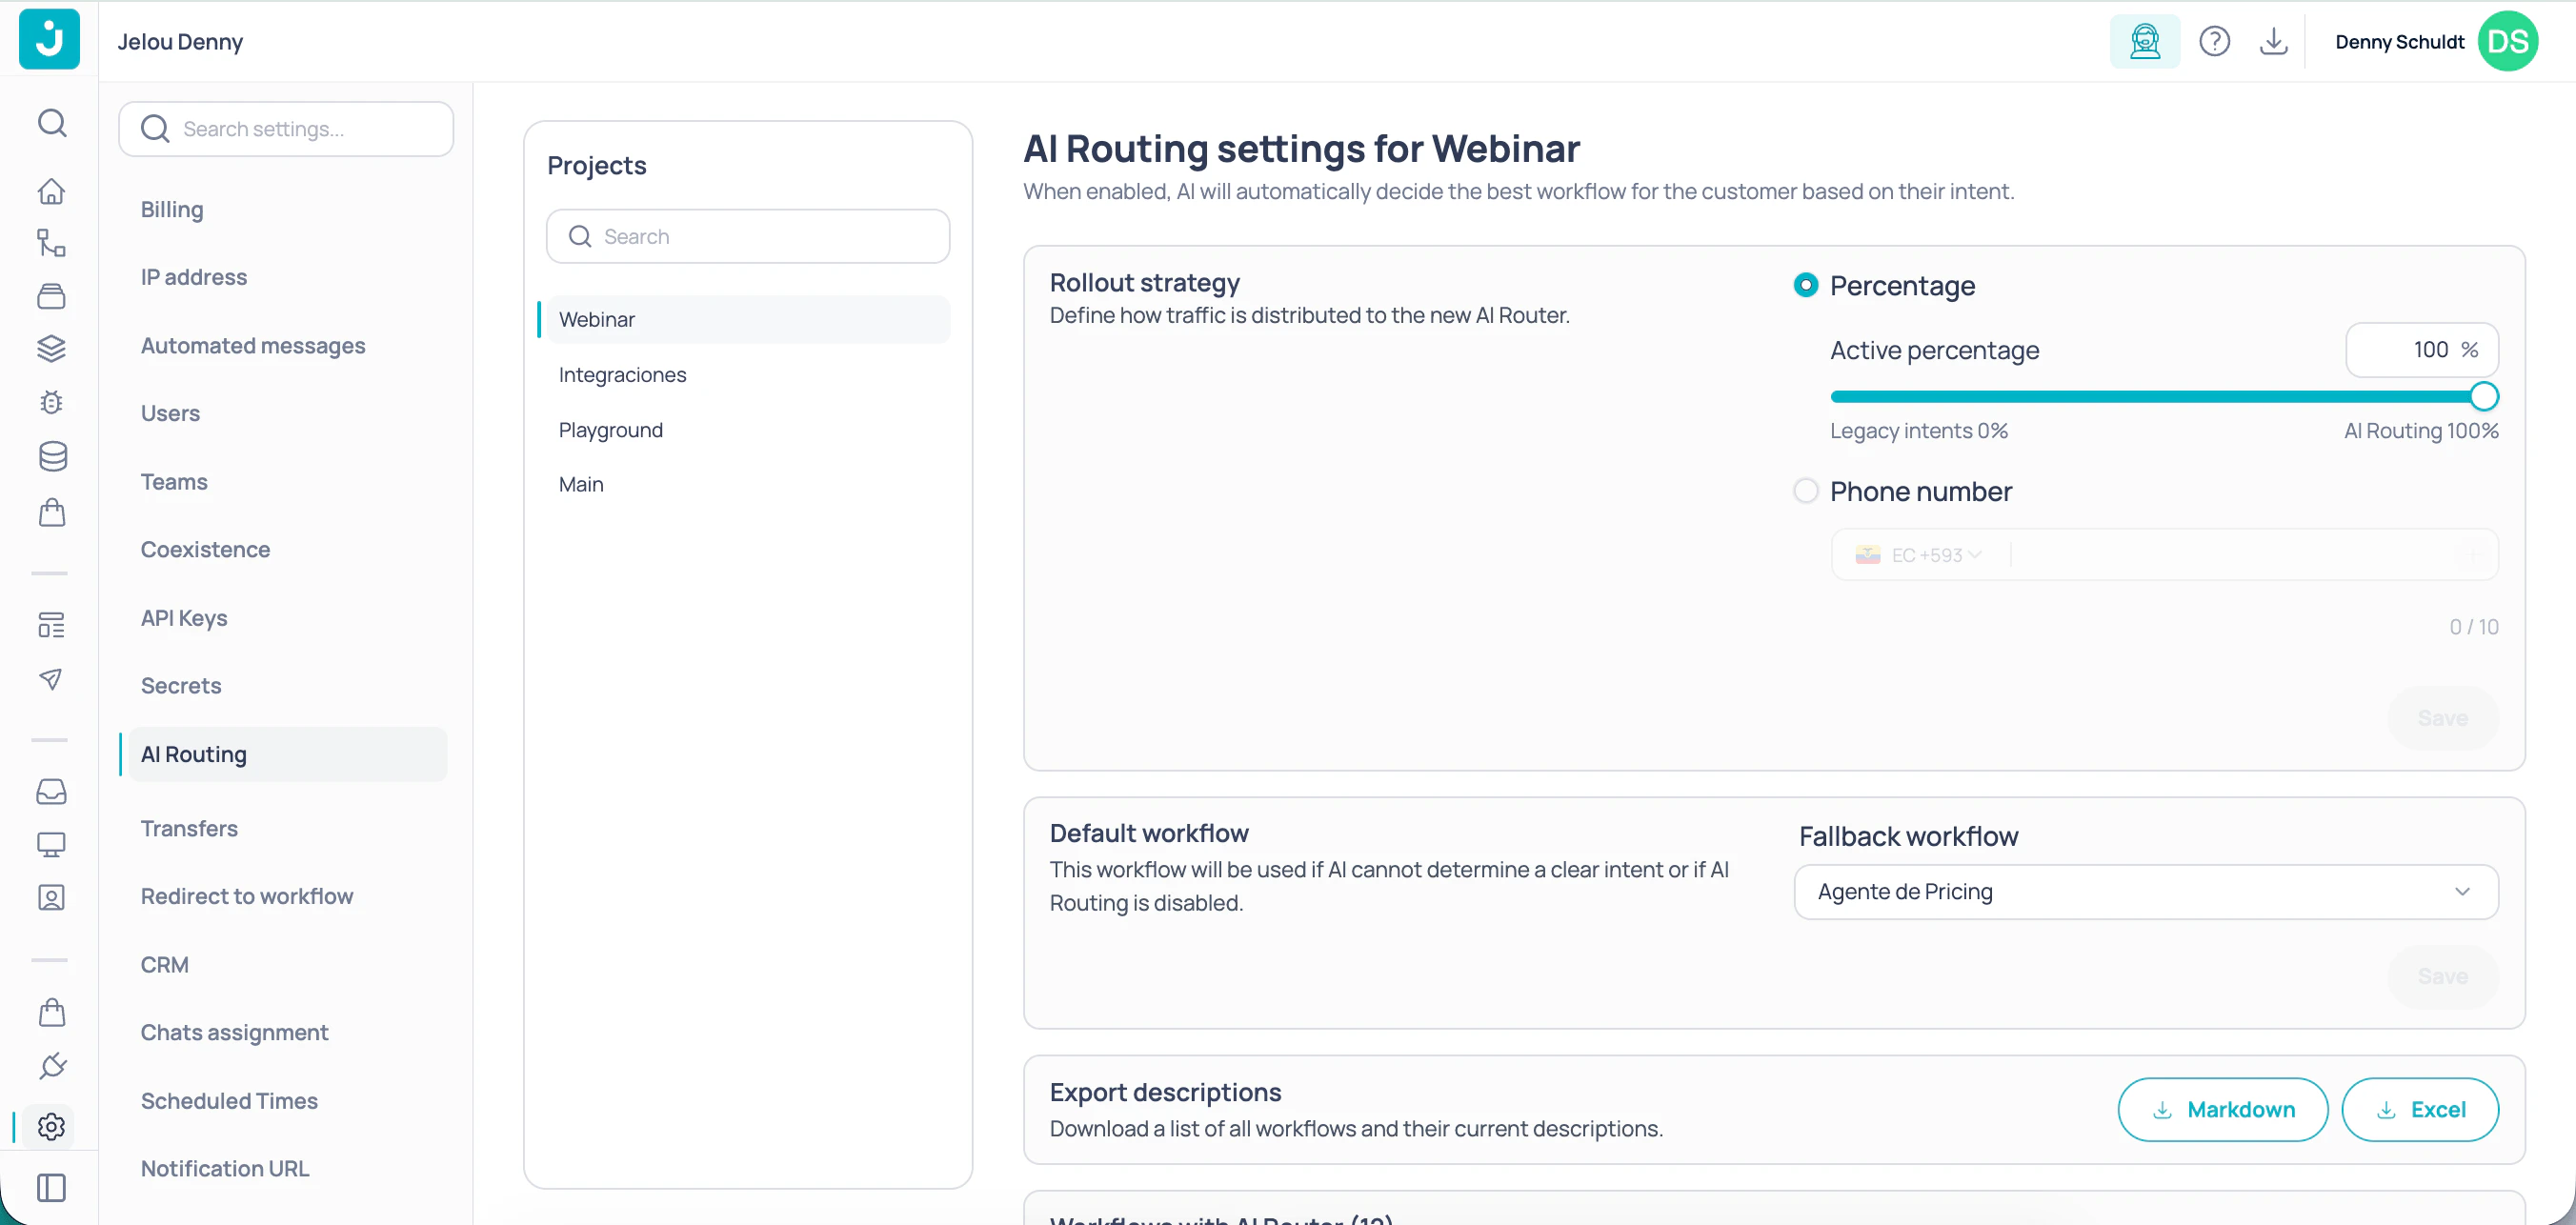
## Project-level configuration
The **AI Routing** page in Settings centralizes the routing configuration for each project. Select the project in the left-side selector to see all configuration cards.
### Rollout strategy
This section only appears if the project still has legacy intents configured.
Defines how traffic is distributed toward AI Routing. Choose between two modes:
**Active percentage** — use the slider or the numeric field to set what percentage of users will use AI Routing. The rest continues using legacy intents.
* `0 %` → all traffic uses legacy intents
* `100 %` → all traffic uses AI Routing
* Useful for a gradual migration without cutting over the previous system all at once
**Phone number** — enter a specific list of phone numbers that can test AI Routing. All other users continue with the legacy system. Ideal for validating routing with a controlled group before opening it to 100 %.
### Takeover
Defines when the AI Router takes control of the conversation. Useful for handling users who open with a greeting before stating their actual request.
Choose between two modes:
**Immediate routing** — the AI Router attempts to route the user from their very first message. Ideal when your users typically write their question directly without preamble.
**Filter greetings** — the system ignores short courtesy messages such as "Hi" or "Good morning" and waits to detect a real intent before routing the user. With this mode active, you can configure two additional values:
| Field | Description |
| ------------------- | ------------------------------------------------------------------------------------ |
| **Wait time** | Seconds the system waits without detecting intent before sending the user a message. |
| **Default message** | Text sent to the user when the wait time expires without detecting an intent. |
### Fallback workflow
Select from the dropdown the workflow that runs when AI Routing cannot determine a clear intent, or when AI Routing is disabled. Click **Save** to apply the change.
### Export descriptions
Download a file listing all the project's workflows and their current descriptions. Choose between **Markdown** or **Excel** format depending on your workflow. Useful for reviewing or auditing the quality of the descriptions AI Routing uses to route messages.
### Workflows with AI Router
The bottom card shows all workflows in the project split into two groups — those already configured for AI Routing and those that are not — with a status indicator:
* **Green dot** — the workflow has a description and AI Routing can use it for routing.
* **Orange dot** — the workflow has no description; AI Routing will not be able to select it correctly.
Click any workflow to open it directly in the canvas and configure it.
Workflows without a description are not routed correctly. If you see orange dots, add a clear description to those workflows from the Start node.
## Workflow-level configuration
Access the configuration panel from the **Start** node of any workflow. The panel has three tabs.
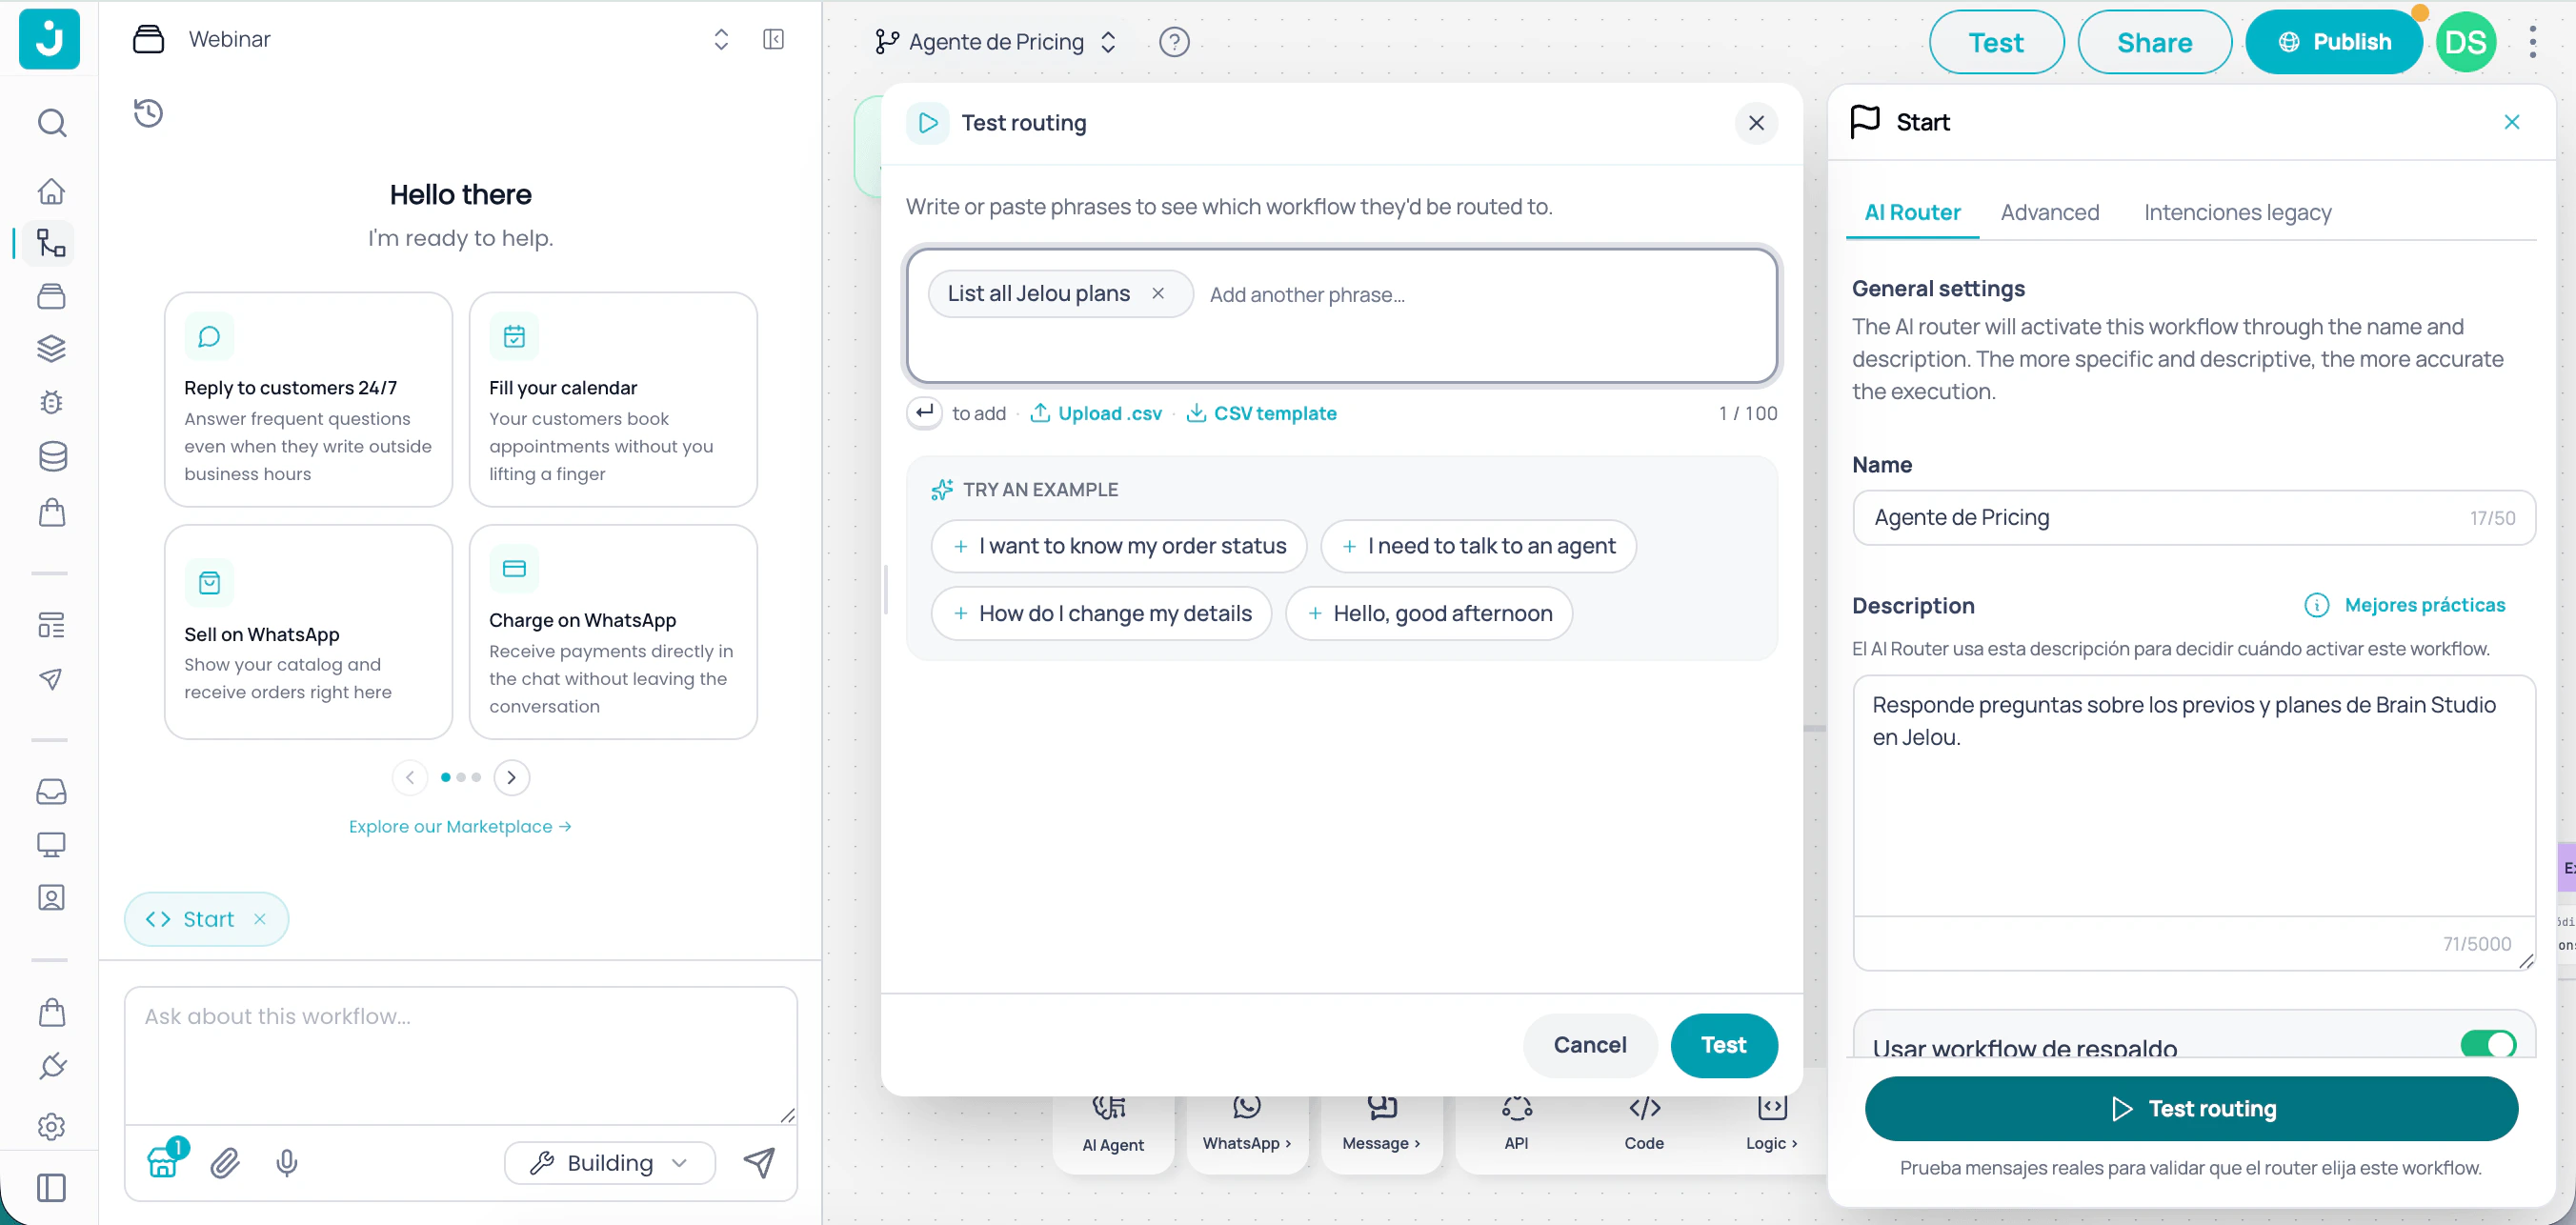
### AI Router tab
Configure the name and description the system uses to route messages to this workflow.
| Field | Description | Limit |
| --------------------- | -------------------------------------------------------------------------------------------------------------------------------------------- | ---------------- |
| **Name** | Short identifier for the workflow. Should concisely describe what it does. | 50 characters |
| **Description** | Explains in detail when this workflow should run and what type of messages it handles. The more specific, the more accurate the routing. | 5,000 characters |
| **Fallback workflow** | Mark this workflow as the default destination when no other workflow matches the message. Only one fallback workflow is allowed per project. | — |
Write clear, specific descriptions: what types of requests the workflow handles, what problems it solves, and in which contexts it should run. The more detailed the description, the more accurate the routing.
#### Test routing
Before publishing, verify that messages route to the correct workflow directly from this tab.
Click **Test routing**. The evaluation modal opens.
Type one or more phrases in the text field, or download the template, fill it with the messages you want to evaluate, and upload it to test in bulk.
For each evaluated message you will see:
* **Selected workflow**: the workflow the message would be routed to.
* **Reasoning**: brief explanation of why that workflow was chosen.
* **Match indicator**: green if the message matches the workflow being tested, grey if it matches a different workflow in the project, amber if there was no match and the fallback workflow will run.
### Advanced tab
Configure execution rules that restrict when and for whom the workflow is triggered.
**Hide workflow** — excludes this workflow from AI Routing. When hidden, the system will never select it automatically; it can only run via a forced redirect from another workflow.
You cannot hide the fallback workflow. Deactivate it as the default workflow first before hiding it.
The following rules restrict workflow execution to specific users or contexts:
Restricts the workflow to a specific group of phone numbers. Only users on the list can trigger it, regardless of message content.
* Required format: E.164 (e.g. `+593999123456`, `+5215512345678`)
* Maximum **20 entries** per workflow
* Each entry includes a phone number and an optional name for identification
If you enable this rule and a user outside the list sends a message, the workflow will not run even if the content matches semantically. The message is routed to the fallback workflow.
Limits the workflow to users communicating from certain countries, using the international phone prefix.
* Examples: `+593` (Ecuador), `+57` (Colombia), `+52` (Mexico), `+55` (Brazil)
* You can select multiple prefixes simultaneously
* If the user's number doesn't match any prefix, the message is routed to the fallback workflow
### Legacy intents tab
This tab only appears if the account still has intents configured.
If 100 % of traffic already uses AI Routing, legacy intents have no effect. You can keep them as a fallback during the transition.
Manage the keyword phrases from the previous routing system. These intents triggered the workflow before AI Routing was available and are kept for projects migrating gradually using the percentage rollout strategy.
## Migrate from legacy intents
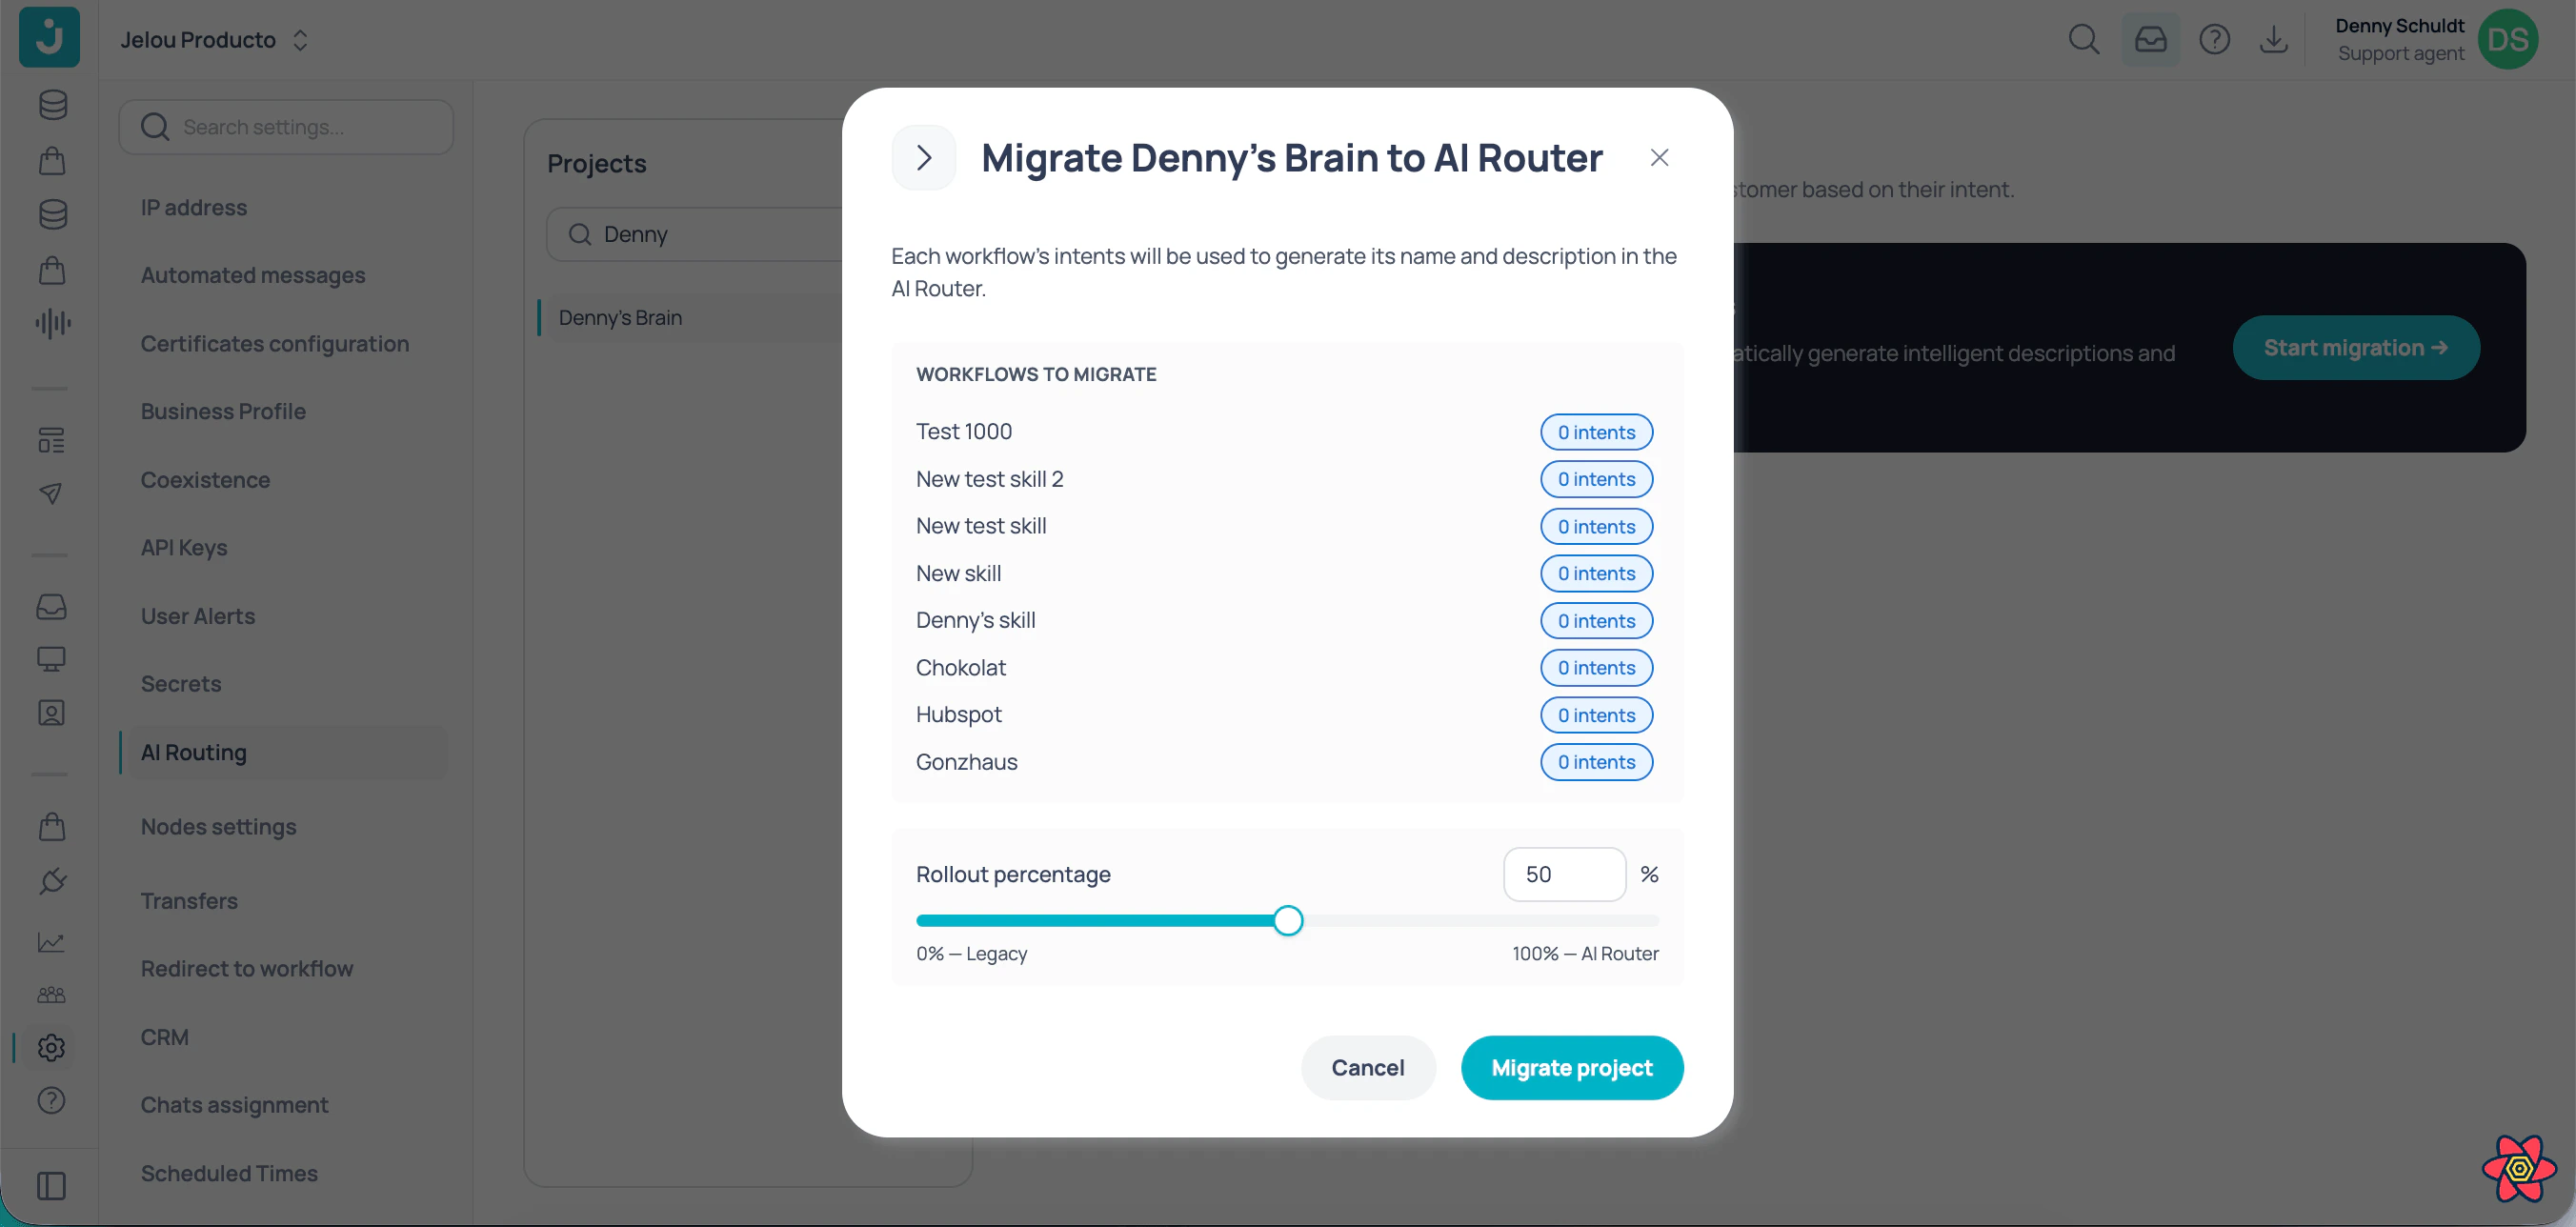
Projects that still use the legacy intents system will see a **Migrate project** button on the **AI Routing** page in Settings. When the migration window opens, the system uses the intents configured in each workflow to automatically infer an initial description — the same one AI Routing will use to route messages.
On the **AI Routing** page, click the **Migrate project** button. The window lists all workflows in the project along with the number of legacy intents associated with each one.
The list shows each workflow with its intent count and the description inferred from those intents. Review each description and adjust any that don't accurately reflect the workflow's purpose — the clearer the description, the more accurate the routing.
Use the slider to determine what percentage of traffic will start using AI Routing. The remaining traffic will continue using legacy intents. Start low — between 10 % and 20 % — to validate routing before scaling up.
Click **Migrate**. The configured percentage takes effect immediately. You can adjust it at any time from the **Rollout strategy** section.
Before increasing the percentage, use **Test routing** from the Start node of each workflow to verify that messages route correctly with AI Routing.
Legacy intents are not deleted during migration. They remain active for the percentage of traffic that is not yet using AI Routing.
## Use cases
A project with support workflows (returns, complaints), sales (catalog, pricing), and payments (billing, payment methods): AI Routing analyzes the user's message and directs it to the correct workflow without menus or selection buttons. The fallback workflow handles ambiguous queries with a generic response.
A company with three product lines configures one workflow per line, each with a detailed description of the issues it handles. Messages that mention specific symptoms go directly to the specialized workflow without the user needing to specify the product.
A customer support team enables the user allowlist on their premium support workflow. Only numbers registered as VIP can access that workflow; all other users are handled by the standard workflow.
A team with existing intents uses the percentage rollout strategy to migrate gradually. They start with 20 % of traffic on AI Routing, validate results with the test panel, and increase the percentage week by week until reaching 100 %.
Deploy your project with AI Routing configured to production.
Review and restore previous versions of your configuration.
Monitor how routed workflows execute in production.
Configure the AI Agent inside each workflow to process routed messages.
 ### Rollout strategy
 ### AI Router tab
Configure the name and description the system uses to route messages to this workflow.
| Field | Description | Limit |
| --------------------- | -------------------------------------------------------------------------------------------------------------------------------------------- | ---------------- |
| **Name** | Short identifier for the workflow. Should concisely describe what it does. | 50 characters |
| **Description** | Explains in detail when this workflow should run and what type of messages it handles. The more specific, the more accurate the routing. | 5,000 characters |
| **Fallback workflow** | Mark this workflow as the default destination when no other workflow matches the message. Only one fallback workflow is allowed per project. | — |
### AI Router tab
Configure the name and description the system uses to route messages to this workflow.
| Field | Description | Limit |
| --------------------- | -------------------------------------------------------------------------------------------------------------------------------------------- | ---------------- |
| **Name** | Short identifier for the workflow. Should concisely describe what it does. | 50 characters |
| **Description** | Explains in detail when this workflow should run and what type of messages it handles. The more specific, the more accurate the routing. | 5,000 characters |
| **Fallback workflow** | Mark this workflow as the default destination when no other workflow matches the message. Only one fallback workflow is allowed per project. | — |