> ## Documentation Index
> Fetch the complete documentation index at: https://docs.jelou.ai/llms.txt
> Use this file to discover all available pages before exploring further.
# Project map
> Visualize the AI Router and every workflow in a single canvas from the Manage workflows view.
The **Project map** is the visual view inside **Manage workflows** that shows the **AI Router** connected to every workflow in the project. The AI Router node sits on the left, each workflow node represents a workflow of the project, and the lines represent the routes the router can take. From there you see at a glance how many workflows you have, which are active, which are hidden from the router and how they are distributed across channels — without leaving the workflows section.
The map is only available on projects with **AI Routing** enabled. If your project has no AI Routing, the **Manage workflows** section takes you to the classic tabular list instead.
## How to access
Enter the project where you want to see the map.
From the sidebar, open **Manage workflows** (`/brain/projects/:projectId/workflows`).
If the project has AI Routing enabled, the view opens with the map on the left and the workflow list on the right on larger screens (small screens use a tab switcher — see [Anatomy of the map](#anatomy-of-the-map)).
You don't need to configure anything extra: the map is enabled automatically whenever the AI Router is on.
## Anatomy of the map
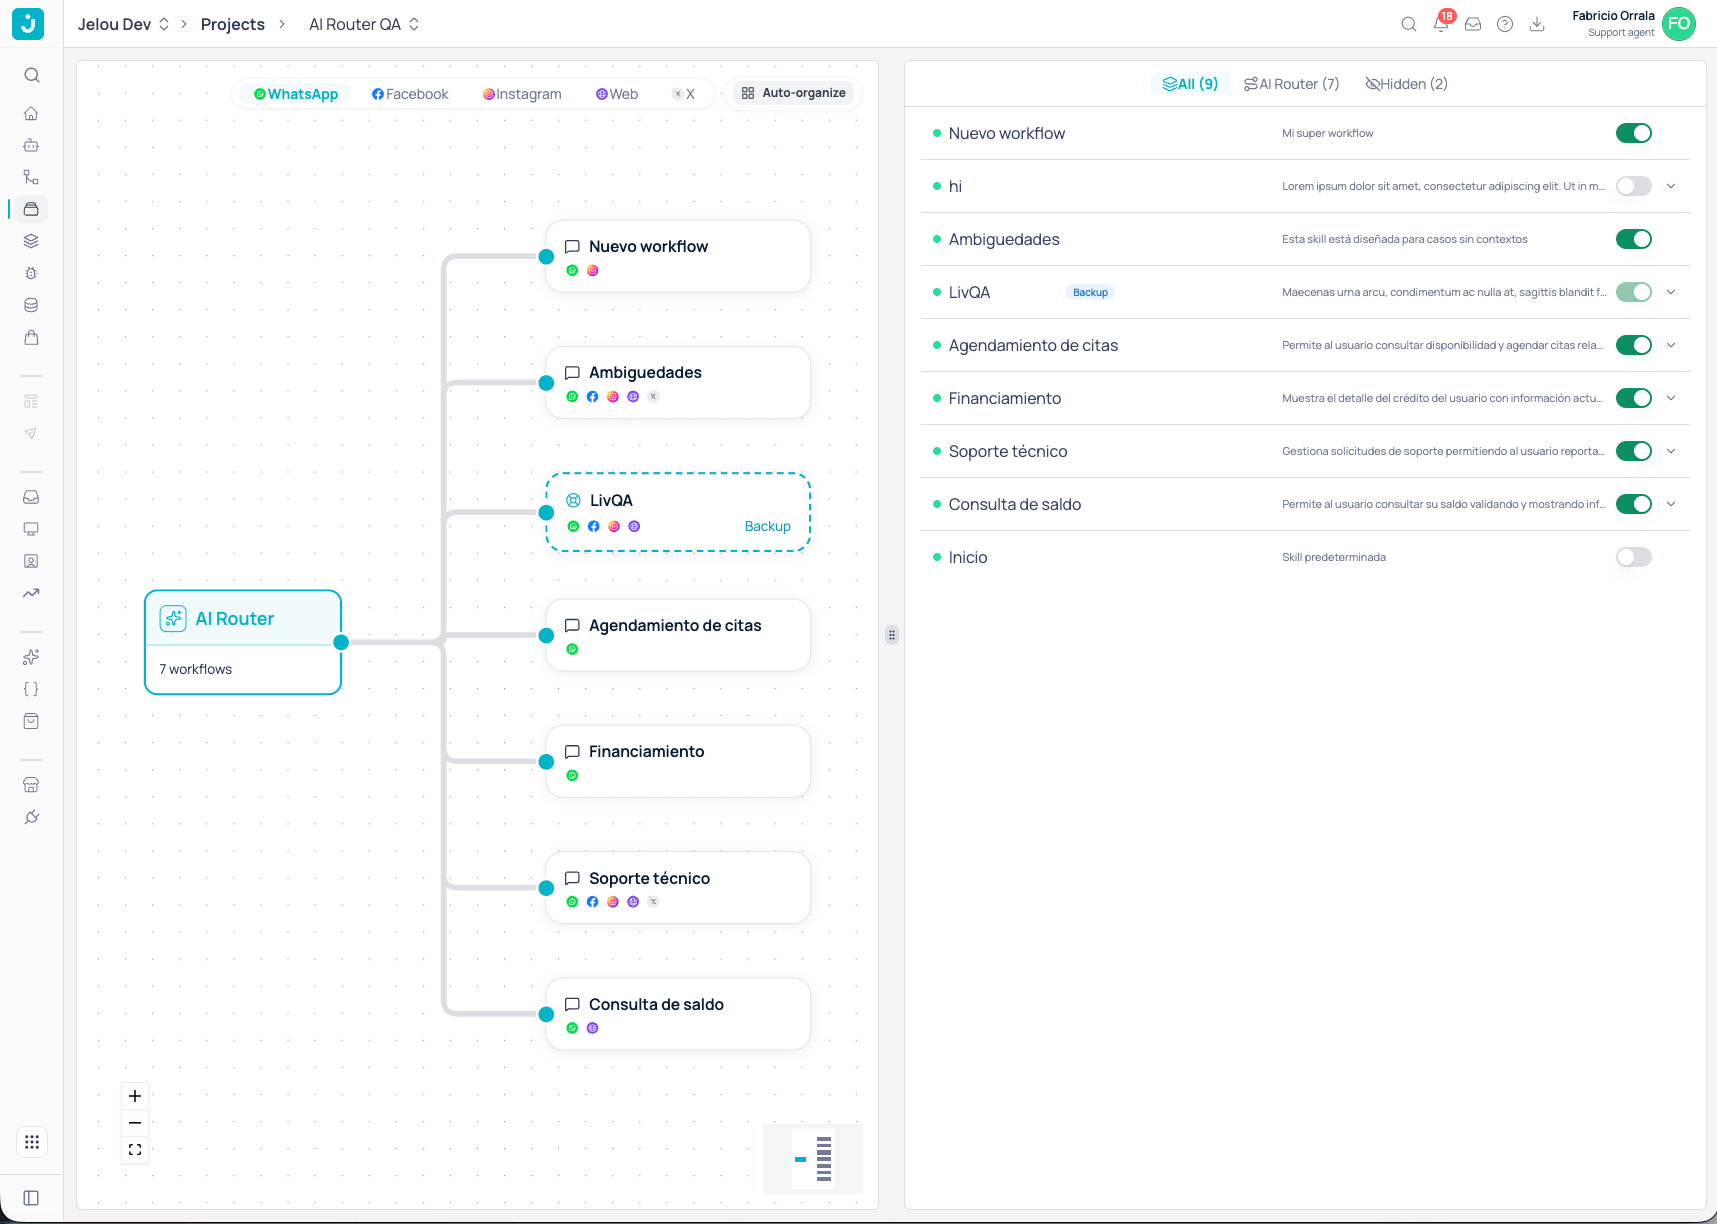 The screen is split into two resizable panes, each with its own controls:
**Left canvas — router graph.** The **AI Router** sits on the left; workflows sit on the right, one per node, connected to the router by an edge. Each node shows the workflow name and the icons of every channel it has a canvas for. Hidden workflows are shown dimmed with a dashed border; the backup workflow gets a **Backup** badge and an emphasized dashed border.
The top-right corner of the canvas hosts the **channel chips** (one per channel present in the project or in the workflows) and the **Auto-organize** button; a minimap sits at the bottom-right.
**Right list — workflow accordion.** The same workflows in a list, with the exact same UX as the **Settings → AI Routing** card. At the top there's a filter with three options: **All**, **AI Router** (only workflows that take part in the router) and **Hidden**, each with its count. Every row shows:
* A **status dot** — green if the workflow has a description, amber if it does not.
* The workflow **name** and a truncated description (if it's long, a chevron on the right expands it inline).
* A **Backup** badge for the default workflow.
* A **Hide/Show in AI Routing switch**. The default workflow is always on and cannot be hidden.
* Two hover-only icons: **Settings** opens the workflow's side panel (the same panel that opens when you click its canvas node); **External link** opens the workflow in Studio, in the same tab.
Clicking the row itself does nothing — only the hover icons and the chevron react.
On small screens the two panes collapse into a tab switcher between **Map** and **Workflows**.
## Main interactions
Click the map node or the row's **Settings** icon (on hover) to open the side panel with the inline workflow configuration (the same panel used by the Start node): name, description, routing rules, and advanced options such as user allowlist, country-code prefix and schedule. To open the full workflow canvas, use the external-link icon — either on the panel header or on the row itself.
Click the AI Router node to open the router configuration panel. From there you can adjust the project-level settings and test the routing with real messages using the **Test routing** button — the map highlights the workflow the router would pick for each message. The external-link icon on the header takes you to the full **AI Routing** settings page.
Two ways: use the **switch** on the workflow's row, or drag its node into the **Hidden** panel (it appears to the right of the canvas as soon as at least one workflow is hidden). Both do the same thing — the workflow is excluded from the AI Router but stays reachable from the view. To re-expose it, flip the switch back or drag its card from the hidden panel into the map. Every time you toggle visibility, the map auto-organizes the nodes so they never end up squished.
Pick a channel from the chips in the top-right corner of the canvas. Only workflows with a canvas for that channel are shown. The map auto-fits whenever you switch channel so the visible nodes always fill the viewport. A second click on the active channel clears the filter.
Use the filter at the top of the list to toggle between **All**, **AI Router** and **Hidden**. The filter only affects the list; the map keeps its view.
You can drag each node freely and its position sticks even after you select another node or the router. To go back to the auto layout, use the **Auto-organize** button in the top-right corner of the canvas: it re-applies the Dagre LR algorithm and fits the view.
Before publishing visibility changes, run **Test routing** from the AI Router panel with real messages from your operation. The highlight on the map tells you whether a message that used to land on one workflow now falls back to the backup because you hid it.
## Use cases
A team about to launch the project on WhatsApp and Instagram: opens the map, filters by each channel with the chips, and confirms the critical workflows show up on both. Workflows with no canvas for a channel disappear from the canvas, so coverage gaps stand out at a glance.
A team that received a ticket from a user whose message ended up on the wrong workflow: opens the map, clicks the AI Router, pastes the real message into **Test routing** and sees the workflow the router would pick today highlighted on the map. From there they tune the description or rules of the correct workflow without leaving the view.
A team building two new workflows that shouldn't receive traffic yet: hides them with the switch or by dragging them into the **Hidden** panel, keeps the rest of the list untouched, and publishes the project. Hidden workflows stay editable from the list and the map, but the router ignores them until they are exposed again.
## Map states
**Empty project.** If the project has no workflows, you see an empty state inviting you to create the first one.
**Single workflow.** If the project has exactly one workflow, the map is not drawn: you see an empty state with an **Open workflow** CTA that jumps straight into its canvas.
**All workflows hidden.** If every workflow is hidden, you see an empty state indicating that no workflow is exposed to the router; unhide at least one to bring back the map.
## Frequently asked
No. The project landing is unchanged. The map lives inside **Manage workflows**, so you only see it when you open that section.
Hiding a workflow from the map **does** change production routing — same effect as hiding it from Settings → AI Routing — and takes effect once you publish the project. Every other interaction with the map (moving nodes, filtering by channel, filtering the list) is purely visual and does not affect how the router decides.
Click the AI Router node to open its side panel and use the **Test routing** button. Enter real messages; the map highlights the workflow the router would pick for each message.
By design: clicking the row itself does not trigger any action, so you can select text or scroll without opening the panel by accident. Use the **Settings** icon to open the inline configuration, or the **External link** icon to jump to the workflow canvas in Studio.
## Related content
Learn how AI Routing is configured at project and workflow level — the capability that enables the map.
The screen is split into two resizable panes, each with its own controls:
**Left canvas — router graph.** The **AI Router** sits on the left; workflows sit on the right, one per node, connected to the router by an edge. Each node shows the workflow name and the icons of every channel it has a canvas for. Hidden workflows are shown dimmed with a dashed border; the backup workflow gets a **Backup** badge and an emphasized dashed border.
The top-right corner of the canvas hosts the **channel chips** (one per channel present in the project or in the workflows) and the **Auto-organize** button; a minimap sits at the bottom-right.
**Right list — workflow accordion.** The same workflows in a list, with the exact same UX as the **Settings → AI Routing** card. At the top there's a filter with three options: **All**, **AI Router** (only workflows that take part in the router) and **Hidden**, each with its count. Every row shows:
* A **status dot** — green if the workflow has a description, amber if it does not.
* The workflow **name** and a truncated description (if it's long, a chevron on the right expands it inline).
* A **Backup** badge for the default workflow.
* A **Hide/Show in AI Routing switch**. The default workflow is always on and cannot be hidden.
* Two hover-only icons: **Settings** opens the workflow's side panel (the same panel that opens when you click its canvas node); **External link** opens the workflow in Studio, in the same tab.
Clicking the row itself does nothing — only the hover icons and the chevron react.
On small screens the two panes collapse into a tab switcher between **Map** and **Workflows**.
## Main interactions
Click the map node or the row's **Settings** icon (on hover) to open the side panel with the inline workflow configuration (the same panel used by the Start node): name, description, routing rules, and advanced options such as user allowlist, country-code prefix and schedule. To open the full workflow canvas, use the external-link icon — either on the panel header or on the row itself.
Click the AI Router node to open the router configuration panel. From there you can adjust the project-level settings and test the routing with real messages using the **Test routing** button — the map highlights the workflow the router would pick for each message. The external-link icon on the header takes you to the full **AI Routing** settings page.
Two ways: use the **switch** on the workflow's row, or drag its node into the **Hidden** panel (it appears to the right of the canvas as soon as at least one workflow is hidden). Both do the same thing — the workflow is excluded from the AI Router but stays reachable from the view. To re-expose it, flip the switch back or drag its card from the hidden panel into the map. Every time you toggle visibility, the map auto-organizes the nodes so they never end up squished.
Pick a channel from the chips in the top-right corner of the canvas. Only workflows with a canvas for that channel are shown. The map auto-fits whenever you switch channel so the visible nodes always fill the viewport. A second click on the active channel clears the filter.
Use the filter at the top of the list to toggle between **All**, **AI Router** and **Hidden**. The filter only affects the list; the map keeps its view.
You can drag each node freely and its position sticks even after you select another node or the router. To go back to the auto layout, use the **Auto-organize** button in the top-right corner of the canvas: it re-applies the Dagre LR algorithm and fits the view.
Before publishing visibility changes, run **Test routing** from the AI Router panel with real messages from your operation. The highlight on the map tells you whether a message that used to land on one workflow now falls back to the backup because you hid it.
## Use cases
A team about to launch the project on WhatsApp and Instagram: opens the map, filters by each channel with the chips, and confirms the critical workflows show up on both. Workflows with no canvas for a channel disappear from the canvas, so coverage gaps stand out at a glance.
A team that received a ticket from a user whose message ended up on the wrong workflow: opens the map, clicks the AI Router, pastes the real message into **Test routing** and sees the workflow the router would pick today highlighted on the map. From there they tune the description or rules of the correct workflow without leaving the view.
A team building two new workflows that shouldn't receive traffic yet: hides them with the switch or by dragging them into the **Hidden** panel, keeps the rest of the list untouched, and publishes the project. Hidden workflows stay editable from the list and the map, but the router ignores them until they are exposed again.
## Map states
**Empty project.** If the project has no workflows, you see an empty state inviting you to create the first one.
**Single workflow.** If the project has exactly one workflow, the map is not drawn: you see an empty state with an **Open workflow** CTA that jumps straight into its canvas.
**All workflows hidden.** If every workflow is hidden, you see an empty state indicating that no workflow is exposed to the router; unhide at least one to bring back the map.
## Frequently asked
No. The project landing is unchanged. The map lives inside **Manage workflows**, so you only see it when you open that section.
Hiding a workflow from the map **does** change production routing — same effect as hiding it from Settings → AI Routing — and takes effect once you publish the project. Every other interaction with the map (moving nodes, filtering by channel, filtering the list) is purely visual and does not affect how the router decides.
Click the AI Router node to open its side panel and use the **Test routing** button. Enter real messages; the map highlights the workflow the router would pick for each message.
By design: clicking the row itself does not trigger any action, so you can select text or scroll without opening the panel by accident. Use the **Settings** icon to open the inline configuration, or the **External link** icon to jump to the workflow canvas in Studio.
## Related content
Learn how AI Routing is configured at project and workflow level — the capability that enables the map.