> ## Documentation Index
> Fetch the complete documentation index at: https://docs.jelou.ai/llms.txt
> Use this file to discover all available pages before exploring further.
# Calendly
> Check availability, generate booking links, and manage Calendly meetings from your Brain Studio flows.
**Calendly** is a self-service scheduling platform designed for sales and service teams. Unlike calendar integrations such as Google Calendar or Outlook (which operate on personal calendars), Calendly is built so that **clients or prospects can book directly** based on availability rules, event types, and shareable links.
In **Brain Studio**, the integration lets your flows check real availability, generate personalized booking links, and manage already scheduled meetings, all from the conversation.
## What Calendly enables
When you connect **Calendly**, you can:
* **Check real availability** for specific event types and time windows
* **Discover and select** the meeting types configured in the account
* **Generate booking links** that are reusable or single-use
* **List, review, and cancel** already scheduled meetings
***
## Installation
### Prerequisites
1. An **active Calendly account**.
2. An **API Key** generated from **Integrations & apps -> API & Webhooks**.
### How to get credentials
To connect **Calendly** in Brain Studio, you need an **API Key** generated from your own Calendly account.
Sign in to Calendly and go to **Integrations & apps**. There you will see the **How would you like to get started?** screen with two options: **Personal access tokens** and **OAuth**.
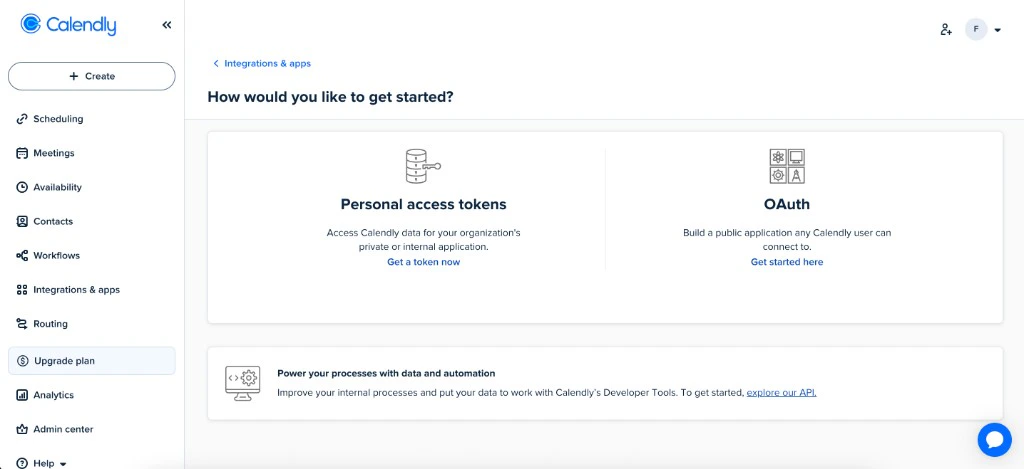 Inside the **Personal access tokens** section, select **Get a token now** to start creating the personal token you will use in Brain Studio.
Calendly will open the **Create a personal access token** modal. In the **Name** field, assign a recognizable name for this integration, such as **Brain Studio** or **Jelou**.
Then, in **Scopes**, select the required permissions so the integration can read user data, event types, availability, and scheduled events, and also create links and cancel events.
Inside the **Personal access tokens** section, select **Get a token now** to start creating the personal token you will use in Brain Studio.
Calendly will open the **Create a personal access token** modal. In the **Name** field, assign a recognizable name for this integration, such as **Brain Studio** or **Jelou**.
Then, in **Scopes**, select the required permissions so the integration can read user data, event types, availability, and scheduled events, and also create links and cancel events.
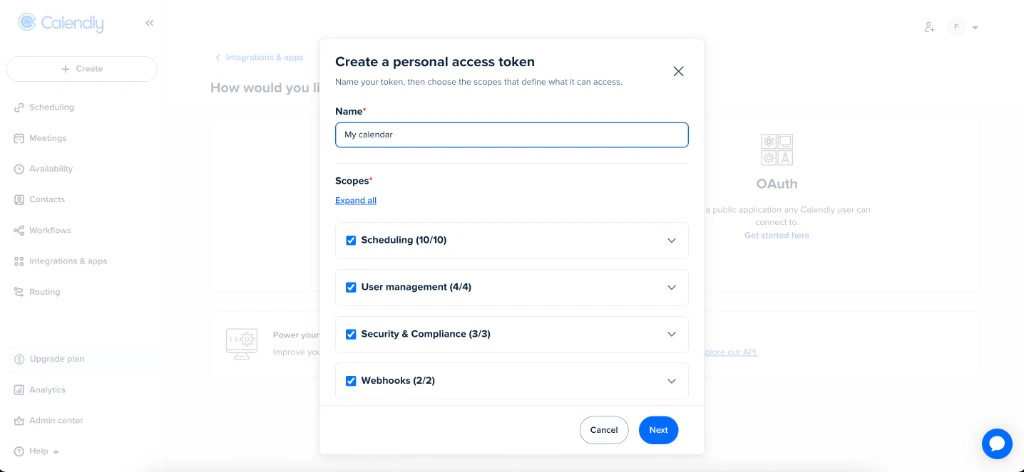 For current Brain Studio tools, the token must cover reading user info, event types, availability, and scheduled events, plus write permissions for links and cancellations.
After creation, Calendly shows the token only once in the modal with a **Copy token** button. Copy it and store it in a secure place.
For current Brain Studio tools, the token must cover reading user info, event types, availability, and scheduled events, plus write permissions for links and cancellations.
After creation, Calendly shows the token only once in the modal with a **Copy token** button. Copy it and store it in a secure place.
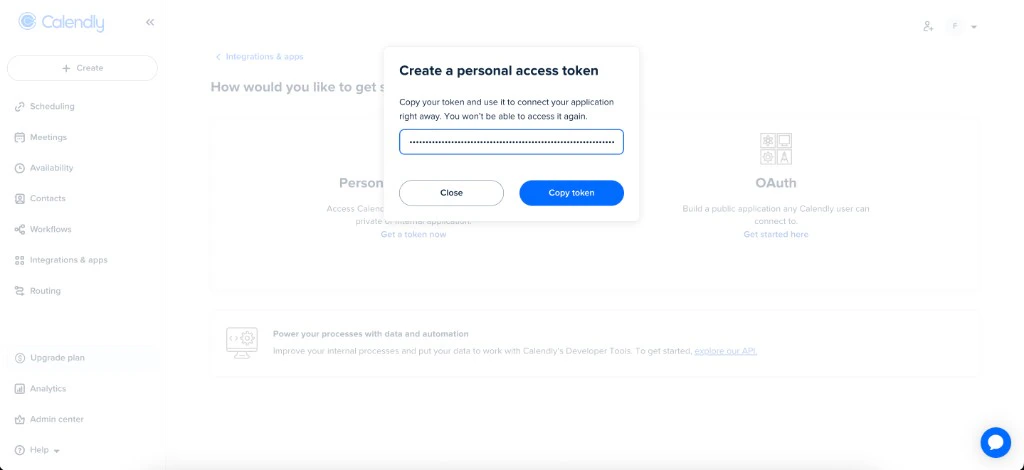 Treat this token like a password. Do not share it or expose it in public code, open documents, or shared channels.
### How to connect it
The most direct way is to use [**Jelou Agent**](/en/guides/getting-started/jelou-agent): describe what you need and the agent connects **Calendly** automatically in your flow.
If you prefer manual installation, open the **Marketplace** and follow these steps with the API Key you got in the previous step.
In Brain Studio, open **Marketplace** from the side menu.
Find the integration and click **Connect**.
Complete the form with your Calendly **API Key**.
The integration will appear as **connected**.
You can use it in **Canvas** or add it as a tool in **AI Agent**.
***
## Available tools
At a high level, actions are grouped as follows:
* **Time and user** — **Get Current Time** and **Get Current User**
* **Event types** — **List Event Types** and **Get Event Type**
* **Availability and scheduled events** — **Check Availability**, **List Scheduled Events**, and **Get Scheduled Event**
* **Links** — **Create Scheduling Link** and **Create Single-Use Link**
* **Cancel** — **Cancel Event**
The integration exposes **10 tools** in Brain Studio; below is each one with the purpose described by the product. The **exact JSON body field names** must match the **node editor** before deployment.
Get the current date and time in **UTC** and in the **user's time zone**.
**IMPORTANT:** call this tool **first** when the user mentions relative dates (for example "tomorrow," "next week," "this Friday," "December 24," etc.). This gives you the correct date to calculate **ISO 8601** timestamps for the rest of Calendly tools.
**Inputs:**
* According to the Brain Studio form (it usually requires no parameters or accepts an empty body).
**Example:**
```json theme={null}
{}
```
Get information about the Calendly user **authenticated** with the API Key, including their **URI** (required for other operations), **name**, **email**, **time zone**, and **organization**.
**Inputs:**
* No required parameters in the usual setup; validate the body in the editor.
**Example:**
```json theme={null}
{}
```
List all event types (meeting types) configured for the user. Returns the **name**, **duration**, **scheduling URL**, and whether they are **active**. Use it to discover which meeting types are available for booking.
**Inputs:**
* Filters or pagination exposed by the node (for example active status, result limit), based on the editor.
**Example:**
```json theme={null}
{
"active": true,
"count": 20
}
```
Adjust keys and values to what the tool accepts in Brain Studio; the goal is to list the catalog before **Check Availability** or link creation.
Get detailed information about a specific **event type**, including **duration**, **description**, **custom questions**, and **scheduling URL**.
**Inputs:**
* Event type identifier in the format required by the node (for example event type URI).
**Example:**
```json theme={null}
{
"event_type_uri": "https://api.calendly.com/event_types/ABC123"
}
```
Get **available time slots** for a specific **event type** within a **date range**. Returns **scheduling URLs** for each available slot. Use it to know **when** someone can meet.
**Inputs:**
* Event type and time window in the format shown by the editor (usually aligned to ISO 8601 ranges).
**Example:**
```json theme={null}
{
"event_type_uri": "https://api.calendly.com/event_types/ABC123",
"start_time": "2025-01-15T00:00:00Z",
"end_time": "2025-01-16T00:00:00Z",
"timezone": "America/Guayaquil"
}
```
Confirm field names (**start\_time** / **end\_time** or others) in the node; they must stay consistent with **Get Current Time** when users speak in relative dates.
List **scheduled events** (booked meetings) with **optional filters** for **date range**, **status** (active / canceled), and **invitee email**. Returns meeting details, including **time**, **location**, and **number of attendees**.
**Inputs:**
* Optional filter parameters according to the form (range, status, invitee email, pagination).
**Example:**
```json theme={null}
{
"min_start_time": "2025-01-01T00:00:00Z",
"max_start_time": "2025-01-31T23:59:59Z",
"status": "active"
}
```
Validate in the editor the exact filter names and the allowed values for **status**.
Get detailed information about a specific **scheduled event**, including **all invitees**, their **responses to custom questions**, the meeting **location** and **join link**, and **cancellation details** when applicable.
**Inputs:**
* Scheduled event identifier (for example event URI), according to the node.
**Example:**
```json theme={null}
{
"event_uri": "https://api.calendly.com/scheduled_events/XYZ789"
}
```
Create a **scheduling link** for an **event type**. The link can be **shared with invitees** to book meetings. Optionally set **max\_event\_count** to limit how many bookings can be made through this link.
**Inputs:**
* Event type and, if applicable, **max\_event\_count**.
**Example:**
```json theme={null}
{
"event_type_uri": "https://api.calendly.com/event_types/ABC123",
"max_event_count": 5
}
```
Create a **single-use scheduling link** that can be used **only once**. Optionally **prefill** the recipient's **email** and **name**. This is intended for sending personalized links to specific people.
The tool **returns only the translated text**, without additional explanations.
**Inputs:**
* Event type and optional prefill data according to the editor.
**Example:**
```json theme={null}
{
"event_type_uri": "https://api.calendly.com/event_types/ABC123",
"invitee_email": "cliente@ejemplo.com",
"invitee_name": "Juan Pérez"
}
```
Cancel a **scheduled event**. You can provide an optional **reason** for cancellation. **This will notify all invitees** that the event has been canceled.
The tool **returns only the translated text**, without additional explanations.
**Inputs:**
* Event identifier to cancel and optional **reason**, according to the form.
**Example:**
```json theme={null}
{
"event_uri": "https://api.calendly.com/scheduled_events/XYZ789",
"reason": "Rescheduling requested by the client"
}
```
***
## How to use it in Brain
Once connected, you can use **Calendly** in two surfaces:
### In AI Agent
Ideal when users want to schedule or manage meetings in natural language, including dates in colloquial phrasing.
In Canvas, select or add the **AI Agent** node.
In the right panel, go to the **Tools** tab.
Use **Add tool**, search for **Calendly**, and enable it.
Choose full integration or enable only the actions you need.
**Calendly** appears in the agent tools list, and you can open its settings with the gear icon.
The agent should invoke **Get Current Time** **before** **Check Availability** or other tools that depend on timestamps when users speak in **relative dates**. Then it can use **List Event Types**, **Check Availability**, links, or **Cancel Event** depending on the conversation.
### In Canvas
Ideal when you need full flow control (for example: **Get Current Time** -> **List Event Types** -> **Check Availability** -> **Create Single-Use Link**).
In the side panel, open **Marketplace** and drag **Calendly** into the flow.
With the node selected, in **Tools** choose the action (for example **Check Availability** or **Create Single-Use Link**).
Fill in the request body JSON and, if needed, **Save response** to a memory variable.
Link the **Task completed** and **There was an error** outputs to the next nodes.
The node is ready to run in the sequence defined by your flow.
**Configuration example:**
The node editor shows the expected JSON body for the selected tool. For **Create Single-Use Link**, it usually includes the event type and invitee data to prefill.
```json theme={null}
{
"event_type_uri": "{{$memory.event_type_uri}}",
"invitee_email": "{{$memory.email_cliente}}",
"invitee_name": "{{$memory.nombre_cliente}}"
}
```
***
## Use cases
A prospect shows interest in chat. Instead of sending a generic Calendly link, the flow identifies the right meeting type, checks real availability, and generates a personalized link.
**Concrete example:** a SaaS company gets inquiries via WhatsApp. The prospect says "I'm interested in a demo." The agent identifies the "30 min Demo" event type, checks availability for the next 3 days, and generates a single-use link with the prospect's name and email prefilled. The prospect books in two clicks, without leaving WhatsApp.
**Ideal for:** B2B sales teams, SaaS, agencies, and professional services that capture leads through conversational channels.
Instead of always sharing the same link, the flow shows real time options based on what the user asks for, making the experience more conversational and less cold.
**Concrete example:** a professional services firm. The client says "Do you have anything Thursday afternoon?" The agent gets current time, checks availability for the right event type in that range, and replies with available slots. The client chooses one and receives the specific booking link for that slot.
**Ideal for:** sales teams, consultants, and services where scheduling experience quality impacts conversion.
The user wants to cancel an appointment but does not have the Calendly email on hand. Instead of searching, they cancel directly from WhatsApp.
**Concrete example:** a prospect writes "I need to cancel my Wednesday meeting." The flow lists scheduled events, finds the appointment by date, confirms with the user, and executes cancellation with the stated reason. The prospect did not need to open email or log into Calendly.
**Ideal for:** teams with high external meeting volume and high rescheduling rates.
***
## Integrations that pair well with Calendly
After a prospect books in Calendly, the flow can log activity in HubSpot: create or update the contact, add a note with the meeting type, and move the deal to the corresponding stage.
**Combined flow:** appointment confirmed in Calendly -> contact updated in HubSpot -> deal moved to "Demo scheduled."
[HubSpot documentation](/en/guides/integraciones/crm/hubspot)
After sharing a Calendly link or detecting a confirmed meeting, the flow can send an email with extra context: pre-demo materials, prep instructions, or access details.
**Combined flow:** Calendly link generated -> Gmail email sent with preparation material for the meeting.
[Gmail documentation](/en/guides/integraciones/productividad/gmail)
Every meeting scheduled or canceled from a conversational flow can trigger an alert in the team's channel, so the assigned rep stays informed without checking Calendly.
**Combined flow:** appointment scheduled in Calendly -> message posted to #sales in Slack with date, prospect, and meeting type.
[Slack documentation](/en/guides/integraciones/productividad/slack)
***
## Related articles
Catalog of integrations available in the Marketplace.
General flow to install and use integrations in Brain Studio.
Treat this token like a password. Do not share it or expose it in public code, open documents, or shared channels.
### How to connect it
The most direct way is to use [**Jelou Agent**](/en/guides/getting-started/jelou-agent): describe what you need and the agent connects **Calendly** automatically in your flow.
If you prefer manual installation, open the **Marketplace** and follow these steps with the API Key you got in the previous step.
In Brain Studio, open **Marketplace** from the side menu.
Find the integration and click **Connect**.
Complete the form with your Calendly **API Key**.
The integration will appear as **connected**.
You can use it in **Canvas** or add it as a tool in **AI Agent**.
***
## Available tools
At a high level, actions are grouped as follows:
* **Time and user** — **Get Current Time** and **Get Current User**
* **Event types** — **List Event Types** and **Get Event Type**
* **Availability and scheduled events** — **Check Availability**, **List Scheduled Events**, and **Get Scheduled Event**
* **Links** — **Create Scheduling Link** and **Create Single-Use Link**
* **Cancel** — **Cancel Event**
The integration exposes **10 tools** in Brain Studio; below is each one with the purpose described by the product. The **exact JSON body field names** must match the **node editor** before deployment.
Get the current date and time in **UTC** and in the **user's time zone**.
**IMPORTANT:** call this tool **first** when the user mentions relative dates (for example "tomorrow," "next week," "this Friday," "December 24," etc.). This gives you the correct date to calculate **ISO 8601** timestamps for the rest of Calendly tools.
**Inputs:**
* According to the Brain Studio form (it usually requires no parameters or accepts an empty body).
**Example:**
```json theme={null}
{}
```
Get information about the Calendly user **authenticated** with the API Key, including their **URI** (required for other operations), **name**, **email**, **time zone**, and **organization**.
**Inputs:**
* No required parameters in the usual setup; validate the body in the editor.
**Example:**
```json theme={null}
{}
```
List all event types (meeting types) configured for the user. Returns the **name**, **duration**, **scheduling URL**, and whether they are **active**. Use it to discover which meeting types are available for booking.
**Inputs:**
* Filters or pagination exposed by the node (for example active status, result limit), based on the editor.
**Example:**
```json theme={null}
{
"active": true,
"count": 20
}
```
Adjust keys and values to what the tool accepts in Brain Studio; the goal is to list the catalog before **Check Availability** or link creation.
Get detailed information about a specific **event type**, including **duration**, **description**, **custom questions**, and **scheduling URL**.
**Inputs:**
* Event type identifier in the format required by the node (for example event type URI).
**Example:**
```json theme={null}
{
"event_type_uri": "https://api.calendly.com/event_types/ABC123"
}
```
Get **available time slots** for a specific **event type** within a **date range**. Returns **scheduling URLs** for each available slot. Use it to know **when** someone can meet.
**Inputs:**
* Event type and time window in the format shown by the editor (usually aligned to ISO 8601 ranges).
**Example:**
```json theme={null}
{
"event_type_uri": "https://api.calendly.com/event_types/ABC123",
"start_time": "2025-01-15T00:00:00Z",
"end_time": "2025-01-16T00:00:00Z",
"timezone": "America/Guayaquil"
}
```
Confirm field names (**start\_time** / **end\_time** or others) in the node; they must stay consistent with **Get Current Time** when users speak in relative dates.
List **scheduled events** (booked meetings) with **optional filters** for **date range**, **status** (active / canceled), and **invitee email**. Returns meeting details, including **time**, **location**, and **number of attendees**.
**Inputs:**
* Optional filter parameters according to the form (range, status, invitee email, pagination).
**Example:**
```json theme={null}
{
"min_start_time": "2025-01-01T00:00:00Z",
"max_start_time": "2025-01-31T23:59:59Z",
"status": "active"
}
```
Validate in the editor the exact filter names and the allowed values for **status**.
Get detailed information about a specific **scheduled event**, including **all invitees**, their **responses to custom questions**, the meeting **location** and **join link**, and **cancellation details** when applicable.
**Inputs:**
* Scheduled event identifier (for example event URI), according to the node.
**Example:**
```json theme={null}
{
"event_uri": "https://api.calendly.com/scheduled_events/XYZ789"
}
```
Create a **scheduling link** for an **event type**. The link can be **shared with invitees** to book meetings. Optionally set **max\_event\_count** to limit how many bookings can be made through this link.
**Inputs:**
* Event type and, if applicable, **max\_event\_count**.
**Example:**
```json theme={null}
{
"event_type_uri": "https://api.calendly.com/event_types/ABC123",
"max_event_count": 5
}
```
Create a **single-use scheduling link** that can be used **only once**. Optionally **prefill** the recipient's **email** and **name**. This is intended for sending personalized links to specific people.
The tool **returns only the translated text**, without additional explanations.
**Inputs:**
* Event type and optional prefill data according to the editor.
**Example:**
```json theme={null}
{
"event_type_uri": "https://api.calendly.com/event_types/ABC123",
"invitee_email": "cliente@ejemplo.com",
"invitee_name": "Juan Pérez"
}
```
Cancel a **scheduled event**. You can provide an optional **reason** for cancellation. **This will notify all invitees** that the event has been canceled.
The tool **returns only the translated text**, without additional explanations.
**Inputs:**
* Event identifier to cancel and optional **reason**, according to the form.
**Example:**
```json theme={null}
{
"event_uri": "https://api.calendly.com/scheduled_events/XYZ789",
"reason": "Rescheduling requested by the client"
}
```
***
## How to use it in Brain
Once connected, you can use **Calendly** in two surfaces:
### In AI Agent
Ideal when users want to schedule or manage meetings in natural language, including dates in colloquial phrasing.
In Canvas, select or add the **AI Agent** node.
In the right panel, go to the **Tools** tab.
Use **Add tool**, search for **Calendly**, and enable it.
Choose full integration or enable only the actions you need.
**Calendly** appears in the agent tools list, and you can open its settings with the gear icon.
The agent should invoke **Get Current Time** **before** **Check Availability** or other tools that depend on timestamps when users speak in **relative dates**. Then it can use **List Event Types**, **Check Availability**, links, or **Cancel Event** depending on the conversation.
### In Canvas
Ideal when you need full flow control (for example: **Get Current Time** -> **List Event Types** -> **Check Availability** -> **Create Single-Use Link**).
In the side panel, open **Marketplace** and drag **Calendly** into the flow.
With the node selected, in **Tools** choose the action (for example **Check Availability** or **Create Single-Use Link**).
Fill in the request body JSON and, if needed, **Save response** to a memory variable.
Link the **Task completed** and **There was an error** outputs to the next nodes.
The node is ready to run in the sequence defined by your flow.
**Configuration example:**
The node editor shows the expected JSON body for the selected tool. For **Create Single-Use Link**, it usually includes the event type and invitee data to prefill.
```json theme={null}
{
"event_type_uri": "{{$memory.event_type_uri}}",
"invitee_email": "{{$memory.email_cliente}}",
"invitee_name": "{{$memory.nombre_cliente}}"
}
```
***
## Use cases
A prospect shows interest in chat. Instead of sending a generic Calendly link, the flow identifies the right meeting type, checks real availability, and generates a personalized link.
**Concrete example:** a SaaS company gets inquiries via WhatsApp. The prospect says "I'm interested in a demo." The agent identifies the "30 min Demo" event type, checks availability for the next 3 days, and generates a single-use link with the prospect's name and email prefilled. The prospect books in two clicks, without leaving WhatsApp.
**Ideal for:** B2B sales teams, SaaS, agencies, and professional services that capture leads through conversational channels.
Instead of always sharing the same link, the flow shows real time options based on what the user asks for, making the experience more conversational and less cold.
**Concrete example:** a professional services firm. The client says "Do you have anything Thursday afternoon?" The agent gets current time, checks availability for the right event type in that range, and replies with available slots. The client chooses one and receives the specific booking link for that slot.
**Ideal for:** sales teams, consultants, and services where scheduling experience quality impacts conversion.
The user wants to cancel an appointment but does not have the Calendly email on hand. Instead of searching, they cancel directly from WhatsApp.
**Concrete example:** a prospect writes "I need to cancel my Wednesday meeting." The flow lists scheduled events, finds the appointment by date, confirms with the user, and executes cancellation with the stated reason. The prospect did not need to open email or log into Calendly.
**Ideal for:** teams with high external meeting volume and high rescheduling rates.
***
## Integrations that pair well with Calendly
After a prospect books in Calendly, the flow can log activity in HubSpot: create or update the contact, add a note with the meeting type, and move the deal to the corresponding stage.
**Combined flow:** appointment confirmed in Calendly -> contact updated in HubSpot -> deal moved to "Demo scheduled."
[HubSpot documentation](/en/guides/integraciones/crm/hubspot)
After sharing a Calendly link or detecting a confirmed meeting, the flow can send an email with extra context: pre-demo materials, prep instructions, or access details.
**Combined flow:** Calendly link generated -> Gmail email sent with preparation material for the meeting.
[Gmail documentation](/en/guides/integraciones/productividad/gmail)
Every meeting scheduled or canceled from a conversational flow can trigger an alert in the team's channel, so the assigned rep stays informed without checking Calendly.
**Combined flow:** appointment scheduled in Calendly -> message posted to #sales in Slack with date, prospect, and meeting type.
[Slack documentation](/en/guides/integraciones/productividad/slack)
***
## Related articles
Catalog of integrations available in the Marketplace.
General flow to install and use integrations in Brain Studio.