> ## Documentation Index
> Fetch the complete documentation index at: https://docs.jelou.ai/llms.txt
> Use this file to discover all available pages before exploring further.
# How to use integrations in Brain
> How to install a Marketplace integration and use it in an AI Agent or in Canvas inside Brain Studio.
Marketplace integrations are installed once and then available across your workspace. This page explains the two ways to install them and the two surfaces where you can use them: **AI Agent** and **Canvas**.
## How to install an integration
### With Jelou Agent
Describe what you want to build. [Jelou Agent](/en/guides/getting-started/jelou-agent) detects which integration you need, asks you to confirm the connection, and builds the flow automatically.
Enable **Jelou Agent** mode in Canvas and write your prompt.
Examples:
* "Build an agent that checks the latest leads in Bitrix24 and lets me add a new one by voice"
* "Create a flow that charges with Stripe and confirms payment to the user"
* "Build an agent that schedules appointments in Google Calendar"
If the integration is not installed, Jelou Agent detects it and shows a confirmation card. Click **Confirm** to connect it. Jelou Agent shows the integration as **Connected** and continues building the flow.
Jelou Agent generates the full flow with all nodes configured. Click **Drag to canvas** to move it.
Jelou Agent chooses the right surface for each case. A payments flow generates Canvas nodes with the payment tool and its specific outputs. A CRM or scheduling flow generates an AI Agent with the integration configured as a tool.
The flow appears in Canvas with all nodes configured.
### From the Marketplace
In Brain Studio, select **Marketplace** from the left sidebar menu.
Browse by categories or use search. Click the integration and then click **Connect**. Enter your credentials (API key, token) or authorize access via OAuth.
Click **Install**.
The integration appears in the **Installed** tab in Marketplace and in the Canvas sidebar under the **Marketplace** section.
## How to use an installed integration
The standard approach is to use the integration as a **tool** in an **AI Agent** node: the model decides when to call each tool based on the conversation. Use **Canvas** when the process requires **explicit branches and outputs** (for example, payments with several possible results). If you build with **Jelou Agent**, it places the integration on the surface that best fits your case.
### In an AI Agent
**Most common case:** inside an [**AI Agent node**](/en/guides/nodos/ai-agent), you grant access to one or more Marketplace integrations; the agent decides **when** to invoke each tool based on conversation context.
This is the natural surface when **user intents are varied**: the same agent can query a CRM, schedule on a calendar, or send an email, depending on what the user asks at each moment.
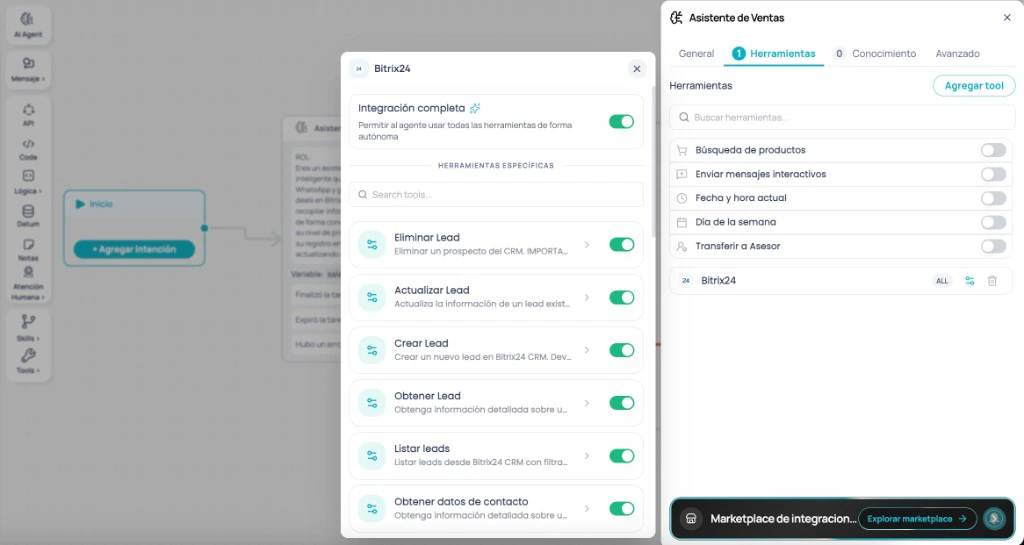 In the **AI Agent** node, go to the **Tools** tab and click **Add tool**.
Type the integration name in search and select it.
* **Full integration:** the agent can access all available tools.
* **Individual selection:** enable only the tools you need.
Some integrations show two tool groups inside **AI Agent**. Shopify, for example, separates native **Jelou Shop** tools (enabled by default) from external Shopify API tools (disabled by default). Enable the tools that match your use case.
For each enabled tool, configure what the agent does when it runs it:
* **None:** the agent continues the conversation normally.
* **Run end\_function:** the agent ends the task after completing that action.
* **Pause interaction:** the agent waits before continuing, useful for intermediate validations or confirmations.
### In Canvas
**Use Canvas** when the process needs **ordered steps** and each result requires a **different route** in the flow.
The clearest case is **payments**: a payment can end in success, failure, code error, or HTTP error, and the flow must react differently to each one. Payment tools expose those outputs; **Canvas** lets you connect each one to the next appropriate step.
In the **AI Agent** node, go to the **Tools** tab and click **Add tool**.
Type the integration name in search and select it.
* **Full integration:** the agent can access all available tools.
* **Individual selection:** enable only the tools you need.
Some integrations show two tool groups inside **AI Agent**. Shopify, for example, separates native **Jelou Shop** tools (enabled by default) from external Shopify API tools (disabled by default). Enable the tools that match your use case.
For each enabled tool, configure what the agent does when it runs it:
* **None:** the agent continues the conversation normally.
* **Run end\_function:** the agent ends the task after completing that action.
* **Pause interaction:** the agent waits before continuing, useful for intermediate validations or confirmations.
### In Canvas
**Use Canvas** when the process needs **ordered steps** and each result requires a **different route** in the flow.
The clearest case is **payments**: a payment can end in success, failure, code error, or HTTP error, and the flow must react differently to each one. Payment tools expose those outputs; **Canvas** lets you connect each one to the next appropriate step.
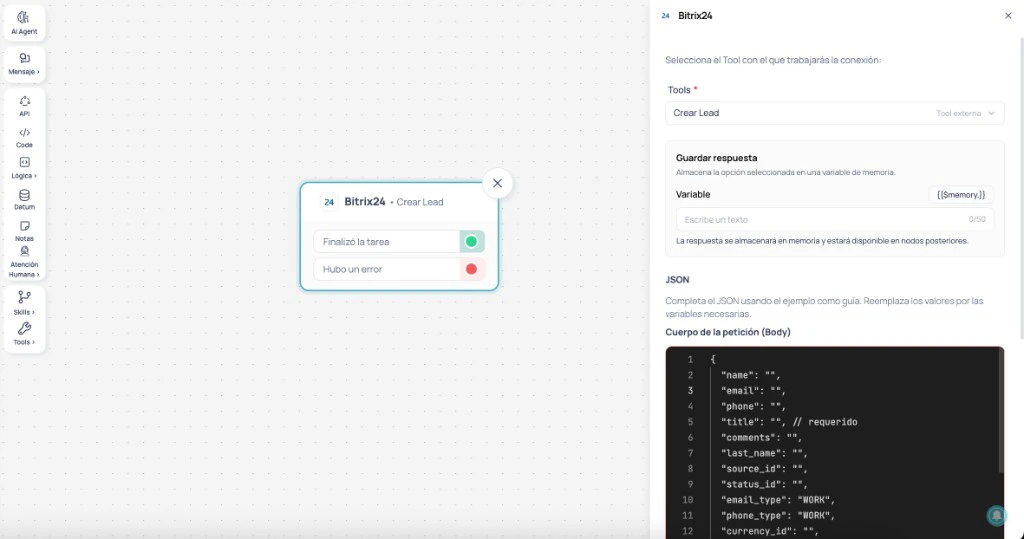 In the left sidebar panel, expand the **Marketplace** section. Drag the integration you want to use into Canvas.
In the right panel, open the **Tools** selector and choose the action you want to run.
Tools are labeled by type:
* **Native tool** - capability built by Jelou, with process-specific outputs (Payment Successful, Payment Failed, Error Code, Validation Successful, etc.)
* **External tool** - provider API action, with two generic outputs: Task completed and There was an error
* **Native tool:** complete the form fields (amount, payment reason, environment, etc.).
* **External tool:** complete the request body in JSON. Use `{{$memory.variable}}` to pass flow variables.
Connect each output to the next step according to the expected result.
The node shows the selected tool name when configured correctly. "Unconfigured node" means you still need to select a tool or complete required fields.
## Canvas vs AI Agent
Quick comparison between **Canvas** and **AI Agent**:
| Criteria | Canvas | AI Agent |
| --------------- | ------------------------------------------------- | ------------------------------------- |
| Flow control | Total - you define each step | Delegated to the agent |
| Process type | Fixed steps with specific outcomes | Varied user intents |
| Result handling | Explicit per node, with specific outputs | Handled by the agent |
| Ideal for | Payments, identity verification, document signing | Assistants with multiple capabilities |
Canvas and AI Agent are not mutually exclusive. An agent can route to a Canvas node to run a transaction that requires controlled steps, then resume the conversation once completed.
Explore all available integrations organized by category.
In the left sidebar panel, expand the **Marketplace** section. Drag the integration you want to use into Canvas.
In the right panel, open the **Tools** selector and choose the action you want to run.
Tools are labeled by type:
* **Native tool** - capability built by Jelou, with process-specific outputs (Payment Successful, Payment Failed, Error Code, Validation Successful, etc.)
* **External tool** - provider API action, with two generic outputs: Task completed and There was an error
* **Native tool:** complete the form fields (amount, payment reason, environment, etc.).
* **External tool:** complete the request body in JSON. Use `{{$memory.variable}}` to pass flow variables.
Connect each output to the next step according to the expected result.
The node shows the selected tool name when configured correctly. "Unconfigured node" means you still need to select a tool or complete required fields.
## Canvas vs AI Agent
Quick comparison between **Canvas** and **AI Agent**:
| Criteria | Canvas | AI Agent |
| --------------- | ------------------------------------------------- | ------------------------------------- |
| Flow control | Total - you define each step | Delegated to the agent |
| Process type | Fixed steps with specific outcomes | Varied user intents |
| Result handling | Explicit per node, with specific outputs | Handled by the agent |
| Ideal for | Payments, identity verification, document signing | Assistants with multiple capabilities |
Canvas and AI Agent are not mutually exclusive. An agent can route to a Canvas node to run a transaction that requires controlled steps, then resume the conversation once completed.
Explore all available integrations organized by category.