> ## Documentation Index
> Fetch the complete documentation index at: https://docs.jelou.ai/llms.txt
> Use this file to discover all available pages before exploring further.
# Tutorial: Implementing your first charge from WhatsApp
> Implement your first charge from WhatsApp step by step with Mercado Pago.
In this guide you will implement [real payments](/guides/integraciones/pagos/introduccion) within a conversational app deployed on WhatsApp, using **Mercado Pago**.
**Prerequisites:**
* Have a flow in Brain Studio ready (for example, an AI Agent that handles a sales process).
* Have a Mercado Pago account (to obtain test and production credentials).
We will use as an example an app that sells tour tickets: the user chooses the tour, date, number of tickets, and provides their email. Now we are going to enable charges with Mercado Pago within the same flow.
This tutorial is divided into three parts:
1. **Implementation in test mode (DEV)**
2. **Testing on WhatsApp**
3. **Going to production (PROD)**
***
# 1. Implementation in test mode (DEV)
## Video 1: Installation and configuration in Brain Studio
***
## Initial setup
First time? Check the step-by-step guide: [Obtaining Mercado Pago credentials](/guides/integraciones/pagos/proveedores/mercado-pago/obtener-credenciales).
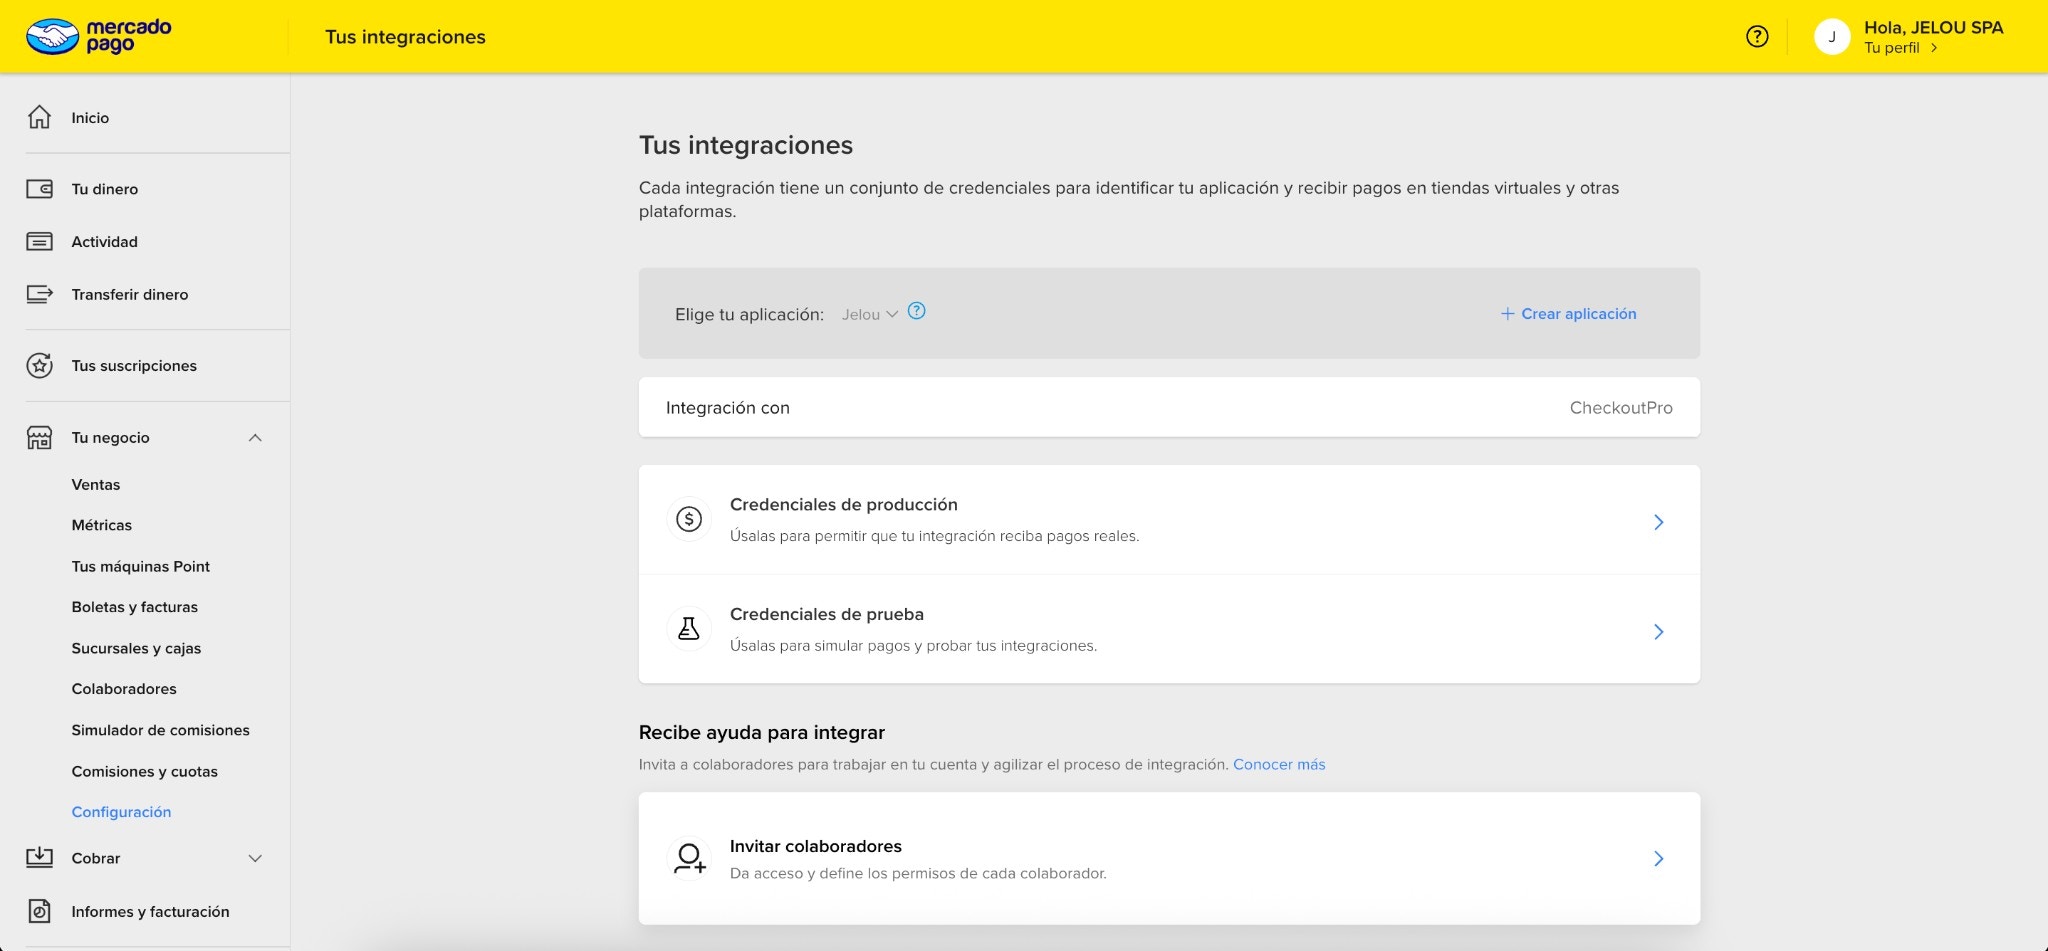
Open your Mercado Pago account and go to **Your integrations**.
* Go to **Test credentials**
* Copy the **Access Token**
You will use this token to install Mercado Pago in Brain Studio.
Token ready to paste into Brain Studio.
In Brain Studio:
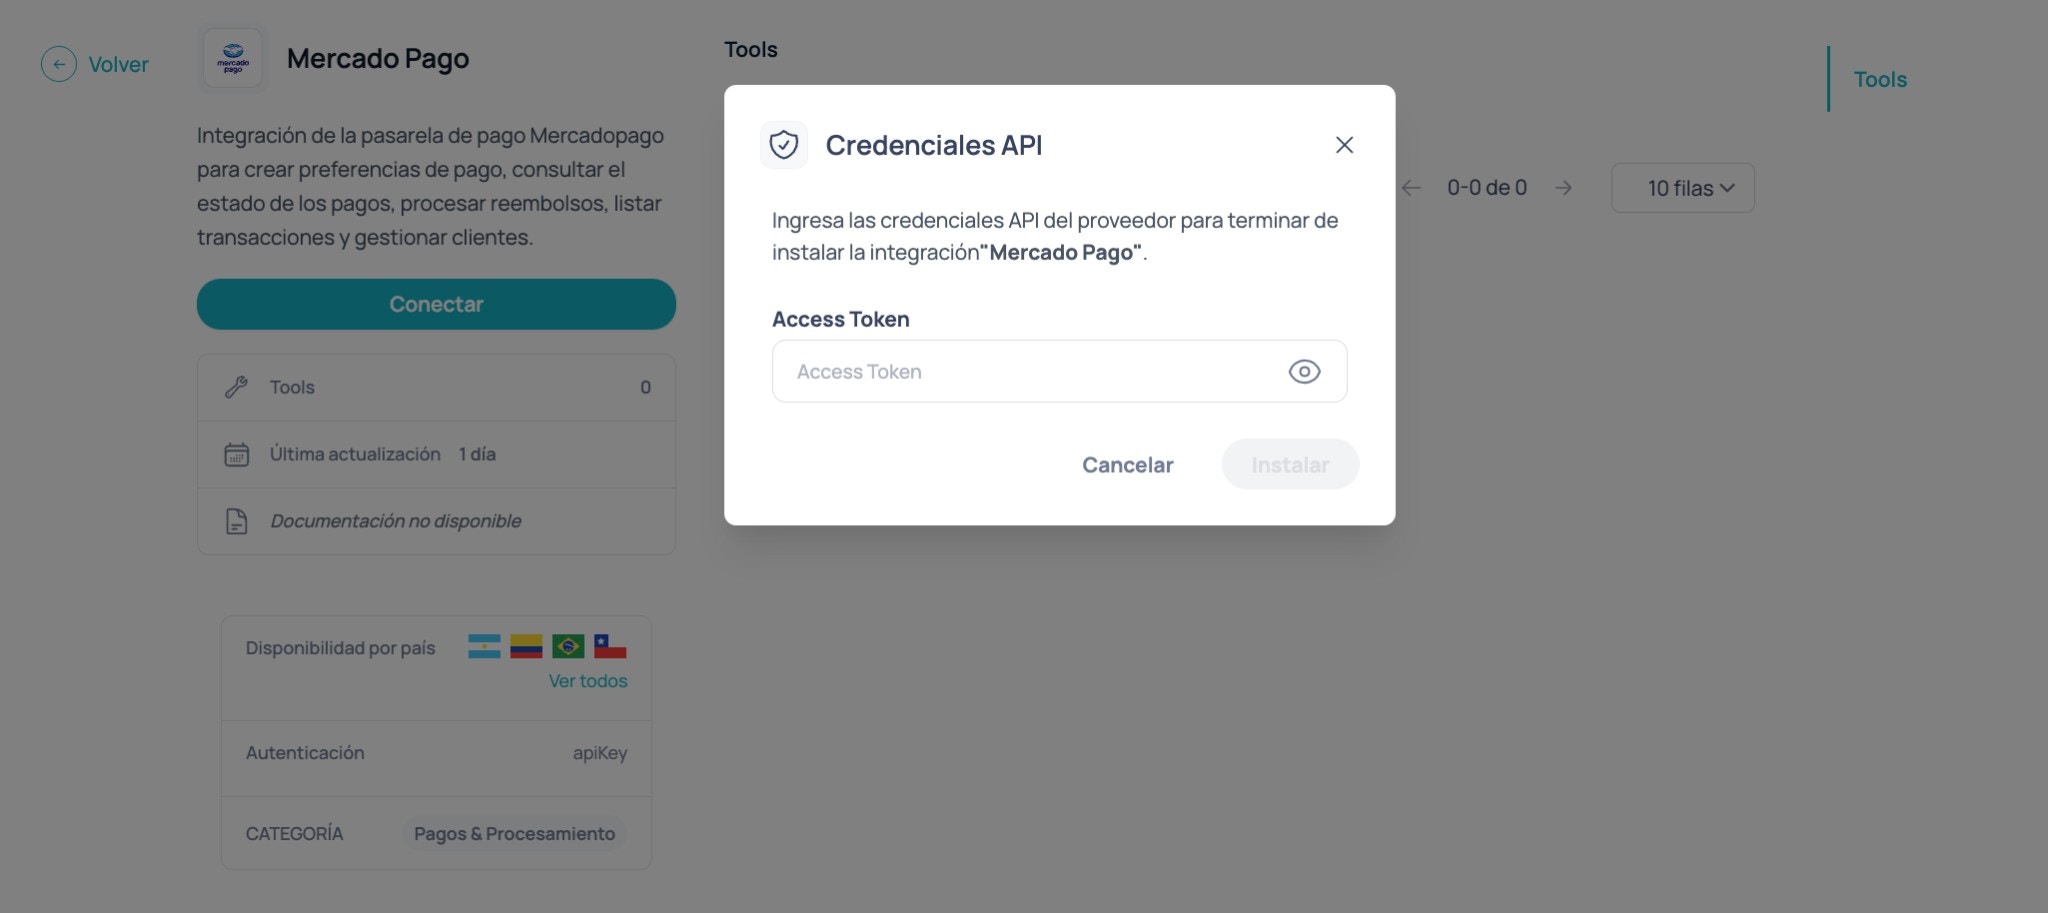
* Go to **Marketplace**
* Search for **Mercado Pago**
* Click **Connect**
* Paste your **test Access Token**
* Click **Install**
Once installed, you will see Mercado Pago available in the **Marketplace** folder in the Canvas side panel.
Mercado Pago visible in Marketplace.
Connect the payment flow right after the user confirms their purchase or reservation.
* Inside Brain, find Mercado Pago in the **Marketplace** folder in the side panel, and drag it to the canvas
* Connect it after the step where the user confirms their purchase or reservation.
Next, configure the node inputs. The three required fields are:
payment reason, taxable amount, and buyer email.
***
## Configure Inputs: What is each field?
Define three fundamental things at the time of the charge:
1. **What you are charging for** (reason + amount + currency)
2. **Who you are charging** (buyer email)
3. **Under what rules** (environment, taxes, expiration, metadata)
Think of this section as the structural definition of the payment: what Mercado Pago needs to create the transaction correctly.
The exact names may vary slightly depending on your template, but the pattern is always the same:
**amount + currency + taxes (if applicable) + buyer email + optional metadata.**
***
## What you must complete
Before going into detail, make sure you have these three elements clear:
* A readable **payment reason** (e.g., "Valpo Walk Tour - 2 ticket(s)")
* A **correct amount** (net if you work with taxes)
* A **valid buyer email** (in DEV it must be a test user)
If these three are well defined, the rest is configuration.
***
## Summary of node inputs
Before going into detail, there are two key ideas:
1. **This node creates the charge** (with amount, currency, taxes, reason, and email).
2. **This node returns a response (JSON)** that you can reuse later (for example, to display a receipt or save payment IDs).
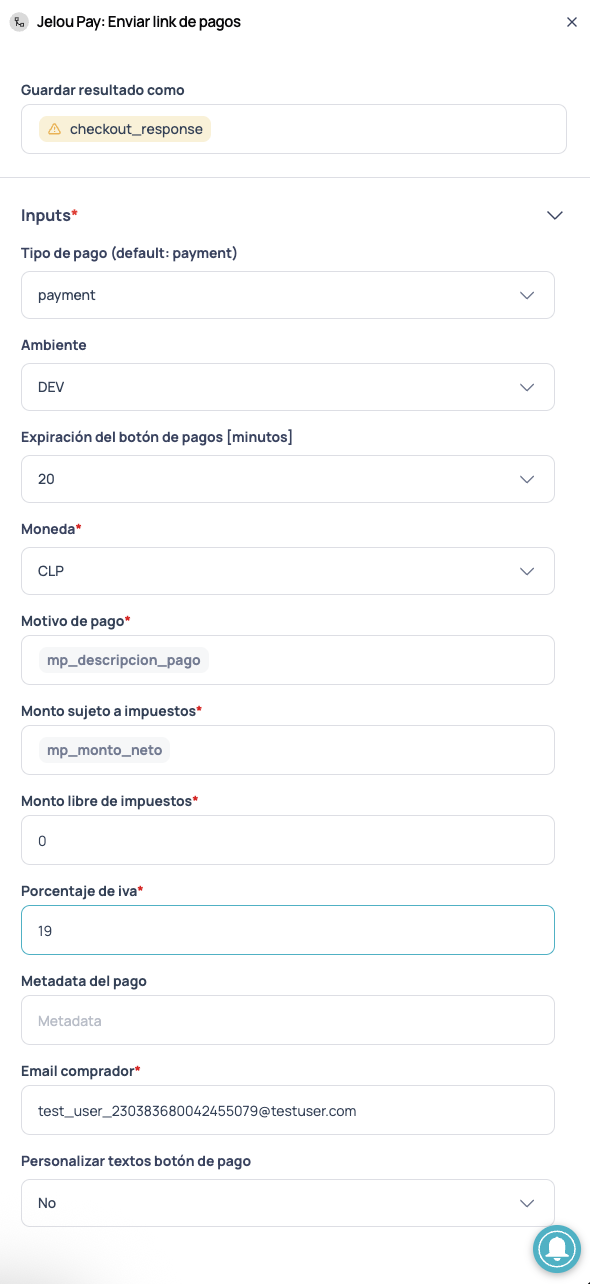
### Save result as
At the top of the node you will see **Save result as**.
There you define the name with which Brain Studio will save **the complete tool response** as a JSON in **Memory**.
* In this tutorial we use: `checkout_response`
* You can then read it from a **Code** node with something like:
* `const r = $memory.getJson('checkout_response')`
**Memory vs Context:**
* **Memory** persists between conversations (useful for querying the payment status later).
* **Context** is only available during the current conversation.
For more details, see the [full guide](/guides/variables/memory-vs-context).
***
## Detail of each input
Below is a practical guide on what to put in each field (in the same order you will see in the node).
| Field | What to put | What it is for |
| ----------------------------- | --------------------------- | --------------------------------------------------------------------------------------- |
| Save result as | `checkout_response` | Saves the tool response (JSON) in Memory with that name |
| Payment type | `payment` | Operation type (in most cases, leave as default) |
| Environment | `DEV` / `PROD` | Defines whether you are testing or charging real |
| Button expiration (min) | `20` (example) | Maximum time to pay before the link/button expires |
| Currency | `CLP`, `MXN`, `COP`, etc. | Charge currency |
| Payment reason | text or variable | Readable description of the charge (seen by the user / dashboard) |
| Taxable amount | net (e.g., `mp_net_amount`) | Tax base (if VAT/taxes apply) |
| Tax-free amount | `0` or amount | The part of the charge exempt/not subject to taxes |
| VAT percentage | `19` (example) | Tax percentage (if applicable) |
| Payment metadata | optional | Context for traceability (only what is essential) |
| Buyer email | required | Buyer's email. In DEV it must be a test user |
| Customize payment button text | `No` / `Yes` | Allows customizing the message that accompanies the payment button (Header/Body/Footer) |
***
### Payment type (default: `payment`)
Leave it as `payment` unless your implementation has another type enabled/defined. In a generic tutorial, `payment` is correct.
***
### Environment (`DEV` / `PROD`)
* **DEV**: controlled testing with test credentials.
* **PROD**: real charges with production credentials.
When you move to **PROD**, verify that your flow already handles the outputs well (success, pending, failed, errors) to avoid leaving the user "hanging".
***
### Button expiration (minutes)
Typical example: `20`.
This avoids out-of-context payments ("I opened it 3 hours later") and helps the conversational flow remain coherent.
***
### Currency
Select the actual charge currency according to country/operation.
Examples: `CLP`, `MXN`, `COP`, `PEN`, etc.
***
### Payment reason
This is the text that lets you easily identify the charge.
Practical recommendation:
* Use a **readable variable** (e.g., `mp_payment_description`)
* Or clear text such as: `Valpo Walk Tour - 2 ticket(s)`
The more "human" the reason, the less friction for support: the user and the merchant understand each other faster when something goes wrong.
***
### Taxable amount + Tax-free amount + VAT
Here you define the structure of the amount.
* **Taxable amount**: the part that does pay VAT (normally the net).
* **Tax-free amount**: the exempt part (if it does not exist in your case, leave it as `0`).
* **VAT percentage**: for example `19`.
**Typical example (sale with VAT):**
* Taxable amount = net (e.g., `20168`)
* Tax-free amount = `0`
* VAT = `19`
**If your case does NOT use taxes:**
* Use `0` as appropriate in your implementation and maintain consistency with your calculation (the important thing is not to "invent" VAT if it does not apply).
***
### Payment metadata
This field is optional but useful; it lets you attach context for traceability.
Recommendation: **minimalist and intentional**. Only save what you would actually use for:
* payment reconciliation
* debugging
* or user support
Useful examples:
* `order_id`
* `order_reference_id` (if your backend uses it)
* `tour_slug`
* `user_id`
***
### Buyer email (very important in DEV)
In **DEV** mode it is extremely important that the buyer is a **test user**, as required by Mercado Pago.
In this tutorial we assume:
* **buyer email = payer email** (they are the same)
In **DEV** use the test user email for the corresponding country (the list is below). In **PROD**, use the user's real email.
If you are in DEV and you put a real email (not a test user), the payment will most likely fail or you will not be able to complete it.
***
### Customize payment button text (optional)
By default it comes as **No**. If you change it to **Yes**, the node enables extra fields to customize the message the user will see *before* opening the checkout.
This is useful when you want the CTA to feel **more contextual** (and less generic), without changing the flow or the checkout itself.
If you select **Yes**, additional fields are enabled to customize the message that accompanies the payment button.
**Fields enabled when activated:**
* `Header` (required)
* `Body` (required)
* `Footer` (required)
When this option is active, you can completely modify the message the user will see before opening the checkout.
***
## Test emails by country (test mode / DEV)
In **DEV**, Mercado Pago only processes payments if the **Buyer email** belongs to a *test user* from the corresponding country.
Copy the one you need and paste it directly into the **Buyer email** field of the node.
Always use the test user from the same country as the credentials you are testing.
```txt theme={null}
test_user_230383680042455079@testuser.com
```
```txt theme={null}
test_user_6344464757279593247@testuser.com
```
```txt theme={null}
test_user_7600640374023229585@testuser.com
```
```txt theme={null}
test_user_538195043292703001@testuser.com
```
```txt theme={null}
test_user_6254528388464257378@testuser.com
```
```txt theme={null}
test_user_1511189314898568640@testuser.com
```
```txt theme={null}
test_user_1178397850300963040@testuser.com
```
If you are in DEV and the payment fails for no apparent reason, first check that the email is a valid test user.
***
## Node configuration: Outputs
The node exposes different outputs depending on the payment status.
***
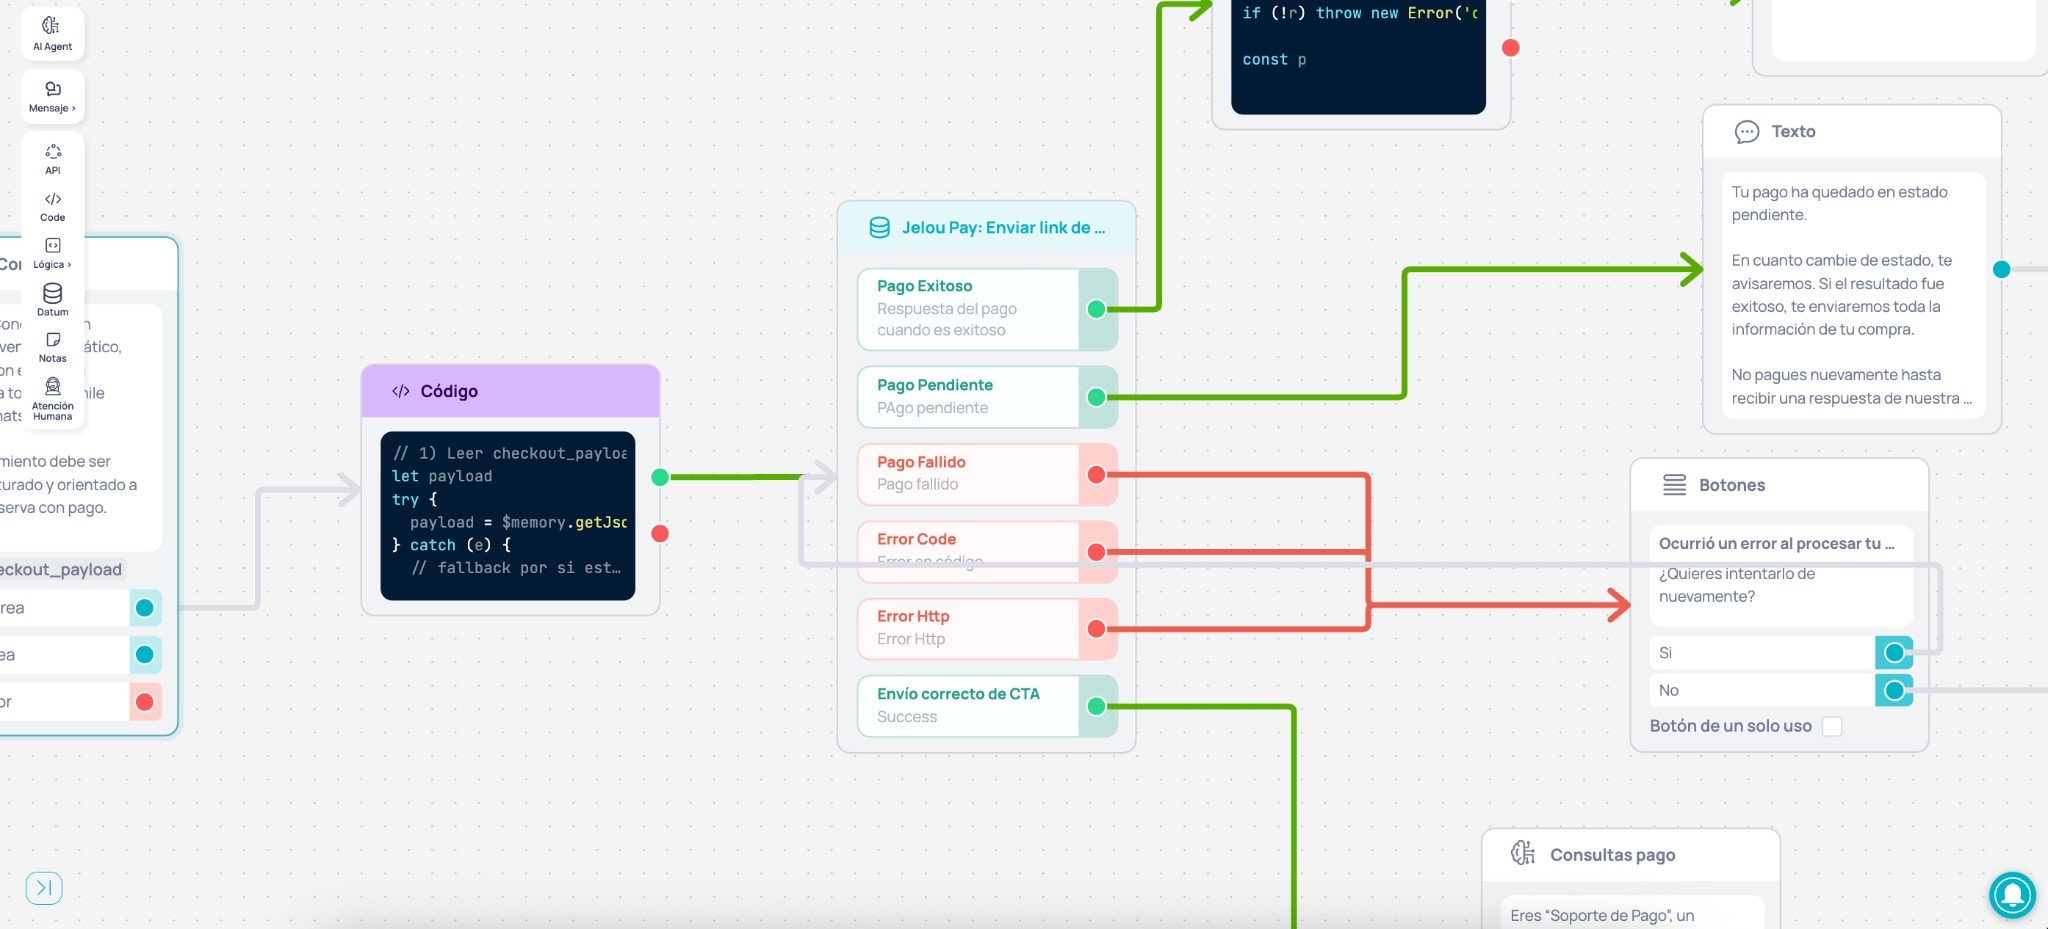
## Quick output map
* **Correct CTA delivery** → The button was sent to the user (no payment result yet).
* **Successful Payment** → The payment was approved.
* **Pending Payment** → The payment was initiated but not yet credited.
* **Failed Payment** → The payment was rejected or not completed.
* **Error Code / Error Http** → Technical error from the flow or from the request.
**CTA** means the payment button was sent successfully.
The other outputs represent the **actual result** of the transaction.
***
## Outputs and what to connect
| Output | What it means | What to connect |
| -------------------- | -------------------------------- | ------------------------------------- |
| Correct CTA delivery | The button was sent successfully | Post-CTA support AI Agent |
| Successful Payment | The payment was approved | Code (normalization) → Text (receipt) |
| Pending Payment | The payment is in process | Informational text + follow-up |
| Failed Payment | The payment was rejected | Text + retry option |
| Error Code | Error in your flow | Error handling block |
| Error Http | Error in request | Error handling block |
***
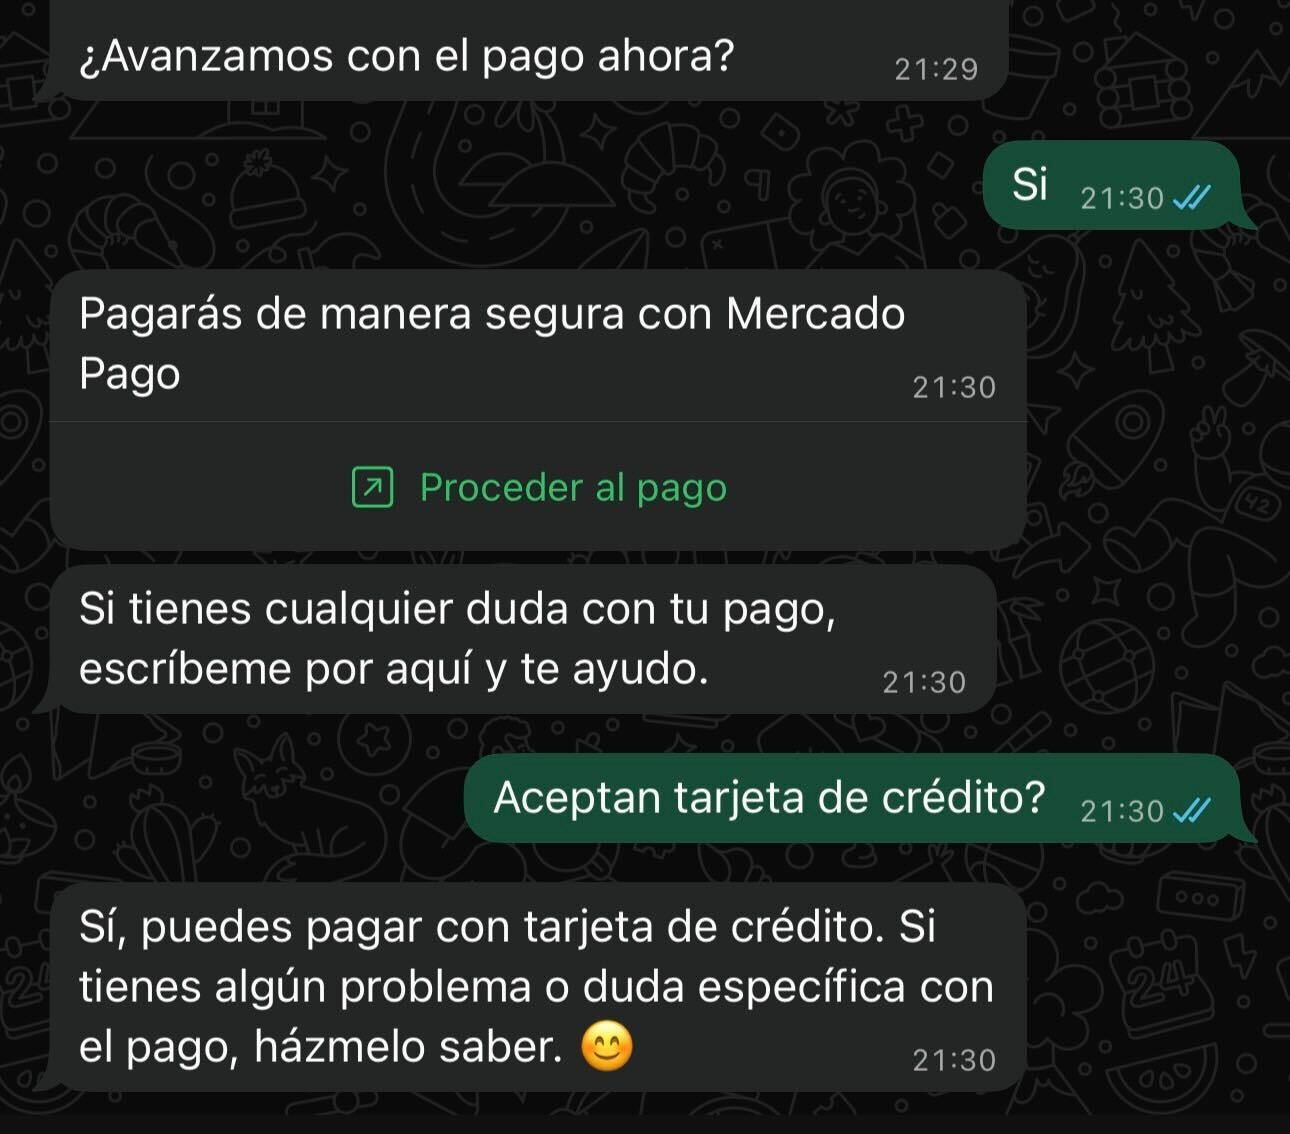
### Correct CTA delivery (Success)
This means the **payment button was sent** to the user, but they have not yet taken an action inside the Webview that determines the transaction status (Approved, Rejected, Pending, Error).
Recommendation: connect a **post-CTA support AI Agent**. This way, when the user receives the payment button, they will have someone on the other side: an agent with the appropriate context who can answer frequent questions, reassure them, and help complete the payment without restarting the sale.
#### Example prompt
The prompt is designed for an **AI Agent** on the **Correct CTA delivery** output, with the **Gmail** tool (Marketplace) connected to send support tickets by email when the user requests it. You can copy it and adjust the tone or rules to your brand.
```txt theme={null}
You are "Payment Support", a help assistant for completing payments within WhatsApp.
Context: the user has just received a button (CTA) to pay. Your role is NOT to sell or recalculate amounts: only to help complete the payment or resolve button issues.
────────────────────
KEY BEHAVIOR
────────────────────
- This agent can run without the user having written anything.
- If there is NO explicit question or problem from the user in the last message, send ONLY this proactive message (once) and then stay in reactive mode:
"If you have any questions about your payment, write to me here and I will help you."
- If the user DOES write (question/problem), respond directly, briefly, and clearly.
- Do not restart the sale. Do not recalculate amounts. Do not generate new links. Do not make up information.
- Maximum 1 emoji per message.
────────────────────
WHAT YOU SUPPORT
────────────────────
- How to pay from the button.
- Button does not open / loading error.
- Pending payment.
- Rejected payment.
- Issues with card / payment method.
If the user reports a problem:
1) Ask for a short description.
2) If helpful, ask for a screenshot (they can send images).
3) Offer to generate a support ticket by email. DO NOT generate a ticket without an explicit "yes".
────────────────────
EMAIL TICKET (GMAIL TOOL)
────────────────────
If the user confirms they want a ticket, use the Gmail tool to send an email to: support@yourdomain.com
Subject:
[Payment Ticket] Operation {operation_id if exists} | Ref {order_reference_id if exists}
Body:
- Buyer/payer email
- What happened (user's text)
- Mentioned status (pending/rejected/error)
- Current date and time
- Useful IDs if they exist: operation_id / order_id / order_reference_id
- Attach evidence if the user sent images
Then confirm:
"Done. I generated the ticket and we will contact you by email."
────────────────────
CLOSING / END OF TASK
────────────────────
If the user says they already paid and does not need more help (e.g., "done", "thank you", "that was it"), respond briefly and close:
"Perfect. If you need anything else, I will be here."
```
***
### Successful Payment
The payment was approved.
Recommendation:
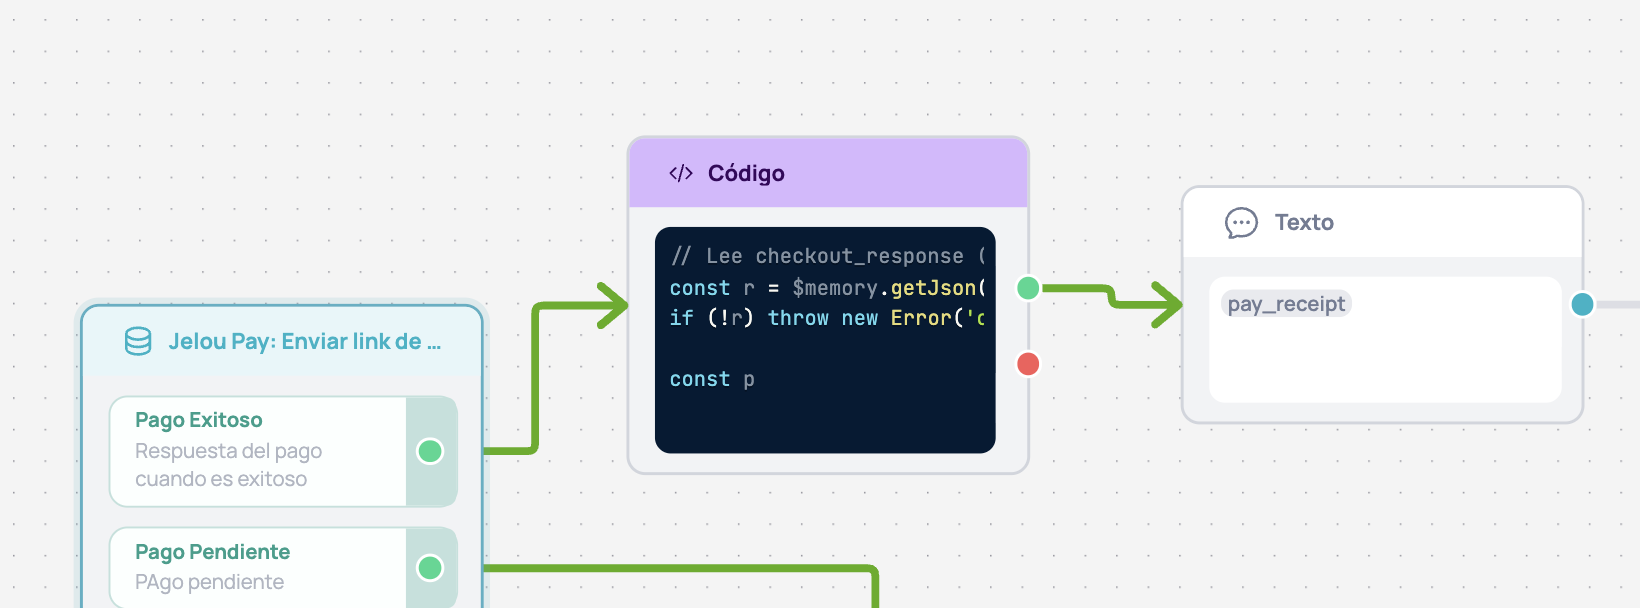
1. Connect a **Code** node to normalize and save the minimum in **Context**.
2. Then a **Text** node that displays the short receipt (receipt line).
#### Example: Normalization code
This node reads `checkout_response` from memory and saves to context only what is reusable.
```javascript normalize-payment.js theme={null}
// Reads checkout_response (saved in Memory) and maps the minimum to Context
const r = $memory.getJson('checkout_response')
if (!r) throw new Error('checkout_response does not exist in memory.')
const pl = r?.paymentLinkResponse
if (!pl) throw new Error('checkout_response.paymentLinkResponse does not exist (check memory).')
const gw = pl.gateway_response || {}
const md = pl.metadata || gw.metadata || {}
// buyer email = payer email (in the demo they match)
const email = String(gw?.payer?.email || md.email || '')
// Identifiers and reusable data
$context.set('pay_operation_id', String(gw.id || '')) // "Operation number" in Mercado Pago
$context.set('pay_amount', Number(pl.amount || 0))
$context.set('pay_currency', String(pl.currency || 'CLP'))
$context.set('pay_email', email)
$context.set('pay_concept', String(gw.description || md.concept || ''))
$context.set('pay_status', String(gw.status || 'approved'))
// Receipt line (post-payment message)
$context.set(
'pay_receipt',
`Done ✅ Payment approved.\n\nMercado Pago operation number: ${String(gw.id || '')}`
)
```
If you use this code, you can print the message to the user in a **Text** output node by pasting this expression:
```txt theme={null}
{{$context.pay_receipt}}
```
***
### Pending Payment
The payment is pending.
Recommendation:
* Connect a **Text** node with a brief explanation.
* Then route to whatever flow comes next (wait, follow-up, support, etc.).
Keep the message simple: the goal is **not to confuse** and **not to push a second payment** without context.
***
### Failed Payment
The payment failed (rejection / not credited).
Recommendation:
* Connect a clear and brief **Text** node.
* Offer a **retry** or method change.
* If the user continues to have issues, route to support.
***
### Error Code / Error Http
Technical errors from your flow (code) or from the HTTP request.
Recommendation:
* Connect an **error handling** block.
* Show a brief message + retry option + support.
* Avoid exposing technical details to the end user.
***
# 2. Testing on WhatsApp
Once you have the node configured (inputs + connected outputs), it is time to **test the complete flow from WhatsApp**.
**Important:** The payment experience opens in a **WebView inside WhatsApp**. Therefore, to validate the payment end-to-end, the test must be done from WhatsApp (not from the Canvas message preview).
## Video 2: Testing from WhatsApp (DEV)
***
## How to start the test from WhatsApp
In Brain Studio you can start a real WhatsApp test in seconds.
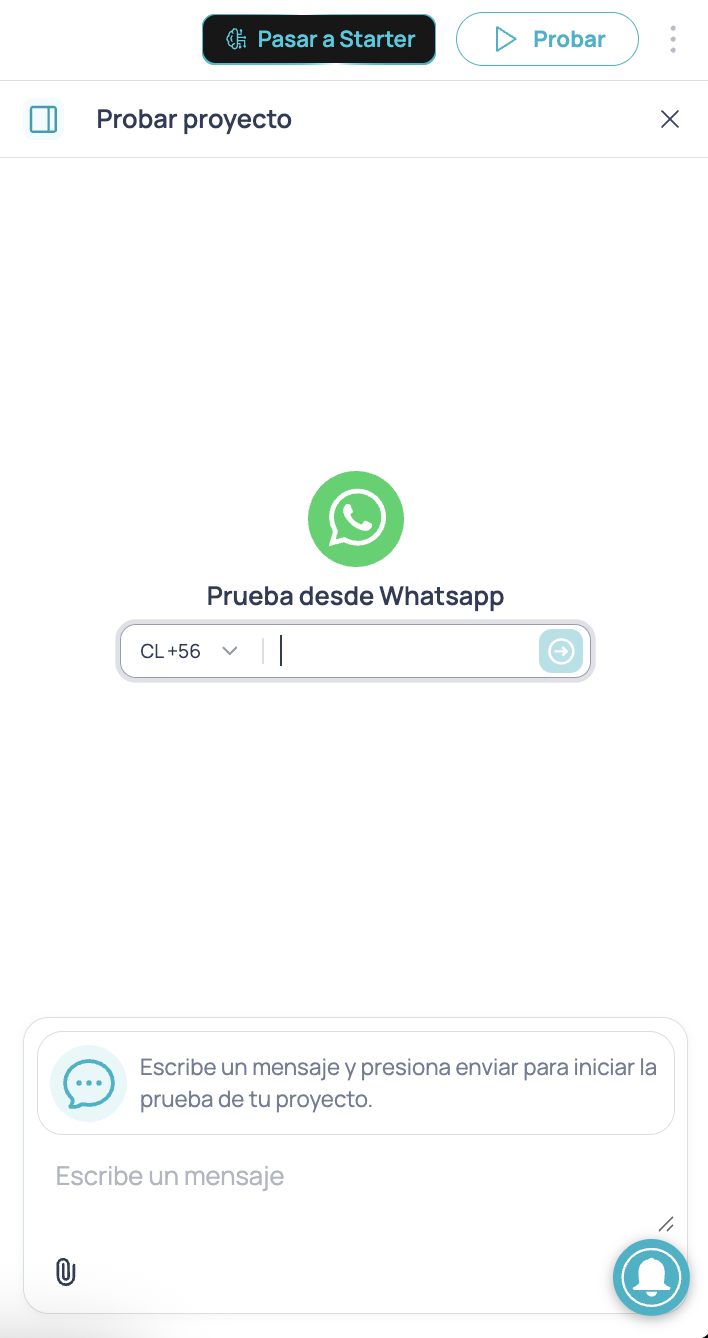
In the upper right corner of the Canvas, click **Test**.
If you do not yet have a connected/enabled WhatsApp channel, this is the fastest way to validate the payment flow.
* Select your prefix (e.g., **CL +56**)
* Enter your number
* Send the first message to begin the test conversation
From that point, the flow runs as if it were a real user.
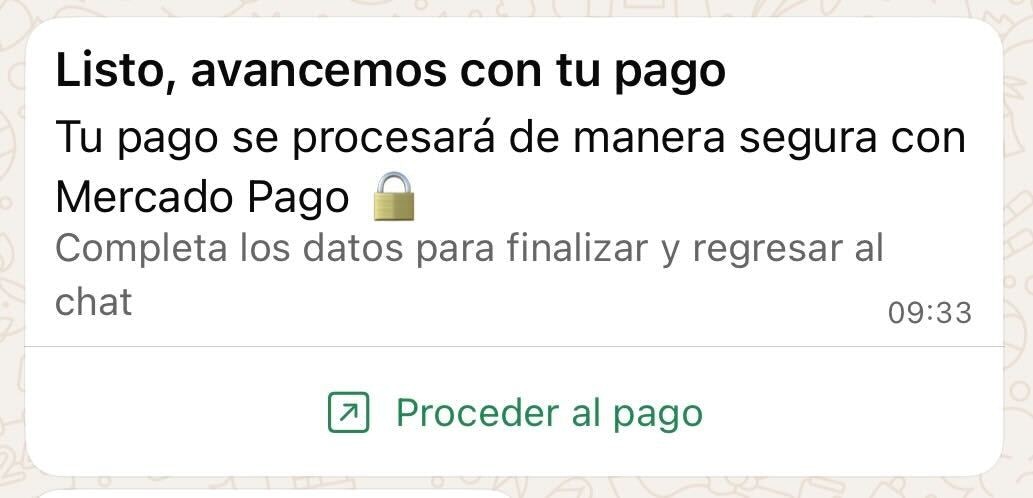
When the bot sends you the **Proceed to payment** button, open it from WhatsApp.
There you will see the checkout WebView and you can test test cards, statuses (approved/rejected), and all output handling.
In some countries, if the user has the Mercado Pago app installed on their device, the checkout webview will attempt to open it automatically as the first payment option. However, for DEV payments this option is not enabled, so you must close it and return to WhatsApp to enter the test card.
***
## Test cards by country
To test different scenarios (approved payment, rejected payment, etc.), Mercado Pago publishes test cards by country.
In **DEV**, remember two things:
* Use **test** credentials.
* Use a valid **test user** in the **Buyer email** field (from the same country as your credentials).
Each link contains card numbers, CVV, and approval/rejection cases:
[Test cards (Chile)](https://www.mercadopago.cl/developers/es/docs/checkout-bricks/integration-test/test-cards)
[Test cards (Peru)](https://www.mercadopago.com.pe/developers/es/docs/your-integrations/test/cards)
[Test cards (Colombia)](https://www.mercadopago.com.co/developers/es/docs/your-integrations/test/cards)
[Test cards (Mexico)](https://www.mercadopago.com.mx/developers/es/docs/shopify/additional-content/your-integrations/test/cards)
[Test cards (Brazil)](https://www.mercadopago.com.br/developers/es/docs/checkout-api-payments/additional-content/your-integrations/test/cards)
[Test cards (Argentina)](https://www.mercadopago.com.ar/developers/es/docs/subscriptions/additional-content/your-integrations/test/cards)
[Test cards (Uruguay)](https://www.mercadopago.com.uy/developers/es/docs/subscriptions/additional-content/your-integrations/test/cards)
If you want to test your flow properly, try at least 2 cases: **one approved** and **one rejected**. This validates that your outputs (Successful Payment / Failed) are connected correctly.
***
# 3. Going to production (PROD)
Going to **PROD** is basically changing two things: **credentials** and **real data**.
The WhatsApp experience remains the same, but now the payment affects your production account.
## Video 3: Production configuration + real payment
In Mercado Pago, go to **Production credentials** and copy your production **Access Token**.
This token is associated with your production account. Only use it when you are ready to charge real.
To avoid confusion (and make it explicit), we will reinstall the integration with the correct token:
* Go to **Marketplace**
* Open **Mercado Pago**
* Press **Delete integration**
* Press **Install again**
* Paste your **production Access Token**
* Press **Install**
In the **Jelou Pay: Send payment link** node:
* Change **Environment** from `DEV` to `PROD`
From this point on, the flow will attempt to generate real charges.
In **DEV**, we used a **test user** for the **Buyer email** field.
In **PROD**, that same field must come from your flow (the user's real email).
If during the test stage you left a hardcoded test user in the input, now replace it with your variable.
In this tutorial, the email is captured during the conversation (AI Agent) and normalized as a variable before reaching the payment node.
The important thing is that in **PROD** the **Buyer email** field is connected to that real data.
If you want the CTA to feel more contextual (without changing the checkout), activate **Customize payment button text**.
* Change the selector to **Yes**
* Complete **Header**, **Body**, and **Footer** (required)
This only customizes the pre-checkout message within WhatsApp.
The payment logic and the WebView do not change.
Make a real payment (wallet or card) and verify:
* **Approved** status
* **Operation number** (operation ID)
* Record visible in your **Mercado Pago dashboard**
Production transactions consume Brain Studio credits per attempt, in addition to provider commissions.
If you are validating for the first time, make a small charge and review the dashboard before scaling.
***
# Next steps
When to use WebView, native experience, or conversational flows.
Other providers by country and specific guides.
Complete reference for inputs, outputs, and node options.
***
With these steps you have the flow working in test and production.
From here you can record operations, issue receipts, send automatic email tickets, or integrate more providers depending on your use case.
 * Go to **Test credentials**
* Copy the **Access Token**
You will use this token to install Mercado Pago in Brain Studio.
* Go to **Test credentials**
* Copy the **Access Token**
You will use this token to install Mercado Pago in Brain Studio.
 Once installed, you will see Mercado Pago available in the **Marketplace** folder in the Canvas side panel.
 ***
## Quick output map
* **Correct CTA delivery** → The button was sent to the user (no payment result yet).
* **Successful Payment** → The payment was approved.
* **Pending Payment** → The payment was initiated but not yet credited.
* **Failed Payment** → The payment was rejected or not completed.
* **Error Code / Error Http** → Technical error from the flow or from the request.
***
## Quick output map
* **Correct CTA delivery** → The button was sent to the user (no payment result yet).
* **Successful Payment** → The payment was approved.
* **Pending Payment** → The payment was initiated but not yet credited.
* **Failed Payment** → The payment was rejected or not completed.
* **Error Code / Error Http** → Technical error from the flow or from the request.
 #### Example prompt
The prompt is designed for an **AI Agent** on the **Correct CTA delivery** output, with the **Gmail** tool (Marketplace) connected to send support tickets by email when the user requests it. You can copy it and adjust the tone or rules to your brand.
#### Example prompt
The prompt is designed for an **AI Agent** on the **Correct CTA delivery** output, with the **Gmail** tool (Marketplace) connected to send support tickets by email when the user requests it. You can copy it and adjust the tone or rules to your brand.
 ***
### Pending Payment
The payment is pending.
Recommendation:
* Connect a **Text** node with a brief explanation.
* Then route to whatever flow comes next (wait, follow-up, support, etc.).
Keep the message simple: the goal is **not to confuse** and **not to push a second payment** without context.
***
### Failed Payment
The payment failed (rejection / not credited).
Recommendation:
* Connect a clear and brief **Text** node.
* Offer a **retry** or method change.
* If the user continues to have issues, route to support.
***
### Error Code / Error Http
Technical errors from your flow (code) or from the HTTP request.
Recommendation:
* Connect an **error handling** block.
* Show a brief message + retry option + support.
* Avoid exposing technical details to the end user.
***
# 2. Testing on WhatsApp
Once you have the node configured (inputs + connected outputs), it is time to **test the complete flow from WhatsApp**.
***
### Pending Payment
The payment is pending.
Recommendation:
* Connect a **Text** node with a brief explanation.
* Then route to whatever flow comes next (wait, follow-up, support, etc.).
Keep the message simple: the goal is **not to confuse** and **not to push a second payment** without context.
***
### Failed Payment
The payment failed (rejection / not credited).
Recommendation:
* Connect a clear and brief **Text** node.
* Offer a **retry** or method change.
* If the user continues to have issues, route to support.
***
### Error Code / Error Http
Technical errors from your flow (code) or from the HTTP request.
Recommendation:
* Connect an **error handling** block.
* Show a brief message + retry option + support.
* Avoid exposing technical details to the end user.
***
# 2. Testing on WhatsApp
Once you have the node configured (inputs + connected outputs), it is time to **test the complete flow from WhatsApp**.