> ## Documentation Index
> Fetch the complete documentation index at: https://docs.jelou.ai/llms.txt
> Use this file to discover all available pages before exploring further.
# Getting credentials
> Get Conekta's public key, private key, and configure the webhook from the admin panel to connect Conekta in Brain Studio.
This guide walks you through preparing credentials and webhooks for test and production in the [Conekta panel](https://panel.conekta.com/).
When you finish this guide, you will have the **public key**, **private key**, and **webhook** configured to connect Conekta in Brain Studio.
***
## Before you begin
You need:
* An **active Conekta account**
* Access to the **[Conekta panel](https://panel.conekta.com/)** with administrator permissions
* A decision on whether you will connect **test** or **production** credentials
***
## Environments in Conekta
Conekta separates credentials by environment:
* **Test:** test environment. Lets you simulate payments without moving real money.
* **Production:** live environment. Processes transactions with real money.
Each environment has its own key pair and its own webhook. Do not mix test credentials or webhooks with production ones.
| Environment | Public key | Private key | Webhook |
| ----------- | ---------------------------------- | -------------------------------------------------- | ---------------------------------------- |
| Test | Visible in **Test API Keys** | You must create it with **Create new private key** | Configure it with **Test Mode** enabled |
| Production | Visible in **Production API Keys** | You must create it with **Create new private key** | Configure it with **Test Mode** disabled |
Do not mix credentials or webhooks across environments. If even one key or webhook belongs to the wrong environment, installation may fail or payment statuses may not sync correctly.
Conekta only lets you **copy or view the private key at the moment it is created**. If you lose it, you must generate a new one.
***
## Webhook URL and events
In both environments you must use the same notification URL:
```text theme={null}
https://chat-payments.jelou.ai/link-webhook?provider=CONEKTA
```
Select these **5 events** within the **orders** category:
| Event | Description |
| ----------------------- | ---------------------------- |
| `order.expired` | The order expired |
| `order.paid` | The order was paid |
| `order.pending_payment` | The order is pending payment |
| `order.refunded` | The order was refunded |
| `order.declined` | The order was declined |
Brain Studio uses these events to update the payment status and continue the flow through the corresponding output.
***
## Part 1 — Prepare test credentials and webhook
Log in at [https://panel.conekta.com/](https://panel.conekta.com/) with the merchant account.
In the **bottom-left corner** of the panel, turn on the **Test Mode** switch.
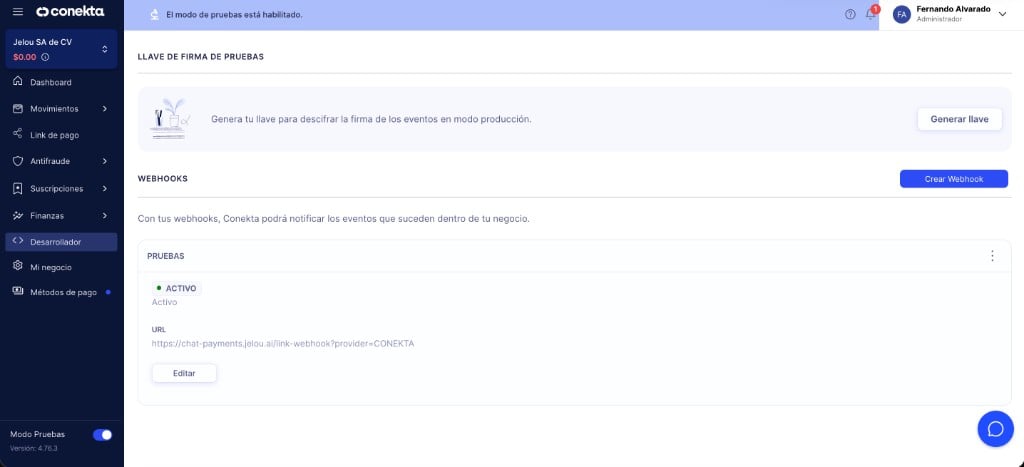
You should see the **Test mode is enabled** notice at the top of the panel.
In the sidebar menu, open **Developer**.
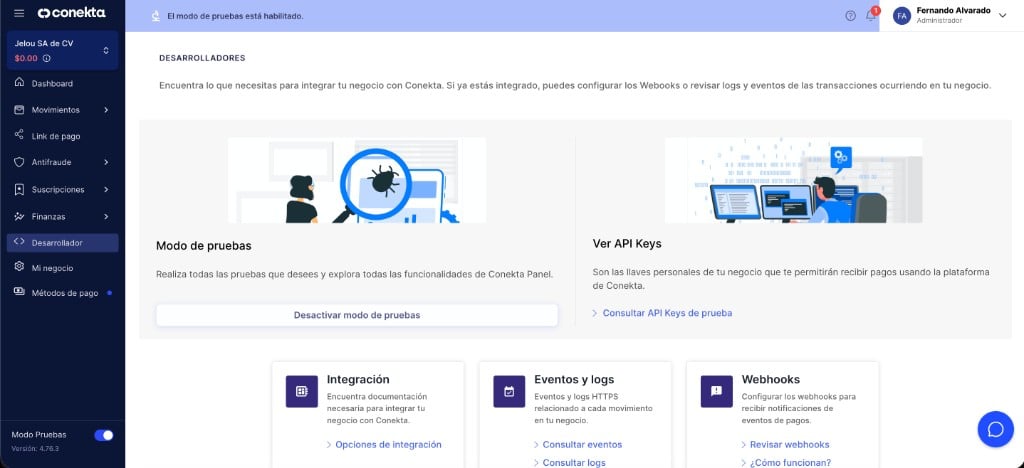 In the **View API Keys** card, click **View test API Keys**.
In the **Public key** section, copy the active key using **Copy key**.
In the **View API Keys** card, click **View test API Keys**.
In the **Public key** section, copy the active key using **Copy key**.
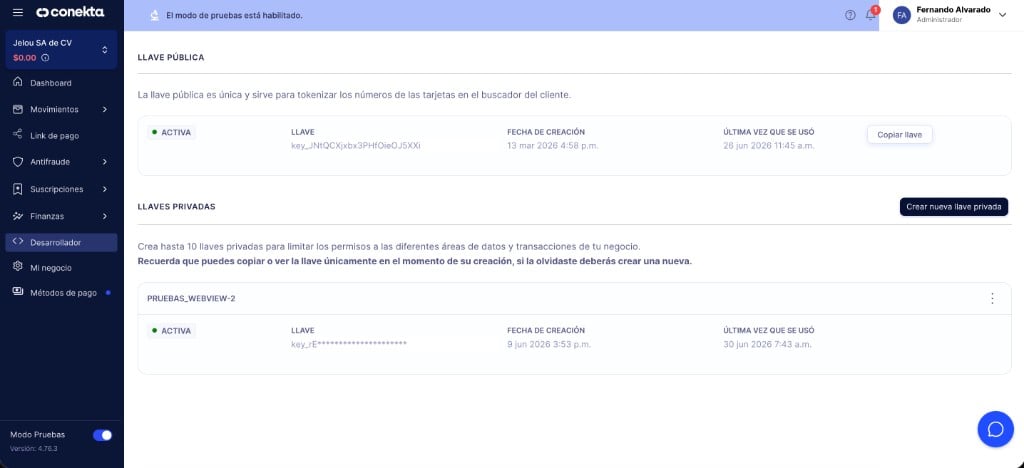 In the **Private keys** section, click **Create new private key**.
Assign a descriptive name, confirm creation, and **copy the private key immediately**. Conekta will not show the full key again after you close that step.
Return to **Developer**. In the **Webhooks** card, click **Review webhooks**.
Click **Create Webhook** and complete:
* **Webhook URL:** `https://chat-payments.jelou.ai/link-webhook?provider=CONEKTA`
* **Name or description:** a descriptive name, for example `Jelou Brain`
* **Events to notify:** select the 5 **orders** events listed above
In the **Private keys** section, click **Create new private key**.
Assign a descriptive name, confirm creation, and **copy the private key immediately**. Conekta will not show the full key again after you close that step.
Return to **Developer**. In the **Webhooks** card, click **Review webhooks**.
Click **Create Webhook** and complete:
* **Webhook URL:** `https://chat-payments.jelou.ai/link-webhook?provider=CONEKTA`
* **Name or description:** a descriptive name, for example `Jelou Brain`
* **Events to notify:** select the 5 **orders** events listed above
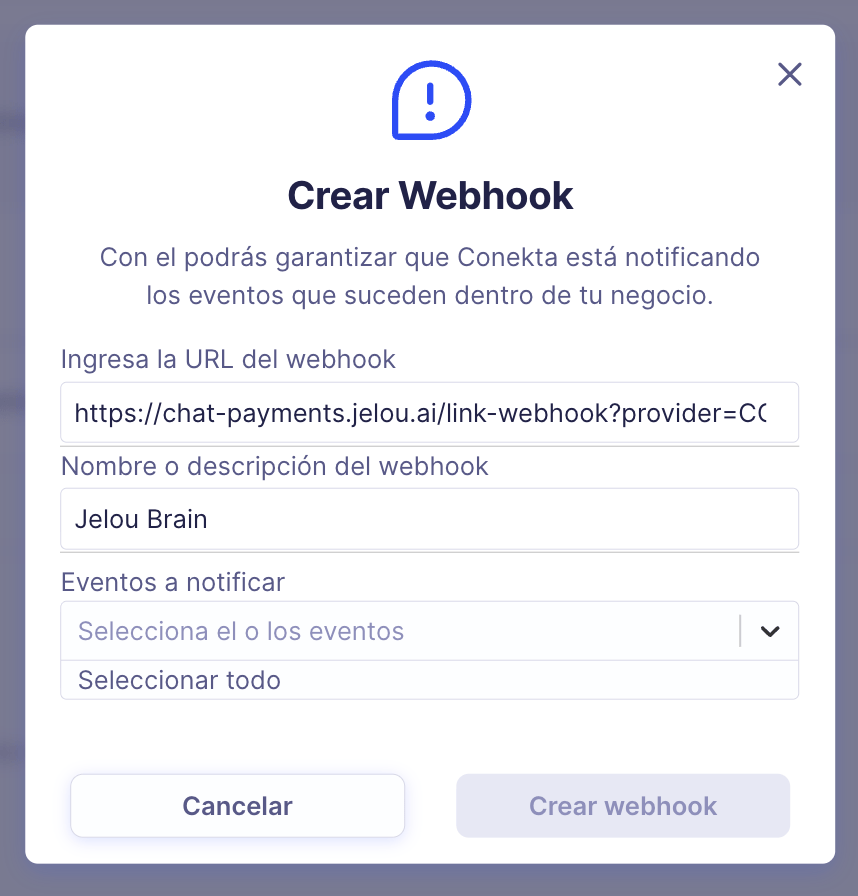
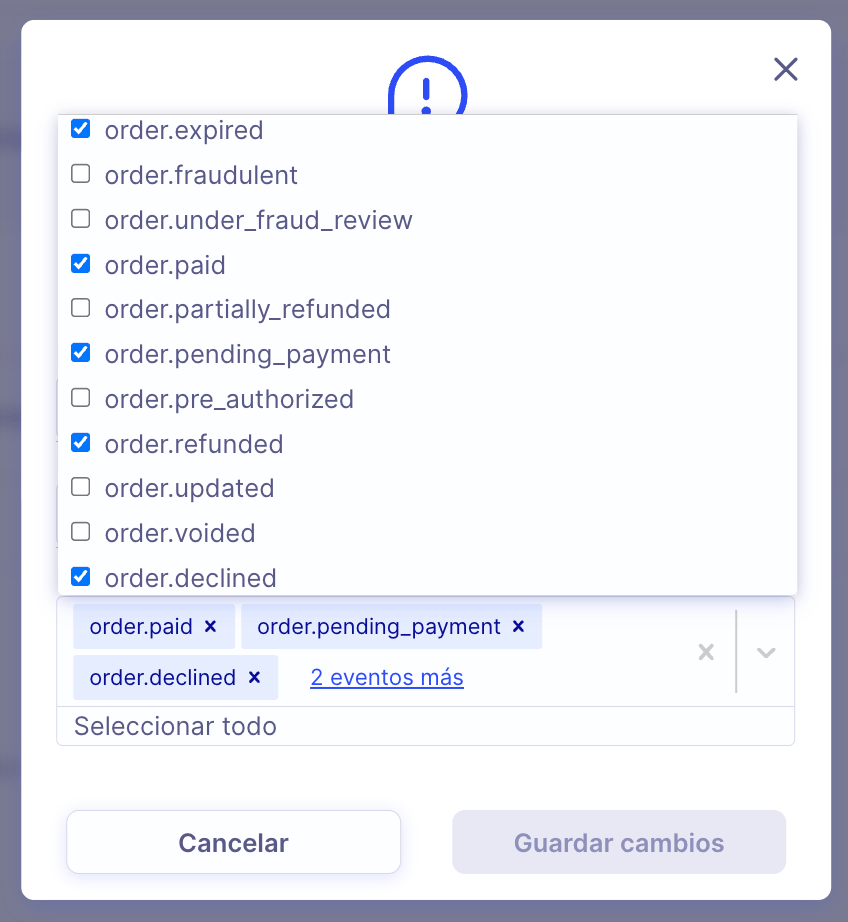 Save the webhook and verify it is **Active** with the Jelou URL.
 ***
## Part 2 — Prepare production credentials and webhook
In the **bottom-left corner** of the panel, turn off the **Test Mode** switch.
Confirm that the test mode notice no longer appears.
In the sidebar menu, open **Developer**.
***
## Part 2 — Prepare production credentials and webhook
In the **bottom-left corner** of the panel, turn off the **Test Mode** switch.
Confirm that the test mode notice no longer appears.
In the sidebar menu, open **Developer**.
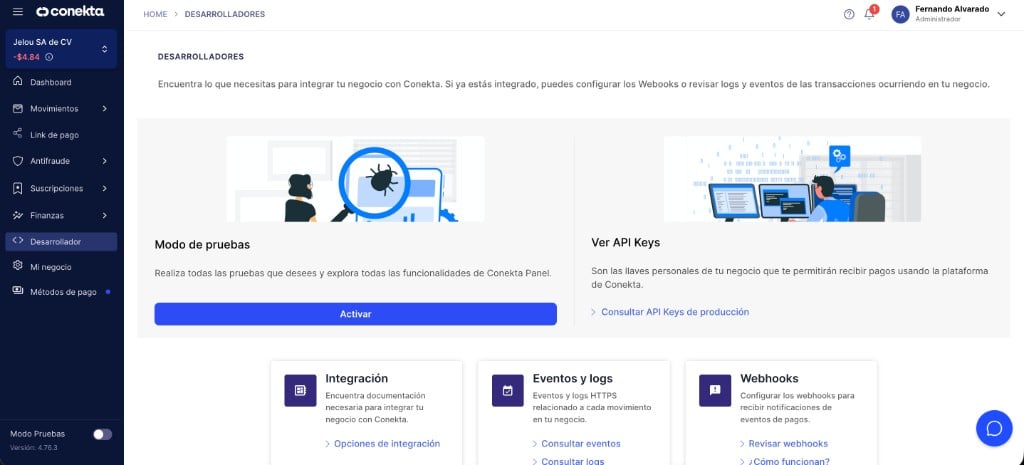 In the **View API Keys** card, click **View production API Keys**.
In the **Public key** section, copy the active key using **Copy key**.
In the **View API Keys** card, click **View production API Keys**.
In the **Public key** section, copy the active key using **Copy key**.
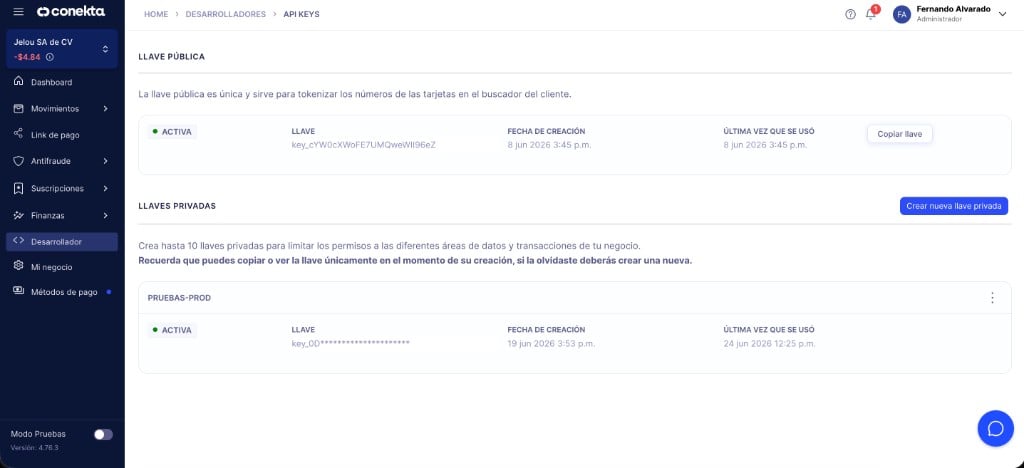 In the **Private keys** section, click **Create new private key**.
Assign a descriptive name, confirm creation, and **copy the private key immediately**.
When you move Conekta to production in Brain Studio, use this production pair. Do not reuse test credentials.
Return to **Developer**. In the **Webhooks** card, click **Review webhooks**.
Click **Create Webhook** and complete the same configuration as in test:
* **Webhook URL:** `https://chat-payments.jelou.ai/link-webhook?provider=CONEKTA`
* **Name or description:** a descriptive name, for example `Jelou Brain`
* **Events to notify:** select the 5 **orders** events listed above
Confirm the webhook is **Active** in the production environment.
***
## What Brain Studio asks for
When installing Conekta, Brain Studio requests:
| Field | Description |
| --------------- | --------------------------------------------------------- |
| **Public key** | Active public key from the environment you are connecting |
| **Private key** | Private key you just created in Conekta |
| **VAT rate** | VAT percentage the integration will use during collection |
VAT is configured during connection in Brain Studio, not in the Conekta panel. The webhook is configured directly in Conekta and is not entered in Brain Studio.
***
## Next step
Install Conekta using the credentials for the environment you will use and define the VAT rate for the integration.
In the **Private keys** section, click **Create new private key**.
Assign a descriptive name, confirm creation, and **copy the private key immediately**.
When you move Conekta to production in Brain Studio, use this production pair. Do not reuse test credentials.
Return to **Developer**. In the **Webhooks** card, click **Review webhooks**.
Click **Create Webhook** and complete the same configuration as in test:
* **Webhook URL:** `https://chat-payments.jelou.ai/link-webhook?provider=CONEKTA`
* **Name or description:** a descriptive name, for example `Jelou Brain`
* **Events to notify:** select the 5 **orders** events listed above
Confirm the webhook is **Active** in the production environment.
***
## What Brain Studio asks for
When installing Conekta, Brain Studio requests:
| Field | Description |
| --------------- | --------------------------------------------------------- |
| **Public key** | Active public key from the environment you are connecting |
| **Private key** | Private key you just created in Conekta |
| **VAT rate** | VAT percentage the integration will use during collection |
VAT is configured during connection in Brain Studio, not in the Conekta panel. The webhook is configured directly in Conekta and is not entered in Brain Studio.
***
## Next step
Install Conekta using the credentials for the environment you will use and define the VAT rate for the integration.