> ## Documentation Index
> Fetch the complete documentation index at: https://docs.jelou.ai/llms.txt
> Use this file to discover all available pages before exploring further.
# Connect in Brain Studio
> Connect your Payphone account from Marketplace using your Access Token, Store ID, IVA (VAT), and Moneda (Currency).
Connect Payphone from **Marketplace** to enable the provider in your workspace and make the payment node available in Brain Studio.
***
## Before you begin
Make sure you have:
* An **active Payphone Business account** with at least one active store
* The **Access Token** generated from the Payphone developer portal
* The **Store ID** for your store in Payphone
* The **IVA (VAT)** value you will use in the operation
* The **Moneda (Currency)** for the integration, which must be **USD**
The Access Token and Store ID are only available **after Payphone approves your company request**. If you don't have them yet, follow the [Getting credentials](/guides/integraciones/pagos/proveedores/payphone/obtener-credenciales) guide first.
***
## Connect from Marketplace
In Brain Studio, go to **Marketplace** from the side menu.
You can find Payphone under the **Payments & Processing** category or by using the search bar.
Click on the **Payphone** card to open its details.
Click **Connect**.
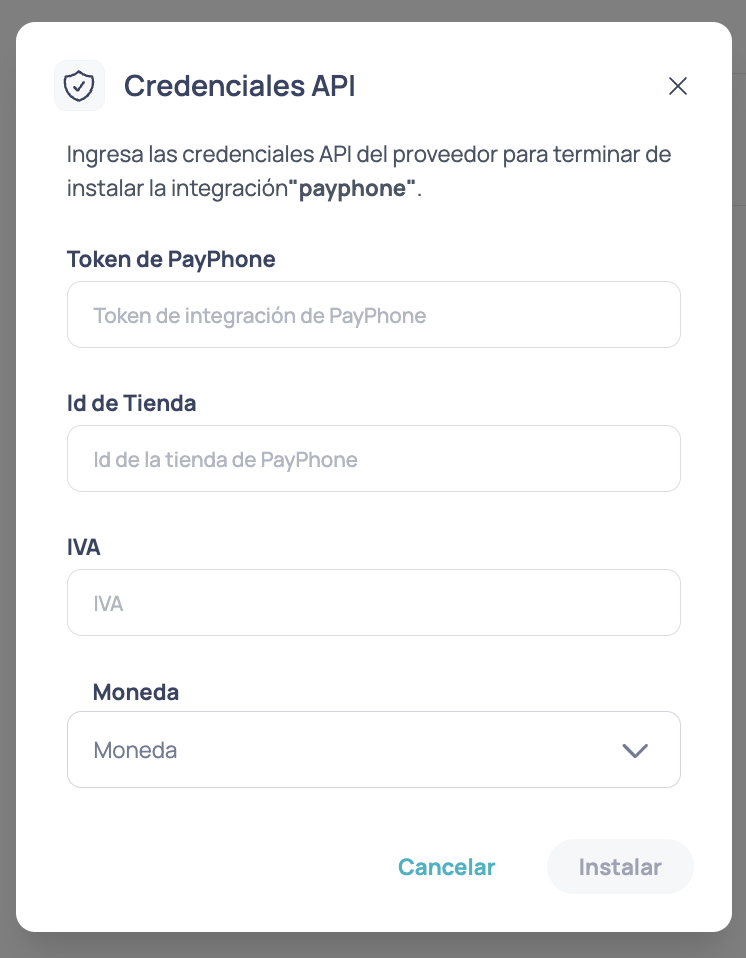
A modal will open requesting these fields:
* **Token de PayPhone** — this is the **Access Token** you obtained from the Payphone Developer portal
* **Id de Tienda** — this is the **Store ID** of the store associated with your approved request in Payphone
* **IVA** — tax value that the flow will apply
* **Moneda** — for this integration it must be set to **USD**
Enter all four values and confirm the installation.
 The **Store ID** must correspond to the store associated with the approved request in Payphone. If it does not match the correct store, the integration may fail.
Brain Studio will validate the configuration and connect the provider to your workspace.
If Payphone appears as connected in Marketplace and the node is available in the Canvas, the integration was successfully enabled.
***
## Installation from Jelou Agent
If you install Payphone from **Jelou Agent**, you will see the same installation modal and must enter exactly the same information:
* **Access Token**
* **Store ID**
* **IVA (VAT)**
* **Moneda (Currency)** (USD)
Installation from Marketplace and installation from Jelou Agent use the same provider configuration.
***
## Test and production mode
Payphone uses the same credentials for testing and for real charges. The environment is controlled from the **environment selector inside the application in the Payphone Developer portal**, not by connecting different tokens in Brain Studio.
Before running your flow, make sure the environment selected in your Payphone application matches the scenario you are executing:
* For **testing:** select the test environment in the application in the Payphone Developer portal
* For **real charges:** select the production environment in the same application
***
## Next step
Once the integration is connected, continue with:
Configure the payment node and handle transaction states in your flow.
The **Store ID** must correspond to the store associated with the approved request in Payphone. If it does not match the correct store, the integration may fail.
Brain Studio will validate the configuration and connect the provider to your workspace.
If Payphone appears as connected in Marketplace and the node is available in the Canvas, the integration was successfully enabled.
***
## Installation from Jelou Agent
If you install Payphone from **Jelou Agent**, you will see the same installation modal and must enter exactly the same information:
* **Access Token**
* **Store ID**
* **IVA (VAT)**
* **Moneda (Currency)** (USD)
Installation from Marketplace and installation from Jelou Agent use the same provider configuration.
***
## Test and production mode
Payphone uses the same credentials for testing and for real charges. The environment is controlled from the **environment selector inside the application in the Payphone Developer portal**, not by connecting different tokens in Brain Studio.
Before running your flow, make sure the environment selected in your Payphone application matches the scenario you are executing:
* For **testing:** select the test environment in the application in the Payphone Developer portal
* For **real charges:** select the production environment in the same application
***
## Next step
Once the integration is connected, continue with:
Configure the payment node and handle transaction states in your flow.