> ## Documentation Index
> Fetch the complete documentation index at: https://docs.jelou.ai/llms.txt
> Use this file to discover all available pages before exploring further.
# Getting credentials
> Create the developer user, configure the application in Payphone, and obtain the Access Token and Store ID to connect the integration in Brain Studio.
## When do you need this guide?
You need it before connecting **Payphone** in Marketplace, when Brain Studio asks you for these two credentials:
* **Access Token**
* **Store ID**
Payphone uses two separate portals during this process:
* **Business Portal**: where you manage users and stores
* **Developer Portal**: where you create the application and obtain the Access Token
The **Access Token** and the **Store ID** are only available after Payphone approves the **company request**. You will not be able to complete the connection in Brain Studio until that approval occurs.
By the end of this guide you will have the **Access Token** and the **Store ID** ready to connect Payphone in Brain Studio.
When installing the integration in Brain Studio you will also need to complete two additional fields that do not come from Payphone:
* **IVA (VAT)** — enter the percentage as an integer (example: `12`)
* **Moneda (Currency)** — must be `USD`
***
## Before you begin
You need:
1. An **active Payphone Business account**
2. At least one **active store** in that account
3. Access to the Payphone developer portal
If you don't have an account yet, you can create one here:
* [Create a Payphone account](https://appstore.payphonetodoesposible.com/registerini)
Portals you will use during this guide:
* [Payphone Business](https://appstore.payphonetodoesposible.com/login)
* [Payphone Developer](https://appdeveloper.payphonetodoesposible.com/login)
***
## Steps to obtain credentials
Enter the **Payphone Business** portal with your merchant account.
From here you will:
* create the developer user
* assign it to the store you will use in the integration
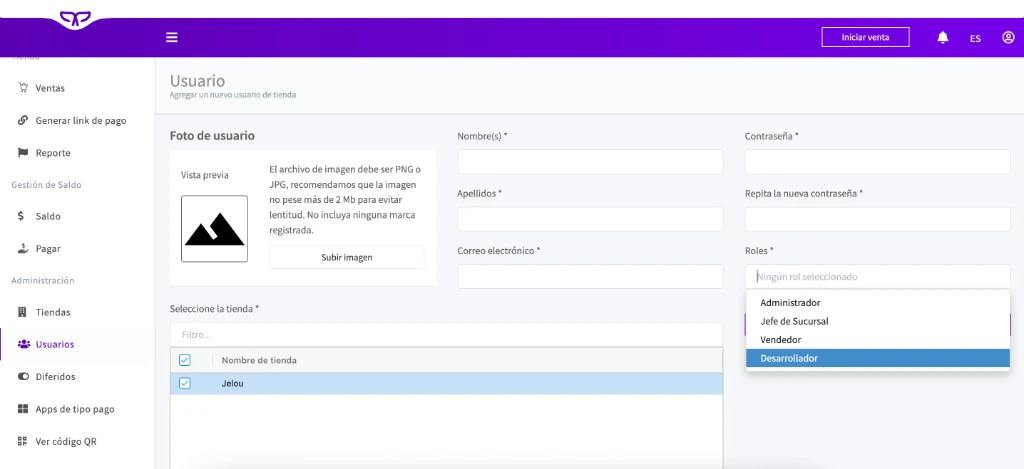
In the Business portal side menu, go to **Administration → Users** and create a new user with a developer profile.
Complete at least:
* **First name**
* **Last name**
* **Email address**
* **Password**
* **Assigned store**
The developer user must be assigned to the correct store. If it is not assigned, you will not be able to operate the integration correctly or obtain the Store ID associated with that store.
 Using the developer user you just created, enter the **Payphone Developer** portal.
Use this link:
* [Log in to the Developer portal](https://appdeveloper.payphonetodoesposible.com/login)
This portal is independent from Payphone Business. You must sign in with the **developer user**, not with the main merchant account.
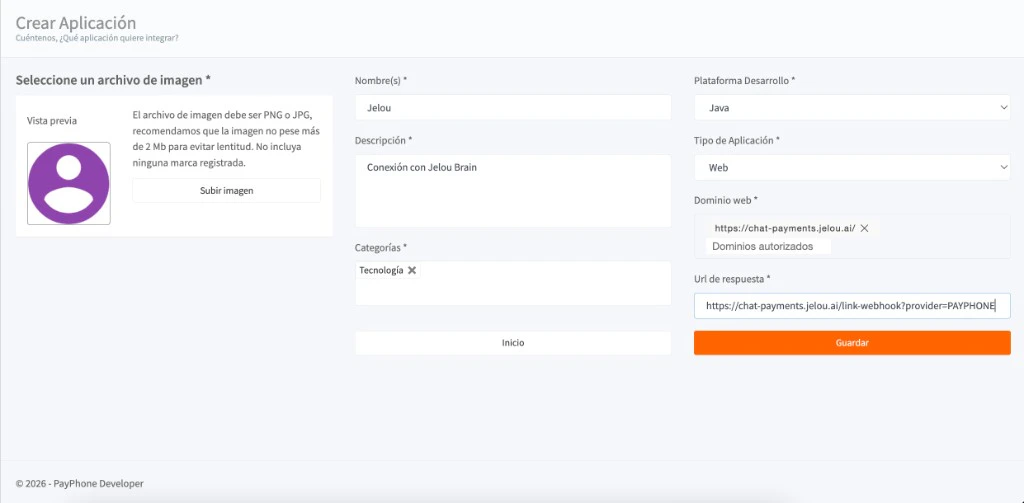
Inside the developer portal, create a new application.
Complete the basic configuration:
* **Application name**
* **Description**
* **Categories**
* **Development platform**: you can select **Java**
* **Application type**: **Web**
Although the development platform field is present, for this integration what matters is that the application type is **Web**.
In the application configuration, enter these values exactly as shown:
| Field | Value |
| ---------------- | --------------------------------------------------------------- |
| **Web domain** | `https://chat-payments.jelou.ai/` |
| **Response URL** | `https://chat-payments.jelou.ai/link-webhook?provider=PAYPHONE` |
These values are required for the Jelou integration. If you configure a different domain or URL, the checkout will not be able to return the payment status correctly to Brain Studio.
Using the developer user you just created, enter the **Payphone Developer** portal.
Use this link:
* [Log in to the Developer portal](https://appdeveloper.payphonetodoesposible.com/login)
This portal is independent from Payphone Business. You must sign in with the **developer user**, not with the main merchant account.
Inside the developer portal, create a new application.
Complete the basic configuration:
* **Application name**
* **Description**
* **Categories**
* **Development platform**: you can select **Java**
* **Application type**: **Web**
Although the development platform field is present, for this integration what matters is that the application type is **Web**.
In the application configuration, enter these values exactly as shown:
| Field | Value |
| ---------------- | --------------------------------------------------------------- |
| **Web domain** | `https://chat-payments.jelou.ai/` |
| **Response URL** | `https://chat-payments.jelou.ai/link-webhook?provider=PAYPHONE` |
These values are required for the Jelou integration. If you configure a different domain or URL, the checkout will not be able to return the payment status correctly to Brain Studio.
 In the developer portal, go to **Solicitud de compañía** (Company Request).
If you don't have a request yet, create a new one and enter:
* **RUC** of the company
* **Reason** for the request
You can use a text like this:
```txt theme={null}
Please assign to integrate payment link through third-party app.
```
In the developer portal, go to **Solicitud de compañía** (Company Request).
If you don't have a request yet, create a new one and enter:
* **RUC** of the company
* **Reason** for the request
You can use a text like this:
```txt theme={null}
Please assign to integrate payment link through third-party app.
```
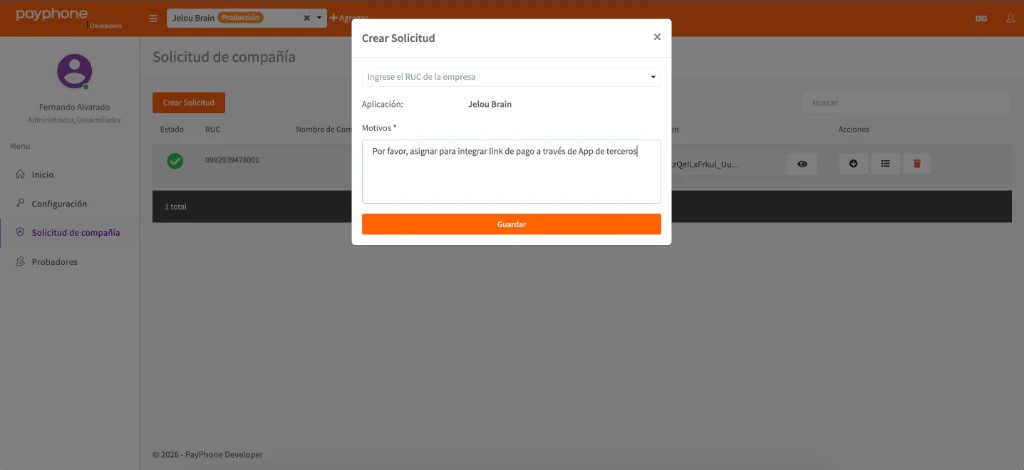 You must wait for this request to be approved before the **Access Token** becomes available. Without approval, you will not be able to complete the connection in Brain Studio.
Once the request is approved, return to the developer portal and open the application you configured.
From there you can copy the **Access Token**.
You must wait for this request to be approved before the **Access Token** becomes available. Without approval, you will not be able to complete the connection in Brain Studio.
Once the request is approved, return to the developer portal and open the application you configured.
From there you can copy the **Access Token**.
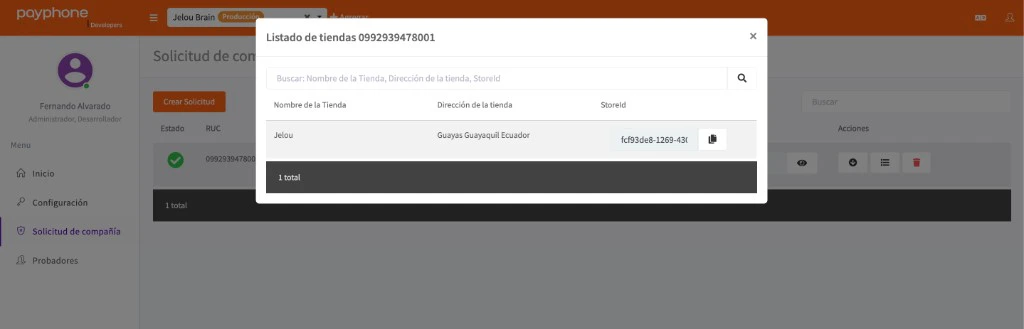
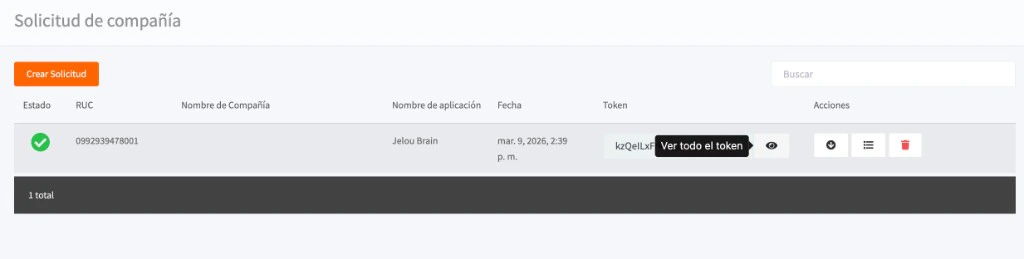 Inside the **Payphone Developer** portal, in the **Solicitud de compañía** (Company Request) section, click the action button of the approved request.
The list of associated stores will open. Copy the **StoreId** of the store you assigned to the developer user.
Inside the **Payphone Developer** portal, in the **Solicitud de compañía** (Company Request) section, click the action button of the approved request.
The list of associated stores will open. Copy the **StoreId** of the store you assigned to the developer user.
 Once you have the **Access Token** and the **Store ID**, you can proceed with the connection in Brain Studio.
***
## Test and production mode
Payphone uses the **same credentials** (Access Token and Store ID) for testing and production.
* You do not need to generate a separate token
* The environment is controlled from the **application configuration in the developer portal**
Inside the Payphone Developer portal, you can switch between **Production** and **Test** using the environment selector in the application.
This change affects how payments are processed, but **does not change the credentials used in Brain Studio**.
Before testing or going to production, make sure the environment selected in Payphone matches the scenario you are validating.
***
## Troubleshooting
If you already submitted the request and still cannot see the Access Token:
* check the request status in the developer portal
* confirm that the RUC and reason were entered correctly
* verify that the application has the correct domain and response URL configured
If approval takes longer than expected, contact Payphone support.
The **Store ID** is obtained from the **Payphone Developer** portal, in the **Solicitud de compañía** (Company Request) section.
Click the action button of the approved request to see the list of associated stores and copy the **StoreId** of the store assigned to the developer user.
Verify that:
* the company request has already been approved
* you copied the full Access Token
* the Store ID corresponds to the correct store
* the developer user is assigned to that store
***
## Best practices
* Do not share the **Access Token** or the **Store ID**
* If you need to rotate the token, do it from the developer portal
* Avoid saving these credentials in public documents or repositories
***
## Related articles
Connect Payphone in Marketplace using the Access Token and Store ID.
Configure the Payphone node and handle payment states inside the flow.
Once you have the **Access Token** and the **Store ID**, you can proceed with the connection in Brain Studio.
***
## Test and production mode
Payphone uses the **same credentials** (Access Token and Store ID) for testing and production.
* You do not need to generate a separate token
* The environment is controlled from the **application configuration in the developer portal**
Inside the Payphone Developer portal, you can switch between **Production** and **Test** using the environment selector in the application.
This change affects how payments are processed, but **does not change the credentials used in Brain Studio**.
Before testing or going to production, make sure the environment selected in Payphone matches the scenario you are validating.
***
## Troubleshooting
If you already submitted the request and still cannot see the Access Token:
* check the request status in the developer portal
* confirm that the RUC and reason were entered correctly
* verify that the application has the correct domain and response URL configured
If approval takes longer than expected, contact Payphone support.
The **Store ID** is obtained from the **Payphone Developer** portal, in the **Solicitud de compañía** (Company Request) section.
Click the action button of the approved request to see the list of associated stores and copy the **StoreId** of the store assigned to the developer user.
Verify that:
* the company request has already been approved
* you copied the full Access Token
* the Store ID corresponds to the correct store
* the developer user is assigned to that store
***
## Best practices
* Do not share the **Access Token** or the **Store ID**
* If you need to rotate the token, do it from the developer portal
* Avoid saving these credentials in public documents or repositories
***
## Related articles
Connect Payphone in Marketplace using the Access Token and Store ID.
Configure the Payphone node and handle payment states inside the flow.