> ## Documentation Index
> Fetch the complete documentation index at: https://docs.jelou.ai/llms.txt
> Use this file to discover all available pages before exploring further.
# Usage and configuration
> Add the Payphone node to your Canvas flow and configure its inputs and outputs.
Once the integration is connected in Marketplace with the **Access Token**, the **Store ID**, the **VAT**, and the **Currency**, the **Payphone** node becomes available in your workspace to use inside your Canvas flows.
***
## Add the node to the Canvas
In the left side panel of Brain Studio, open the **Marketplace** folder.
If the integration is correctly connected, you will see **Payphone** listed as an available provider.
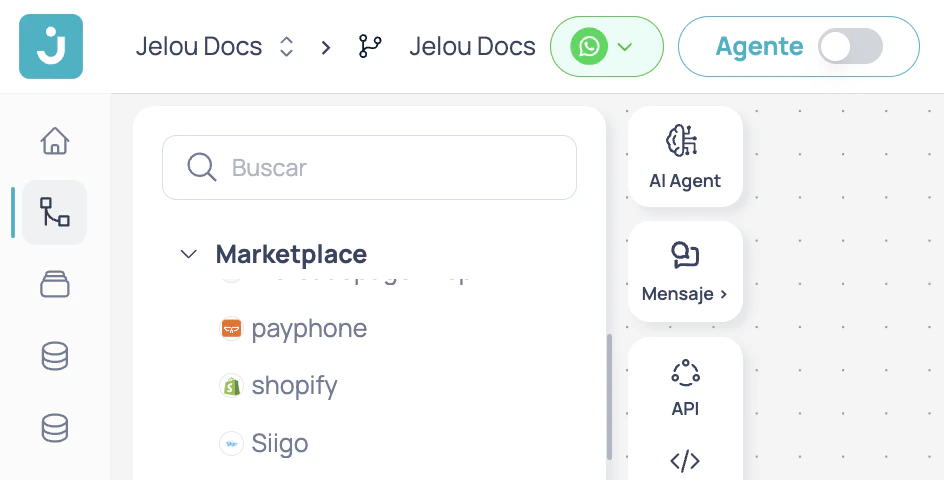 Drag **Payphone** from the side panel into your flow in the Canvas.
When you drop it, the node block will be created with its available outputs.
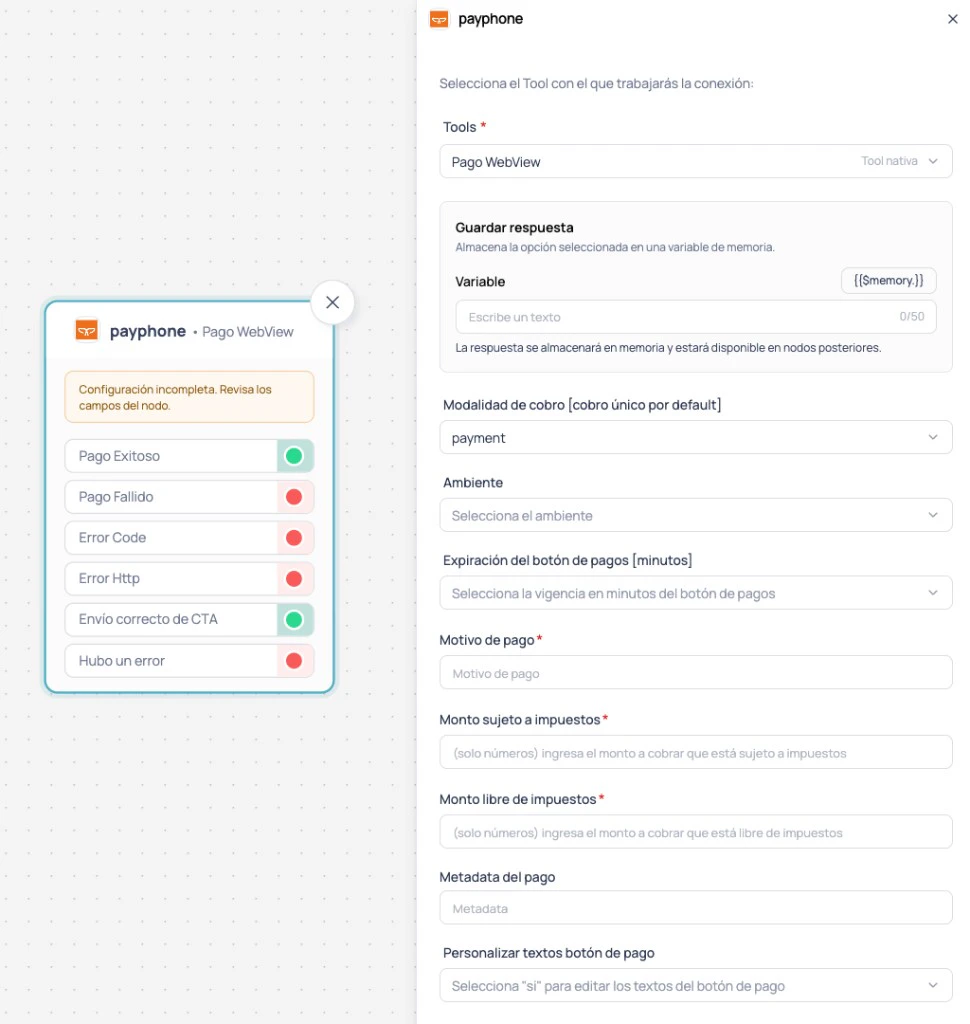
Select the node in the Canvas to open its configuration panel on the right side.
From there you can complete the **inputs** and review the available **outputs**.
Drag **Payphone** from the side panel into your flow in the Canvas.
When you drop it, the node block will be created with its available outputs.
Select the node in the Canvas to open its configuration panel on the right side.
From there you can complete the **inputs** and review the available **outputs**.
 ***
## Configure the node
Defines the name of the variable where Brain Studio will store the **complete JSON** response from the node.
Useful if you want to use the response later (logs, validations, traceability, or flow decisions).
Defines the charge mode.
For this integration, the default value is `payment`.
Defines the environment in which the charge will be executed.
**Available values:** `DEV`, `PROD`
The value configured here must match the environment selected in the application inside **Payphone Developer**.
If you configure `DEV` in the node but the application is in production, or vice versa, the flow may fail or produce inconsistent results.
Defines how long the payment button remains valid from the moment it is sent to the user.
**Available values:** `10`, `20`, `30`, `60`
Descriptive text for the charge.
Examples:
* order number
* product or service name
* internal payment reference
Enter the amount to charge that is subject to taxes.
Accepts numeric values in dollars, including decimals when applicable.
Enter the amount to charge that is exempt from taxes.
Accepts numeric values in dollars, including decimals when applicable.
Additional information for traceability or internal reference.
You can use this field to correlate the payment with an order, a quote, or a reconciliation operation.
If you select **Yes**, additional fields are enabled to customize the message that accompanies the payment button.
**Fields enabled when activated:**
* `Header` (required)
* `Body` (required)
* `Footer` (required)
When this option is active, you can fully modify the message the user will see before opening the checkout.
Title of the message that accompanies the payment button.
Main text of the message that accompanies the payment button.
Closing or disclaimer text of the message that accompanies the payment button.
Triggered when Payphone confirms that the transaction was processed correctly.
This is the official payment confirmation point within the flow.
Usage examples:
* issue an invoice
* activate a subscription
* release a product or service
* update the status of an order in an external system
Triggered when the transaction was rejected or declined.
Recommendations:
* inform the user
* allow a retry
* redirect to another payment method
Triggered when Payphone returns an internal error code during the creation or processing of the payment.
Triggered when a communication error with the provider occurs, for example a timeout, a network issue, or an invalid response.
Triggered when the payment button was sent correctly in the conversation.
Indicates that the message with the button was successfully displayed in WhatsApp. From this output you can connect a wait node or a message telling the user they can now complete the payment.
***
## Important considerations
If you configure the node in `DEV`, the application in **Payphone Developer** must also be in **Test**.
If you configure the node in `PROD`, the application in **Payphone Developer** must be in **Production**.
When a payment is initially pending, the agent informs the user of that status through the corresponding message.
If Payphone later updates the result, the flow continues through the corresponding final output:
* **Successful Payment**
* **Failed Payment**
The pending state is not exposed as an independent output of the node.
***
## Configure the node
Defines the name of the variable where Brain Studio will store the **complete JSON** response from the node.
Useful if you want to use the response later (logs, validations, traceability, or flow decisions).
Defines the charge mode.
For this integration, the default value is `payment`.
Defines the environment in which the charge will be executed.
**Available values:** `DEV`, `PROD`
The value configured here must match the environment selected in the application inside **Payphone Developer**.
If you configure `DEV` in the node but the application is in production, or vice versa, the flow may fail or produce inconsistent results.
Defines how long the payment button remains valid from the moment it is sent to the user.
**Available values:** `10`, `20`, `30`, `60`
Descriptive text for the charge.
Examples:
* order number
* product or service name
* internal payment reference
Enter the amount to charge that is subject to taxes.
Accepts numeric values in dollars, including decimals when applicable.
Enter the amount to charge that is exempt from taxes.
Accepts numeric values in dollars, including decimals when applicable.
Additional information for traceability or internal reference.
You can use this field to correlate the payment with an order, a quote, or a reconciliation operation.
If you select **Yes**, additional fields are enabled to customize the message that accompanies the payment button.
**Fields enabled when activated:**
* `Header` (required)
* `Body` (required)
* `Footer` (required)
When this option is active, you can fully modify the message the user will see before opening the checkout.
Title of the message that accompanies the payment button.
Main text of the message that accompanies the payment button.
Closing or disclaimer text of the message that accompanies the payment button.
Triggered when Payphone confirms that the transaction was processed correctly.
This is the official payment confirmation point within the flow.
Usage examples:
* issue an invoice
* activate a subscription
* release a product or service
* update the status of an order in an external system
Triggered when the transaction was rejected or declined.
Recommendations:
* inform the user
* allow a retry
* redirect to another payment method
Triggered when Payphone returns an internal error code during the creation or processing of the payment.
Triggered when a communication error with the provider occurs, for example a timeout, a network issue, or an invalid response.
Triggered when the payment button was sent correctly in the conversation.
Indicates that the message with the button was successfully displayed in WhatsApp. From this output you can connect a wait node or a message telling the user they can now complete the payment.
***
## Important considerations
If you configure the node in `DEV`, the application in **Payphone Developer** must also be in **Test**.
If you configure the node in `PROD`, the application in **Payphone Developer** must be in **Production**.
When a payment is initially pending, the agent informs the user of that status through the corresponding message.
If Payphone later updates the result, the flow continues through the corresponding final output:
* **Successful Payment**
* **Failed Payment**
The pending state is not exposed as an independent output of the node.