> ## Documentation Index
> Fetch the complete documentation index at: https://docs.jelou.ai/llms.txt
> Use this file to discover all available pages before exploring further.
# Connect in Brain Studio
> Install Wompi in Brain Studio, configure its credentials, and use the payment node in your flows.
Connect Wompi to enable the provider in your workspace and make the payment node available in Brain Studio with an **embedded WebView** experience.
***
## Before you begin
Make sure you have:
* An **active Wompi account**
* Wompi's **public key**
* Wompi's **private key**
* Wompi's **events secret**
* Wompi's **integrity secret**
* The **VAT percentage** that the operation will apply
* The correct credentials for your environment: **Sandbox** or **Production**
To obtain or review credentials, follow [Obtaining credentials](/guides/integraciones/pagos/proveedores/wompi/obtener-credenciales).
For the checkout to open inside WhatsApp as an embedded WebView, the account must be **WhatsApp Business verified**.
If it is not verified, the checkout will open in the device's external browser.
***
## Ways to start the installation
You can start the Wompi installation from different points in Brain Studio. All paths use the same provider configuration.
Ask Jelou Agent to add payments with Wompi while you build or adjust a flow.
Examples:
* "Add payments with Wompi to this flow"
* "I need to charge with Wompi for this case"
* "I want to process payments with Wompi"
Jelou Agent detects Wompi as an available provider from Marketplace and triggers the assisted installation flow.
Open **Marketplace**, search for **Wompi** in **Payments & Processing** or use the search bar.
Then press **Connect** or **Install** to start the installation flow.
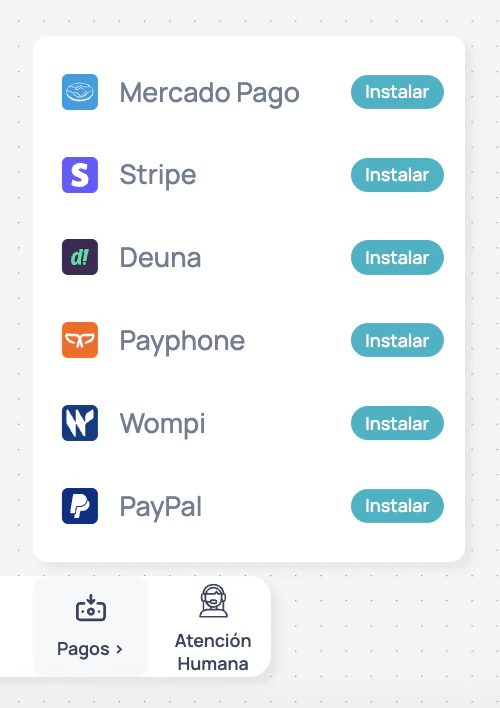
From the **Canvas** toolbar, open the **Payments** node.
Inside the **Payments** node, you can see **Wompi** as an available provider. If it is not connected yet, press **Install** to start the same connection flow used by Marketplace, Jelou Agent, and templates.
 Some Brain Studio templates may include a payment configuration.
While creating the template, Brain Studio may ask you to choose a payment provider and connect Wompi as part of the configuration flow.
All installation paths use the same provider configuration. What changes is where you start the flow.
***
## Common installation flow
Regardless of the entry point, the shared process is the following.
The first modal asks you to choose **Try with Jelou** or **Connect my account**.
* **Try with Jelou:** installs the gateway in [test mode](/guides/integraciones/pagos/modo-prueba), without an account or your own credentials.
* **Connect my account:** uses your test or production credentials. Continue with the steps on this page.
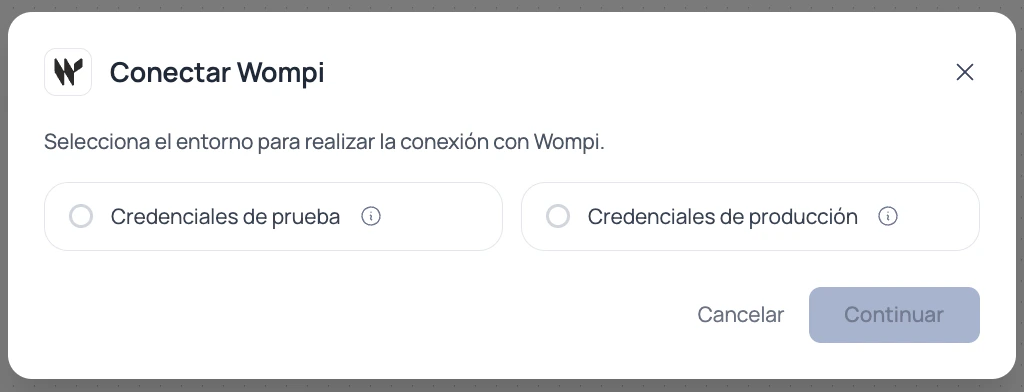
Brain Studio will ask you to select whether you will connect Wompi with **test credentials** or **production credentials**.
In Wompi, these credentials correspond to **Sandbox** or **Production** keys.
Some Brain Studio templates may include a payment configuration.
While creating the template, Brain Studio may ask you to choose a payment provider and connect Wompi as part of the configuration flow.
All installation paths use the same provider configuration. What changes is where you start the flow.
***
## Common installation flow
Regardless of the entry point, the shared process is the following.
The first modal asks you to choose **Try with Jelou** or **Connect my account**.
* **Try with Jelou:** installs the gateway in [test mode](/guides/integraciones/pagos/modo-prueba), without an account or your own credentials.
* **Connect my account:** uses your test or production credentials. Continue with the steps on this page.
Brain Studio will ask you to select whether you will connect Wompi with **test credentials** or **production credentials**.
In Wompi, these credentials correspond to **Sandbox** or **Production** keys.
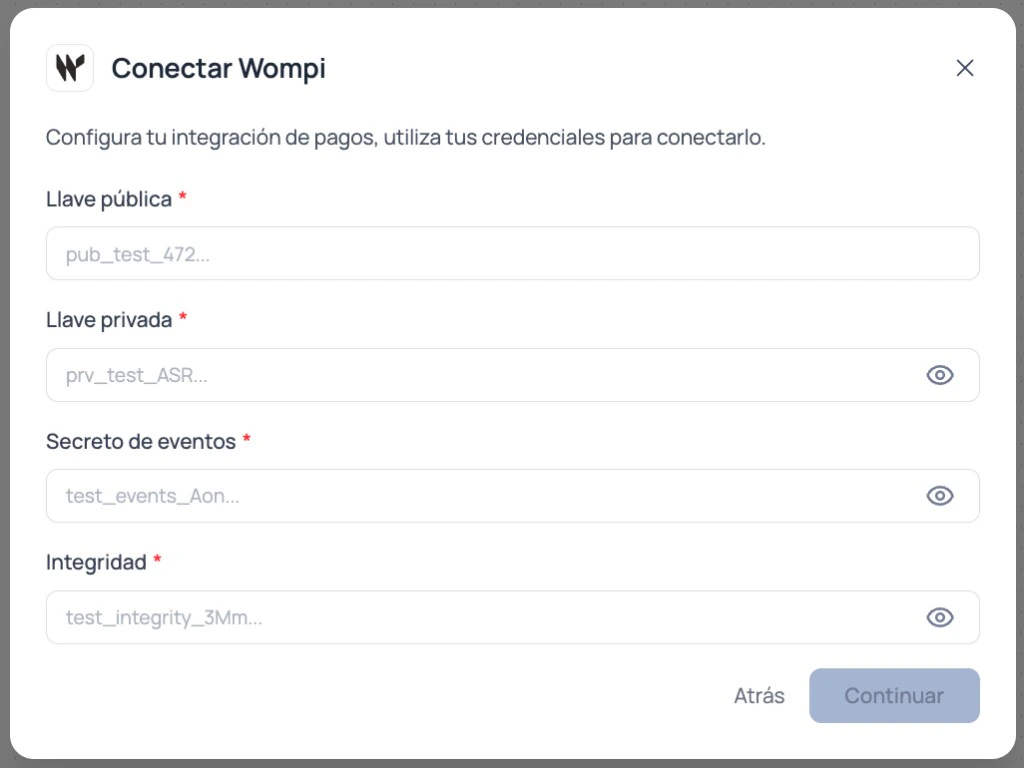
 Complete the modal with:
* **Public key**
* **Private key**
* **Events secret**
* **Integrity**
Complete the modal with:
* **Public key**
* **Private key**
* **Events secret**
* **Integrity**
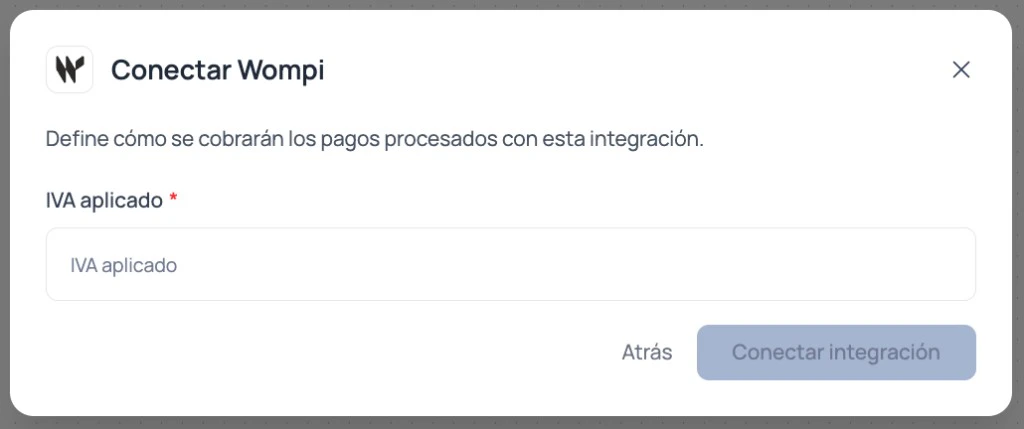
 Define the **applied VAT** that the integration will use during the payment operation.
 Confirm the connection. Brain Studio will save the configuration and make **Wompi** available in your workspace.
After installing, you can use Wompi from the **Payments** node in **Canvas**, whether the flow started from Jelou Agent, Marketplace, the Payments node, or a template.
***
## Sandbox vs Production credentials
Wompi separates credentials by environment:
* **Sandbox:** credentials for testing without real money.
* **Production:** credentials for processing real payments.
Keys and secrets have different prefixes depending on the environment:
| Environment | Public key | Private key | Events secret | Integrity secret |
| ----------- | -------------- | -------------- | ----------------- | -------------------- |
| Sandbox | `pub_test_...` | `prv_test_...` | `test_events_...` | `test_integrity_...` |
| Production | `pub_prod_...` | `prv_prod_...` | `prod_events_...` | `prod_integrity_...` |
Sandbox credentials do not process real payments. Before going live, you must connect Wompi using production credentials.
Always use credentials from the same environment. Do not mix Sandbox keys or secrets with Production keys or secrets.
***
## Switch to production
If you installed Wompi with **development/Sandbox** credentials, you can use the payment node for testing. To operate with real payments:
You can start the change from:
* The **advanced sidebar** of the Wompi node in **Canvas**
* The **Wompi** page in **Marketplace**
In both cases, the same modal opens to switch the integration to production.
Confirm the connection. Brain Studio will save the configuration and make **Wompi** available in your workspace.
After installing, you can use Wompi from the **Payments** node in **Canvas**, whether the flow started from Jelou Agent, Marketplace, the Payments node, or a template.
***
## Sandbox vs Production credentials
Wompi separates credentials by environment:
* **Sandbox:** credentials for testing without real money.
* **Production:** credentials for processing real payments.
Keys and secrets have different prefixes depending on the environment:
| Environment | Public key | Private key | Events secret | Integrity secret |
| ----------- | -------------- | -------------- | ----------------- | -------------------- |
| Sandbox | `pub_test_...` | `prv_test_...` | `test_events_...` | `test_integrity_...` |
| Production | `pub_prod_...` | `prv_prod_...` | `prod_events_...` | `prod_integrity_...` |
Sandbox credentials do not process real payments. Before going live, you must connect Wompi using production credentials.
Always use credentials from the same environment. Do not mix Sandbox keys or secrets with Production keys or secrets.
***
## Switch to production
If you installed Wompi with **development/Sandbox** credentials, you can use the payment node for testing. To operate with real payments:
You can start the change from:
* The **advanced sidebar** of the Wompi node in **Canvas**
* The **Wompi** page in **Marketplace**
In both cases, the same modal opens to switch the integration to production.
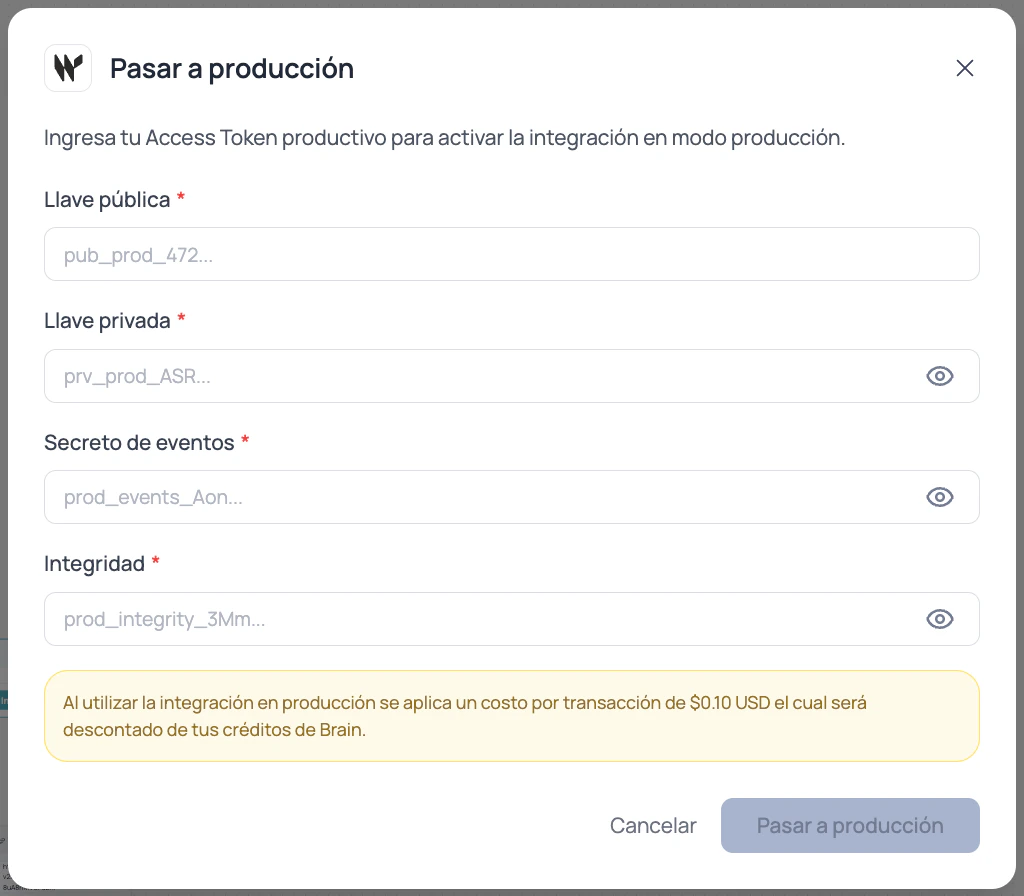 Enter the Production credentials:
* **Public key**
* **Private key**
* **Events secret**
* **Integrity**
Review and confirm the **applied VAT** that the integration will use in production.
Confirm the action. From that moment on, the integration operates with production credentials.
***
## Change credentials
* To switch from **development/Sandbox** to **Production** with the same installation, use the **Switch to production** section.
* To **rotate credentials** or **replace the configuration**, disconnect Wompi and reinstall it following the **common installation flow** on this page.
***
## Next step
Once the integration is connected, continue with:
Configure the payment node and continue the flow based on the WebView payment result.
Enter the Production credentials:
* **Public key**
* **Private key**
* **Events secret**
* **Integrity**
Review and confirm the **applied VAT** that the integration will use in production.
Confirm the action. From that moment on, the integration operates with production credentials.
***
## Change credentials
* To switch from **development/Sandbox** to **Production** with the same installation, use the **Switch to production** section.
* To **rotate credentials** or **replace the configuration**, disconnect Wompi and reinstall it following the **common installation flow** on this page.
***
## Next step
Once the integration is connected, continue with:
Configure the payment node and continue the flow based on the WebView payment result.