> ## Documentation Index
> Fetch the complete documentation index at: https://docs.jelou.ai/llms.txt
> Use this file to discover all available pages before exploring further.
# AI Agent
> Intelligent agent node for autonomous conversations powered by AI
The **AI Agent** node is the central component for creating autonomous conversations powered by artificial intelligence in Brain Studio. It allows you to configure an agent that processes user messages, queries knowledge bases, executes tools, and generates contextual responses autonomously.
The configuration panel is organized into **four tabs**:
1. **General** — Model and instructions
2. **Tools** — Native, custom, and MCP tools
3. **Context** — Initial message, conversation history, and external knowledge
4. **Advanced** — Save response, fallback model, security, expiration, DLP, and more
***
## General
The General tab contains the essential agent configuration.
### Model
Select the language model (LLM) the agent will use to generate responses. Consider latency, cost, and task complexity before making your selection.
Available models include:
**OpenAI**
* **GPT 4.1 Mini**: a simplified variant of GPT-4.1 optimized for fast responses with lower resource demands.
* **GPT 4.1**: a refined evolution of GPT-4, with better understanding, reasoning, and accuracy.
* **GPT 4-o (Azure)**: a GPT 4-o version hosted on Azure, focused on stability and performance in enterprise environments. Supports vision.
* **GPT 4-o Mini**: a faster, lighter version of GPT 4-o, oriented toward speed-first use cases. Supports vision.
* **GPT 5.2**: OpenAI's latest-generation model with advanced reasoning, larger context, and high precision on complex tasks.
**Anthropic (Claude)**
* **Claude 3.5 Sonnet**: excellent for complex tasks requiring more elaborate text and extensive contexts.
* **Claude 4 Sonnet**: high reasoning and analysis capability.
* **Claude 4.6 Sonnet**: Claude's latest generation, with improved reasoning and greater accuracy.
**Google (Gemini)**
* **Gemini 2.5 Flash**: fast processing with multimodal capabilities. Supports vision.
* **Gemini 2.5 Pro**: advanced reasoning with multimodal capabilities. Supports vision.
* **Gemini 3 Flash**: latest generation of Gemini with optimized multimodal processing. Supports vision.
**Meta (Llama)**
* **Llama 4 Scout**: agile, low-latency model, ideal for quick ideas and lightweight interactions.
* **Llama 4 Maverick**: high-performance model designed for demanding reasoning and multi-step problem solving.
Models marked with **"Supports vision"** can process images uploaded in the Context tab. If you need the agent to interpret images as part of its context, select one of these models.
You can also add **custom models** using the "Add model" button. This allows you to connect your own or third-party models that are not in the predefined list.
### Instructions
Define the base behavior of the agent through a system prompt. The instructions determine what role it adopts, what tone it uses, and what steps it follows before responding. Make sure they are concise, concrete, and free of ambiguity.
Instructions support **variable interpolation** using the `{{$variable}}` syntax, which allows you to dynamically customize behavior based on the conversation context.
The field includes a character counter that adjusts based on the selected model, since each model has a different maximum limit.
[See prompting recommendations and examples](/guides/agentes-ia/prompting)
***
## Tools
The Tools tab allows you to add tools that extend the agent's capabilities beyond text generation. The agent autonomously decides when to invoke each tool based on the conversation context.
To add tools, click the **"+ Add tools"** button and select the tools you need.
### Native tools
These are predefined tools built into the platform. They are marked with the text "(Native)" in the selector:
| Tool | Description |
| :--------------------------- | :----------------------------------------------------------- |
| **Product search** | Queries the product catalog configured in the bot |
| **Send interactive message** | Renders buttons, lists, and quick replies to the user |
| **Send Call to Action** | Sends CTA buttons with URL, with WebView support |
| **Current date and time** | Gets the current date and time for a specific timezone |
| **Day of the week** | Calculates the day corresponding to a date |
| **Transfer to agent** | Transfers the conversation to a human agent or support queue |
[See detailed documentation on native tools](/guides/agentes-ia/tools-nativas)
### Custom tools
Tools created by the user from Brain Studio. When adding a custom tool you can configure:
* **Name** and **description** that the model uses to decide when to invoke it.
* Custom **input parameters**.
* **Action on execution**: behavior after the tool has been executed.
[See how to create your first tool](/guides/tools/tu-primer-tool)
### MCP Tools (Model Context Protocol)
Integrate external services using the MCP standard. There are two types of integration:
#### Native MCP apps
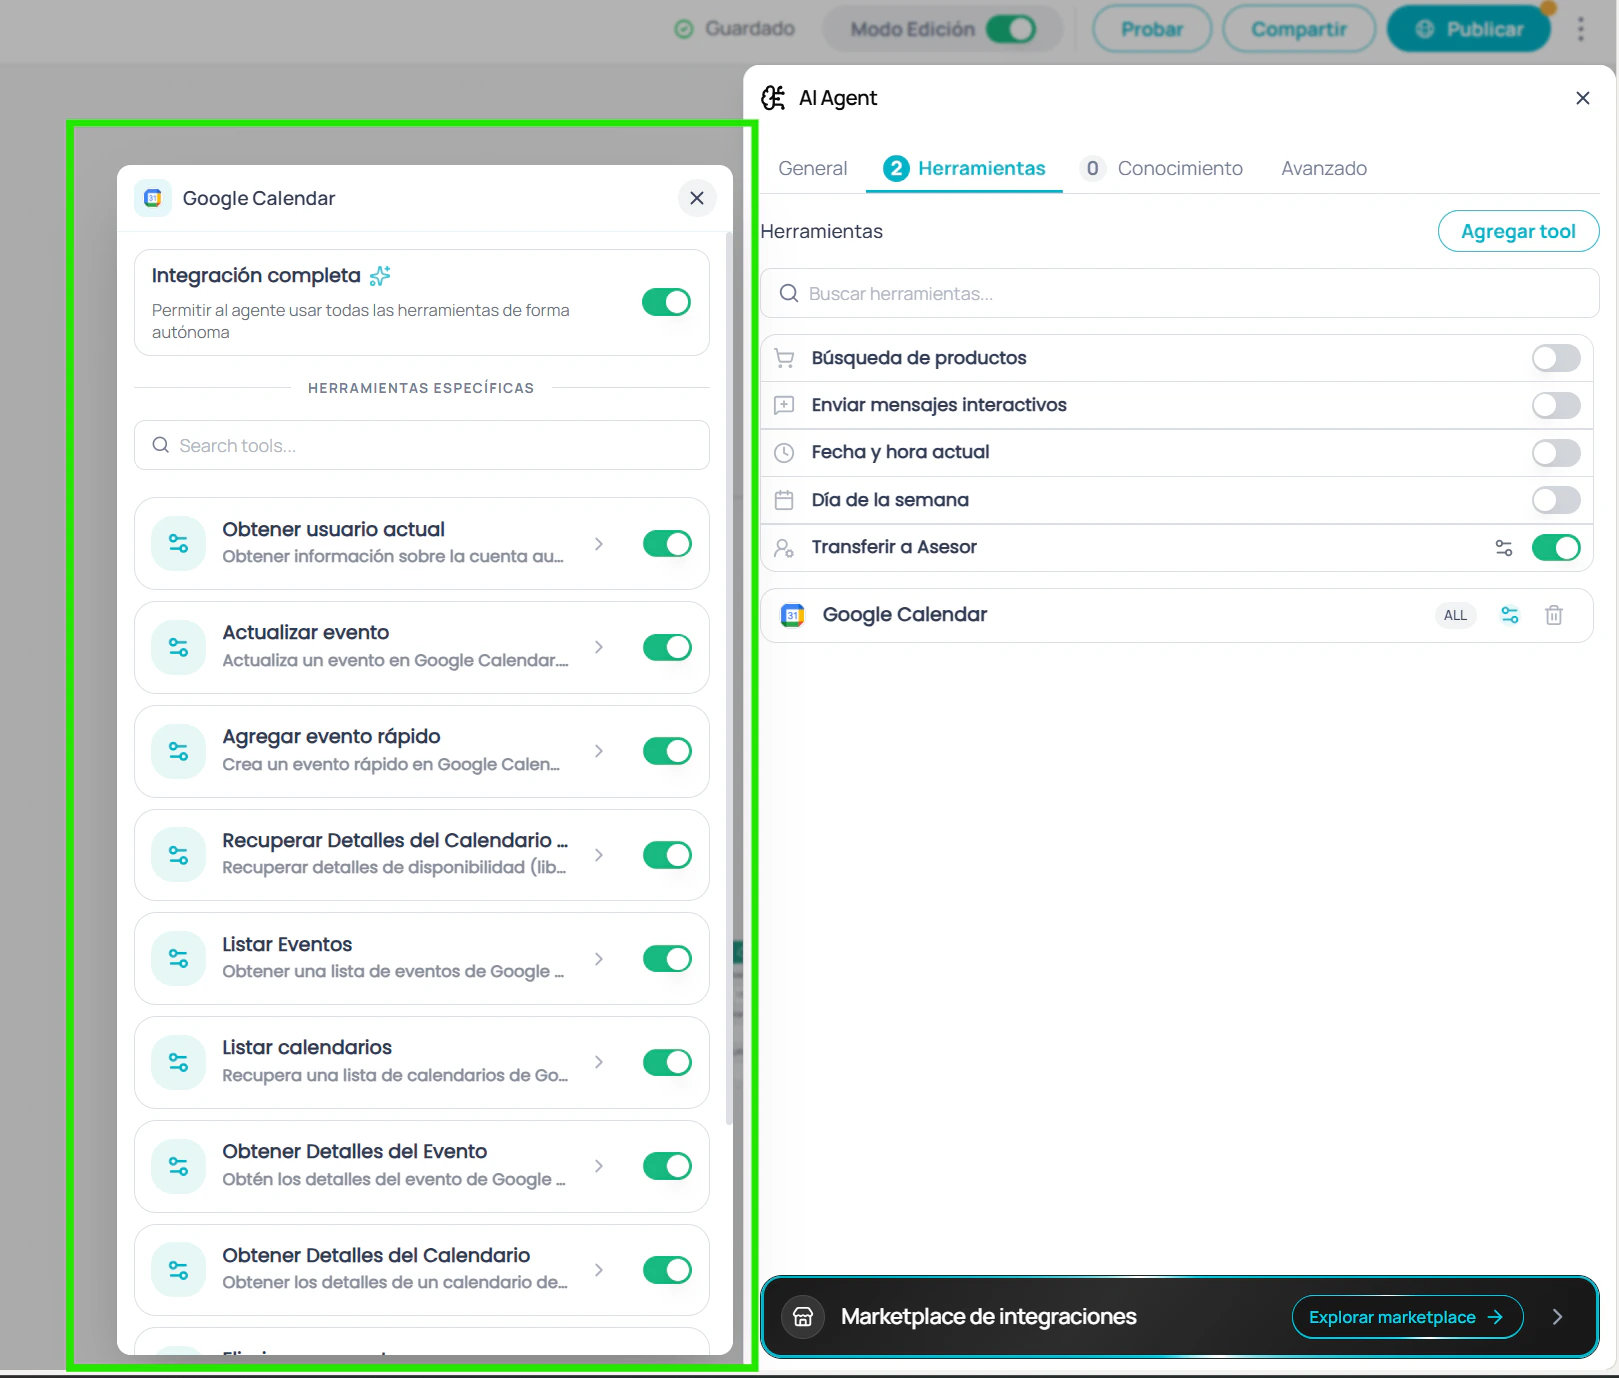
Applications from the Jelou marketplace that are installed directly on the platform. Each MCP app can be configured in two modes:
* **Integration mode**: enables all of the app's tools at once.
* **Granular mode**: allows you to select individual tools from the app and configure each one separately.
 #### Default parameters
In granular mode, each individual tool allows you to configure **default parameters**. Click on a tool to open its detail view, where you can:
* View all tool parameters with their type, description, and whether they are required.
* **Set default values** that the agent will use on every invocation, instead of letting the AI decide.
* Use the **variable selector** to inject dynamic values from the flow (e.g., `{{$context.email}}`).
* Toggle between **form view** and **JSON editor** to edit all parameters at once.
* Search parameters by name when the tool has many.
#### Default parameters
In granular mode, each individual tool allows you to configure **default parameters**. Click on a tool to open its detail view, where you can:
* View all tool parameters with their type, description, and whether they are required.
* **Set default values** that the agent will use on every invocation, instead of letting the AI decide.
* Use the **variable selector** to inject dynamic values from the flow (e.g., `{{$context.email}}`).
* Toggle between **form view** and **JSON editor** to edit all parameters at once.
* Search parameters by name when the tool has many.
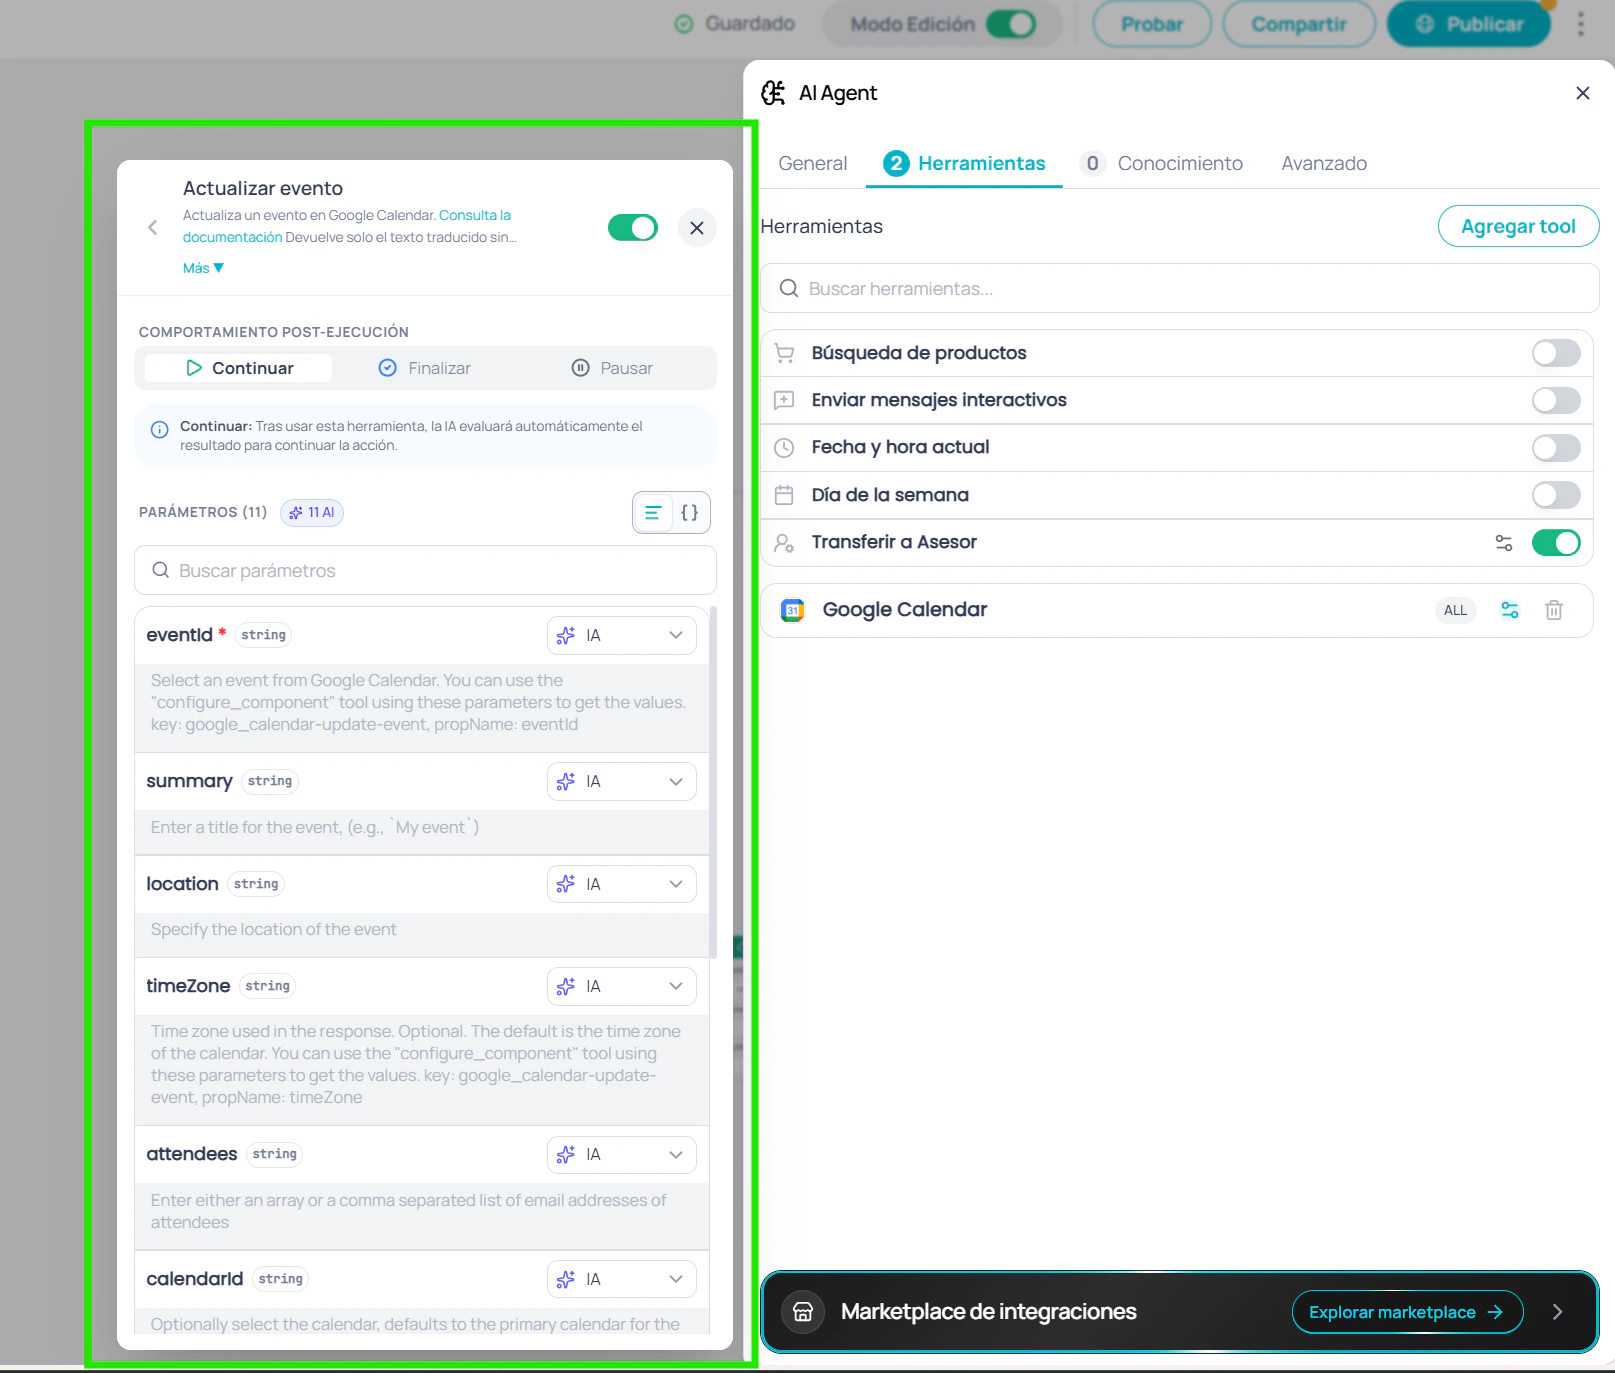 Each parameter displays an indicator:
| Indicator | Meaning |
| :--------- | :------------------------------------------------------------ |
| **Manual** | Has a value set by you — the agent will always use that value |
| **Auto** | No value set — the agent decides the value on each invocation |
If you leave all parameters as "Auto", the behavior is identical to before: the agent decides all values based on the conversation context.
#### External MCP servers
Connections to your own MCP servers via custom URL.
Enter the URL of your MCP server endpoint.
Configure custom headers (name and value) for authentication or other metadata.
Once connected, select the available tools you want to enable.
### Tool actions
Each tool (native, custom, or MCP) can configure an action that runs after it is invoked:
| Action | Behavior |
| :-------------------- | :----------------------------------------------------- |
| **None** | The agent continues the conversation normally |
| **End function** | The workflow execution ends after using the tool |
| **Pause interaction** | The conversation pauses until it is resumed externally |
***
## Context
The Context tab centralizes the configuration of the agent's input context: how each conversation starts, how many previous messages it remembers, and what knowledge sources it consults to generate its responses.
### Initial message
Defines the text the agent receives as the first user turn when the node begins executing. This setting determines what information the agent starts with to generate its first response.
| Option | Behavior | When to use |
| :------------------------ | :------------------------------------------------------------------------------------------ | :--------------------------------------------------------------------------------------------------------------------- |
| **Pass the last message** | The agent receives the last message in the conversation as the initial input | Most cases: customer service, technical support, general queries |
| **No user message** | No user turn is sent to the model; the agent responds based only on its system instructions | When there is no relevant user message to pass to the agent (HSM campaigns, automated workflows, post-data collection) |
| **Custom** | Shows a text field with a variable selector to define a custom value | When you need to combine variables or send specific context to the agent |
**Pass the last message** is the default and recommended option for most cases. The agent automatically receives what the user wrote (internally equivalent to `{{$message.text}}`), enabling a natural conversational experience.
#### Use case examples
**`Pass the last message`** — Customer service
A user writes "What are the business hours?" and the agent receives it directly as input, generating a response based on its knowledge base.
**`No user message`** — When there is no real user query
Use this option when the last available message does not represent a real user query. Common scenarios:
* **Post-HSM campaign**: the user responded to a WhatsApp template by tapping a button like "Yes, I'm interested". That payload is not a query — the agent should start from its instructions and the flow's context.
* **Automated workflows**: the flow was triggered by a webhook, scheduler, or external API. There is no user message because no user wrote anything.
* **Post-data collection**: previous Input nodes already collected name, order number, etc. The last message is a data point (e.g., `"ORD-12345"`), not a question. The agent should respond based on the information already stored in memory.
In this mode, the agent generates its first response based solely on its system instructions. If you need the agent to greet the user, configure it in the agent's instructions.
**`Custom`** — Tailored context with variables
Allows you to build an input message by combining flow variables. For example, to pass context information to the agent:
```
Product: {{$context.product_name}}. Query: {{$message.text}}
```
This is useful when the agent needs additional context beyond the user's message, such as data collected in previous nodes of the flow.
When selecting **Custom**, the field supports variable interpolation with the `{{$variable}}` syntax and has a 100-character limit. Use the variable selector to explore the available variables in your flow.
### Remember previous messages
When enabled, the agent includes as context the last N messages of the conversation each time it starts. This allows maintaining conversational coherence when the user resumes a session after an interval.
Activate the **Remember previous messages** toggle.
Enter how many previous messages the agent should remember. The valid range is **1 to 50 messages**.
Use a low value (5–10 messages) for transactional conversations and a higher value for technical support where the full history may be relevant.
### Upload block
The unified upload block accepts documents and images in the same interaction. You can add files in three ways:
* **Drag and drop** files directly onto the block
* **Click** on the block to open the file selector
* **Paste a URL** in the link field at the bottom of the block (supports the same document and image formats listed below)
| Type | Supported formats | Maximum size |
| :------------ | :---------------------------------------------- | :------------- |
| **Documents** | `.pdf`, `.xlsx`, `.md`, `.txt`, `.json`, `.csv` | 2 MB per file |
| **Images** | `.jpg`, `.jpeg`, `.png` | 10 MB per file |
In addition to `.pdf` and `.csv`, you can upload `.xlsx`, `.md`, `.txt`, and `.json` files as knowledge sources.
Documents are processed one at a time. If you select or drag multiple documents simultaneously, only the first one will be processed and you will receive a notice to upload the remaining ones individually. Images, on the other hand, are processed in batch.
### Documents
When you upload a document, a panel opens where you define its **name** (maximum 30 characters) and an optional **description** that helps the agent understand the file's content. Once uploaded, you can edit its metadata or delete it from the list.
### Images
Images are uploaded directly without additional steps and appear as thumbnails below the upload block. You can upload up to **3 images** per agent.
* Click a thumbnail to view it in full screen
* Hover over a thumbnail to see the delete button
Images require a model with **multimodal capabilities** (marked with "Supports vision" in the [model list](#model)). If the selected model does not support vision, you will see a warning banner and the agent will not process images during the conversation.
### Datastores
Connect Datum databases so the agent can query structured information in real time:
* Select the datastore to connect
* Configure the allowed operations on the database
It is recommended to always load documents in the Context tab to anchor the agent's responses to your business's official documentation. Assign clear descriptions to each uploaded file to maximize effectiveness. The model will prioritize information from your files and datastores over its general knowledge, drastically reducing the risk of hallucinations.
### External context
Allows resuming this node from an external system via the resume API. Useful for workflows that require external asynchronous processing, such as validations, payments, or approvals.
Activate the **Add external context** toggle to expand the configuration.
Copy the endpoint URL that your external system will need to call:
```
POST https://gateway.jelou.ai/workflows/v1/skills/resume
```
Your external system must send the following request:
**Headers**
```json theme={null}
{
"x-api-key": "Your API key",
"Content-Type": "application/json"
}
```
**Payload**
```json theme={null}
{
"executionId": "{{$context.executionId}}",
"message": "string (optional)",
"pauseInteraction": false
}
```
The `executionId` is available as `{{$context.executionId}}` within the flow and is valid for 24 hours.
***
## Advanced
The Advanced tab contains additional settings for finer control over agent behavior.
### Save response
Allows you to store the agent's last response in a variable for use in subsequent nodes of the flow.
Activate the corresponding toggle.
Enter the name of the variable where the response will be stored (for example: `ai_agent_response`).
The variable will be available as `{{$context.ai_agent_response}}` in subsequent nodes of the flow.
### Fallback model
Select an alternative model that will be used automatically if the primary model fails or is unavailable.
The fallback model cannot be the same as the primary model.
### Processing options
Independent options to enable additional capabilities for messages the user sends during the conversation:
| Option | Description |
| :------------------------------ | :--------------------------------------------------------------------------------------------------------------------------------- |
| **PDF support** | Allows the agent to read and process PDF documents sent by the user during the conversation (text only, not images inside the PDF) |
| **Read image URLs** | Enables the agent to process images that the user sends as a URL with descriptive text during the conversation |
| **Quick Reply Payload support** | Allows the agent to interpret the payload of quick replies from interactive messages |
These options apply to files that the **end user** sends during the conversation. Images and documents you configure as agent context are managed from the **Context** tab.
### Multi-message response
Splits the agent's response into separate bubbles when it contains paragraph breaks (`\n\n`), media URLs, or lists. Image, video, audio, or document URLs are sent as independent media bubbles according to the channel, while numbered lists are kept together.
Each parameter displays an indicator:
| Indicator | Meaning |
| :--------- | :------------------------------------------------------------ |
| **Manual** | Has a value set by you — the agent will always use that value |
| **Auto** | No value set — the agent decides the value on each invocation |
If you leave all parameters as "Auto", the behavior is identical to before: the agent decides all values based on the conversation context.
#### External MCP servers
Connections to your own MCP servers via custom URL.
Enter the URL of your MCP server endpoint.
Configure custom headers (name and value) for authentication or other metadata.
Once connected, select the available tools you want to enable.
### Tool actions
Each tool (native, custom, or MCP) can configure an action that runs after it is invoked:
| Action | Behavior |
| :-------------------- | :----------------------------------------------------- |
| **None** | The agent continues the conversation normally |
| **End function** | The workflow execution ends after using the tool |
| **Pause interaction** | The conversation pauses until it is resumed externally |
***
## Context
The Context tab centralizes the configuration of the agent's input context: how each conversation starts, how many previous messages it remembers, and what knowledge sources it consults to generate its responses.
### Initial message
Defines the text the agent receives as the first user turn when the node begins executing. This setting determines what information the agent starts with to generate its first response.
| Option | Behavior | When to use |
| :------------------------ | :------------------------------------------------------------------------------------------ | :--------------------------------------------------------------------------------------------------------------------- |
| **Pass the last message** | The agent receives the last message in the conversation as the initial input | Most cases: customer service, technical support, general queries |
| **No user message** | No user turn is sent to the model; the agent responds based only on its system instructions | When there is no relevant user message to pass to the agent (HSM campaigns, automated workflows, post-data collection) |
| **Custom** | Shows a text field with a variable selector to define a custom value | When you need to combine variables or send specific context to the agent |
**Pass the last message** is the default and recommended option for most cases. The agent automatically receives what the user wrote (internally equivalent to `{{$message.text}}`), enabling a natural conversational experience.
#### Use case examples
**`Pass the last message`** — Customer service
A user writes "What are the business hours?" and the agent receives it directly as input, generating a response based on its knowledge base.
**`No user message`** — When there is no real user query
Use this option when the last available message does not represent a real user query. Common scenarios:
* **Post-HSM campaign**: the user responded to a WhatsApp template by tapping a button like "Yes, I'm interested". That payload is not a query — the agent should start from its instructions and the flow's context.
* **Automated workflows**: the flow was triggered by a webhook, scheduler, or external API. There is no user message because no user wrote anything.
* **Post-data collection**: previous Input nodes already collected name, order number, etc. The last message is a data point (e.g., `"ORD-12345"`), not a question. The agent should respond based on the information already stored in memory.
In this mode, the agent generates its first response based solely on its system instructions. If you need the agent to greet the user, configure it in the agent's instructions.
**`Custom`** — Tailored context with variables
Allows you to build an input message by combining flow variables. For example, to pass context information to the agent:
```
Product: {{$context.product_name}}. Query: {{$message.text}}
```
This is useful when the agent needs additional context beyond the user's message, such as data collected in previous nodes of the flow.
When selecting **Custom**, the field supports variable interpolation with the `{{$variable}}` syntax and has a 100-character limit. Use the variable selector to explore the available variables in your flow.
### Remember previous messages
When enabled, the agent includes as context the last N messages of the conversation each time it starts. This allows maintaining conversational coherence when the user resumes a session after an interval.
Activate the **Remember previous messages** toggle.
Enter how many previous messages the agent should remember. The valid range is **1 to 50 messages**.
Use a low value (5–10 messages) for transactional conversations and a higher value for technical support where the full history may be relevant.
### Upload block
The unified upload block accepts documents and images in the same interaction. You can add files in three ways:
* **Drag and drop** files directly onto the block
* **Click** on the block to open the file selector
* **Paste a URL** in the link field at the bottom of the block (supports the same document and image formats listed below)
| Type | Supported formats | Maximum size |
| :------------ | :---------------------------------------------- | :------------- |
| **Documents** | `.pdf`, `.xlsx`, `.md`, `.txt`, `.json`, `.csv` | 2 MB per file |
| **Images** | `.jpg`, `.jpeg`, `.png` | 10 MB per file |
In addition to `.pdf` and `.csv`, you can upload `.xlsx`, `.md`, `.txt`, and `.json` files as knowledge sources.
Documents are processed one at a time. If you select or drag multiple documents simultaneously, only the first one will be processed and you will receive a notice to upload the remaining ones individually. Images, on the other hand, are processed in batch.
### Documents
When you upload a document, a panel opens where you define its **name** (maximum 30 characters) and an optional **description** that helps the agent understand the file's content. Once uploaded, you can edit its metadata or delete it from the list.
### Images
Images are uploaded directly without additional steps and appear as thumbnails below the upload block. You can upload up to **3 images** per agent.
* Click a thumbnail to view it in full screen
* Hover over a thumbnail to see the delete button
Images require a model with **multimodal capabilities** (marked with "Supports vision" in the [model list](#model)). If the selected model does not support vision, you will see a warning banner and the agent will not process images during the conversation.
### Datastores
Connect Datum databases so the agent can query structured information in real time:
* Select the datastore to connect
* Configure the allowed operations on the database
It is recommended to always load documents in the Context tab to anchor the agent's responses to your business's official documentation. Assign clear descriptions to each uploaded file to maximize effectiveness. The model will prioritize information from your files and datastores over its general knowledge, drastically reducing the risk of hallucinations.
### External context
Allows resuming this node from an external system via the resume API. Useful for workflows that require external asynchronous processing, such as validations, payments, or approvals.
Activate the **Add external context** toggle to expand the configuration.
Copy the endpoint URL that your external system will need to call:
```
POST https://gateway.jelou.ai/workflows/v1/skills/resume
```
Your external system must send the following request:
**Headers**
```json theme={null}
{
"x-api-key": "Your API key",
"Content-Type": "application/json"
}
```
**Payload**
```json theme={null}
{
"executionId": "{{$context.executionId}}",
"message": "string (optional)",
"pauseInteraction": false
}
```
The `executionId` is available as `{{$context.executionId}}` within the flow and is valid for 24 hours.
***
## Advanced
The Advanced tab contains additional settings for finer control over agent behavior.
### Save response
Allows you to store the agent's last response in a variable for use in subsequent nodes of the flow.
Activate the corresponding toggle.
Enter the name of the variable where the response will be stored (for example: `ai_agent_response`).
The variable will be available as `{{$context.ai_agent_response}}` in subsequent nodes of the flow.
### Fallback model
Select an alternative model that will be used automatically if the primary model fails or is unavailable.
The fallback model cannot be the same as the primary model.
### Processing options
Independent options to enable additional capabilities for messages the user sends during the conversation:
| Option | Description |
| :------------------------------ | :--------------------------------------------------------------------------------------------------------------------------------- |
| **PDF support** | Allows the agent to read and process PDF documents sent by the user during the conversation (text only, not images inside the PDF) |
| **Read image URLs** | Enables the agent to process images that the user sends as a URL with descriptive text during the conversation |
| **Quick Reply Payload support** | Allows the agent to interpret the payload of quick replies from interactive messages |
These options apply to files that the **end user** sends during the conversation. Images and documents you configure as agent context are managed from the **Context** tab.
### Multi-message response
Splits the agent's response into separate bubbles when it contains paragraph breaks (`\n\n`), media URLs, or lists. Image, video, audio, or document URLs are sent as independent media bubbles according to the channel, while numbered lists are kept together.
 Enabled by default for agents created after April 24, 2026. Earlier agents keep the previous behavior (single bubble) until you manually enable the toggle.
### Security (Guardrails)
Configure the agent's level of protection against misuse, prompt injection, and out-of-scope requests.
Activate the security toggle to access the configuration options.
Choose the preset that best fits your use case:
| Level | Description |
| :----------- | :----------------------------------------------------- |
| **Low** | Minimum protection, greater response flexibility |
| **Medium** | Balance between security and flexibility (recommended) |
| **High** | Strict protection, restricts out-of-scope responses |
| **Critical** | Maximum protection, ideal for regulated contexts |
Enable an additional protection layer that filters model inputs and outputs to detect malicious content.
[See complete security and guardrails guide](/guides/agentes-ia/seguridad)
### Expiration
Configure a time limit for the agent session. If the user does not respond within the configured time, the session expires automatically.
Activate the expiration toggle.
Define the time and select the unit:
* **Minutes**: range from 1 to 1200
* **Hours**: range from 1 to 20
* **Default value**: 8 hours (28,800 seconds)
### DLP (Data Loss Prevention)
Enable automatic detection and masking of sensitive information in agent conversations.
Activate the DLP toggle to access the configuration.
Choose which types of information should be automatically detected and masked:
| Data type | Default replacement value |
| :----------------------- | :------------------------- |
| Credit card number | `[CreditCardNumber]` |
| Credit card track number | `[CreditCardTrackNumber]` |
| Email address | `[EmailAddress]` |
| Financial account number | `[FinancialAccountNumber]` |
| IP address | `[IpAddress]` |
| Location | `[Location]` |
| Geographic coordinates | `[LocationCoordinates]` |
| Phone number | `[PhoneNumber]` |
| Date | `[Date]` |
| Person name | `[PersonName]` |
Modify the replacement value for each data type according to your needs.
The **Credit card number** type is always selected by default and cannot be disabled.
### Follow-up message
Lets the agent proactively resume an inactive conversation by sending a reminder to a user who stopped replying. When you turn on the **Enable follow-up message** toggle, a settings button appears that opens a modal where you define how the reminder behaves.
Turn on the toggle to reveal the settings button. Click the gear icon to open the **Follow-up message** modal.
Select how the reminder is generated:
* **Automatic**: the agent writes the reminder on its own based on the conversation.
* **Manual**: you write an instruction that defines how the agent should behave when resuming. The field accepts up to **900** characters.
Adjust the two controls that prevent the agent from over-nudging:
| Field | Description | Values |
| :-------------------------------------- | :----------------------------------------------------------------------- | :------------------------------------------------------- |
| **Wait between wakeups** | Idle time before sending each reminder. | 5, 10, 15, 20, 25, 30, 45, 60 or 120 minutes (default 5) |
| **Stop after # attempts without reply** | Maximum number of consecutive reminders without a reply before stopping. | 1 to 5 (default 2) |
The available options are capped by the agent's **expiration time**: you can only pick values lower than that time. Once the session expires, the agent stops sending reminders.
***
## Configuration example
A typical configuration flow for a customer service agent:
Select **GPT-4.1** as the model and write clear instructions defining the agent's role, tone, and scope.
Enable **Transfer to agent** to escalate complex conversations, **Product search** if the agent handles catalog queries, and **Send interactive message** to show options to the user.
Select **Pass the last message** as the initial message, upload the FAQ document in PDF format, add reference images if the model supports vision, and connect the product datastore if applicable.
Configure a **fallback model**, set **expiration** to 30 minutes, enable **security** at medium level, and activate **DLP** if financial or personal data is handled.
Enabled by default for agents created after April 24, 2026. Earlier agents keep the previous behavior (single bubble) until you manually enable the toggle.
### Security (Guardrails)
Configure the agent's level of protection against misuse, prompt injection, and out-of-scope requests.
Activate the security toggle to access the configuration options.
Choose the preset that best fits your use case:
| Level | Description |
| :----------- | :----------------------------------------------------- |
| **Low** | Minimum protection, greater response flexibility |
| **Medium** | Balance between security and flexibility (recommended) |
| **High** | Strict protection, restricts out-of-scope responses |
| **Critical** | Maximum protection, ideal for regulated contexts |
Enable an additional protection layer that filters model inputs and outputs to detect malicious content.
[See complete security and guardrails guide](/guides/agentes-ia/seguridad)
### Expiration
Configure a time limit for the agent session. If the user does not respond within the configured time, the session expires automatically.
Activate the expiration toggle.
Define the time and select the unit:
* **Minutes**: range from 1 to 1200
* **Hours**: range from 1 to 20
* **Default value**: 8 hours (28,800 seconds)
### DLP (Data Loss Prevention)
Enable automatic detection and masking of sensitive information in agent conversations.
Activate the DLP toggle to access the configuration.
Choose which types of information should be automatically detected and masked:
| Data type | Default replacement value |
| :----------------------- | :------------------------- |
| Credit card number | `[CreditCardNumber]` |
| Credit card track number | `[CreditCardTrackNumber]` |
| Email address | `[EmailAddress]` |
| Financial account number | `[FinancialAccountNumber]` |
| IP address | `[IpAddress]` |
| Location | `[Location]` |
| Geographic coordinates | `[LocationCoordinates]` |
| Phone number | `[PhoneNumber]` |
| Date | `[Date]` |
| Person name | `[PersonName]` |
Modify the replacement value for each data type according to your needs.
The **Credit card number** type is always selected by default and cannot be disabled.
### Follow-up message
Lets the agent proactively resume an inactive conversation by sending a reminder to a user who stopped replying. When you turn on the **Enable follow-up message** toggle, a settings button appears that opens a modal where you define how the reminder behaves.
Turn on the toggle to reveal the settings button. Click the gear icon to open the **Follow-up message** modal.
Select how the reminder is generated:
* **Automatic**: the agent writes the reminder on its own based on the conversation.
* **Manual**: you write an instruction that defines how the agent should behave when resuming. The field accepts up to **900** characters.
Adjust the two controls that prevent the agent from over-nudging:
| Field | Description | Values |
| :-------------------------------------- | :----------------------------------------------------------------------- | :------------------------------------------------------- |
| **Wait between wakeups** | Idle time before sending each reminder. | 5, 10, 15, 20, 25, 30, 45, 60 or 120 minutes (default 5) |
| **Stop after # attempts without reply** | Maximum number of consecutive reminders without a reply before stopping. | 1 to 5 (default 2) |
The available options are capped by the agent's **expiration time**: you can only pick values lower than that time. Once the session expires, the agent stops sending reminders.
***
## Configuration example
A typical configuration flow for a customer service agent:
Select **GPT-4.1** as the model and write clear instructions defining the agent's role, tone, and scope.
Enable **Transfer to agent** to escalate complex conversations, **Product search** if the agent handles catalog queries, and **Send interactive message** to show options to the user.
Select **Pass the last message** as the initial message, upload the FAQ document in PDF format, add reference images if the model supports vision, and connect the product datastore if applicable.
Configure a **fallback model**, set **expiration** to 30 minutes, enable **security** at medium level, and activate **DLP** if financial or personal data is handled.