
Auto-publish
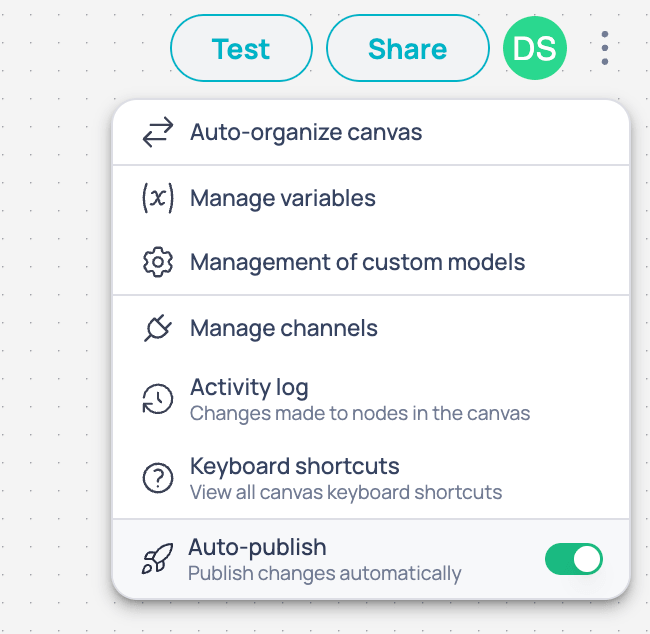
Auto-publish enabled in the options menu
The setting applies at the account level: when enabled, it affects all regular workflows in the company at the same time.
Auto-publish only applies to regular workflows. Marketplace Tools and Workflows always require manual publication.
Enable or disable auto-publish
1
Open the context menu
In the Brain top bar, click the options icon in the upper right corner.
2
Change the setting
Find the Auto-publish option and enable or disable the toggle as needed.
Publish manually
Auto-publish disabled in the options menu
1
Identify pending changes
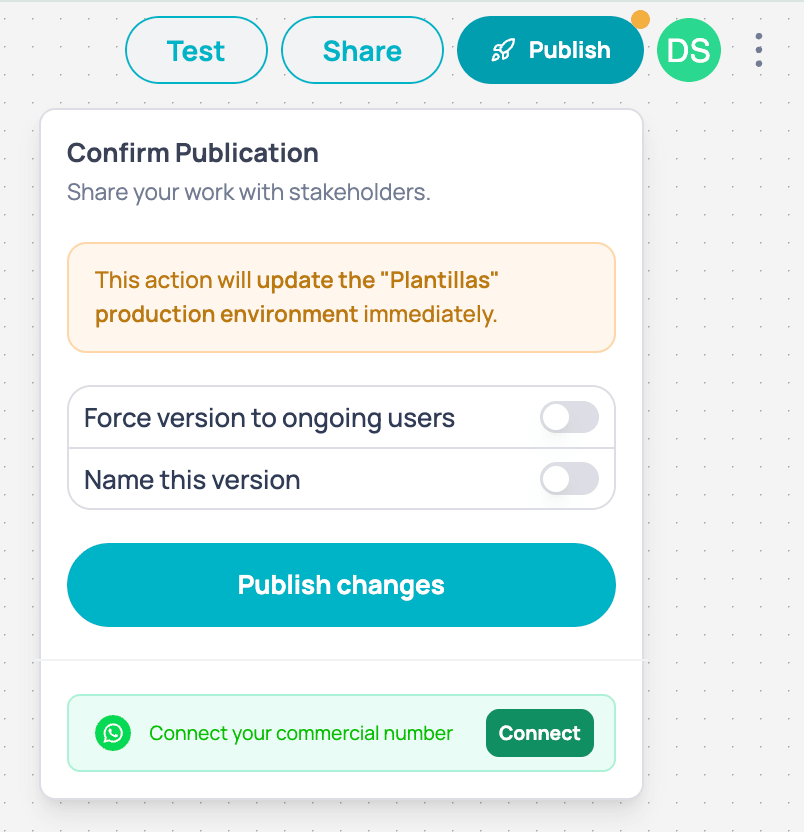
When there are unpublished changes, the Publish button in the top bar will show an orange indicator. This means your draft differs from the last published version.
2
Click Publish
Click the Publish button in the top bar. A confirmation popover opens indicating that the changes will be deployed to production.
3
Review publish options
Publishing will deploy to production all changes in the workflows of your current project. You can either force this new version so users already mid-flow adopt it, or add a name to this version to help you identify it in the version history.
4
Confirm the publication
Click Publish changes. The system creates a new commit with the date, time, and your user as the author.
Publish to the Marketplace
You can publish individual Workflows and Tools to the Marketplace so other teams can reuse them. This publication is always manual, regardless of your account’s publishing mode.1
Open the publish option
From the canvas of your workflow or Tool, click the Publish button in the toolbar.
2
Fill out the form
Fill in the required fields:
- Version: version name (e.g.
v1.0.0,v2.1.0). - Description: brief summary of the changes or functionality.
- Privacy: choose between Public (visible to all users) or Private (access only with authorization).
3
Publish
Click Publish. The version will be available in the Marketplace and can be selected from AI Agent nodes or other workflows.
Selecting versions in nodes
When you add a published workflow or Tool to an AI Agent node, you can choose which version to use from the version selector in the configuration panel. Each version shows whether it is public or private.If you publish a new version with changes to inputs or outputs, workflows using previous versions will not be affected until you manually update the selected version.
Version history
The version history records all manual publications of your project. From here you can preview any version, compare changes, and restore a previous version.The version history is only available when auto-publish is disabled. With auto-publish active, changes do not generate entries in the version history.
1
Access the version history
In the Brain top bar, open the options menu in the upper right corner and select Version History. A side panel will expand with the list of versions sorted by date.Each entry shows:
- Date and time of publication
- User who made the publication
- Current badge on the version active in production
2
Preview and compare versions
Select a different version to see in the canvas how your workflow was built at that moment. Use this view to compare before deciding whether to restore.
3
Restore a version
If you need to go back to a previous version, click Restore this version in the upper right corner — the button only appears in preview mode. Keep in mind that restoring replaces the active production version immediately.
Tester
Test your workflow before publishing
Jelou Apps
Share and test in production