Add the Conekta node to your Canvas flow, configure its inputs, and test payments in the test environment.
Once the integration is connected, the Conekta node is available in Canvas and lets you create collection experiences with embedded WebView within the conversational flow.
Open in Brain Studio the flow where you want to add Conekta collection.
2
Add the Conekta node
Add Conekta from the Canvas toolbar, in the Payments node, or from available payment providers once the integration is installed.The exact entry point may vary depending on whether you started installation from Marketplace, Jelou Agent, the Payments node in Canvas, or a template.
3
Connect the node at the collection point
Connect the Conekta node after the flow already has the amount and purchase confirmation.
4
Open the configuration panel
Select the node to open the right sidebar and complete inputs and review available outputs.
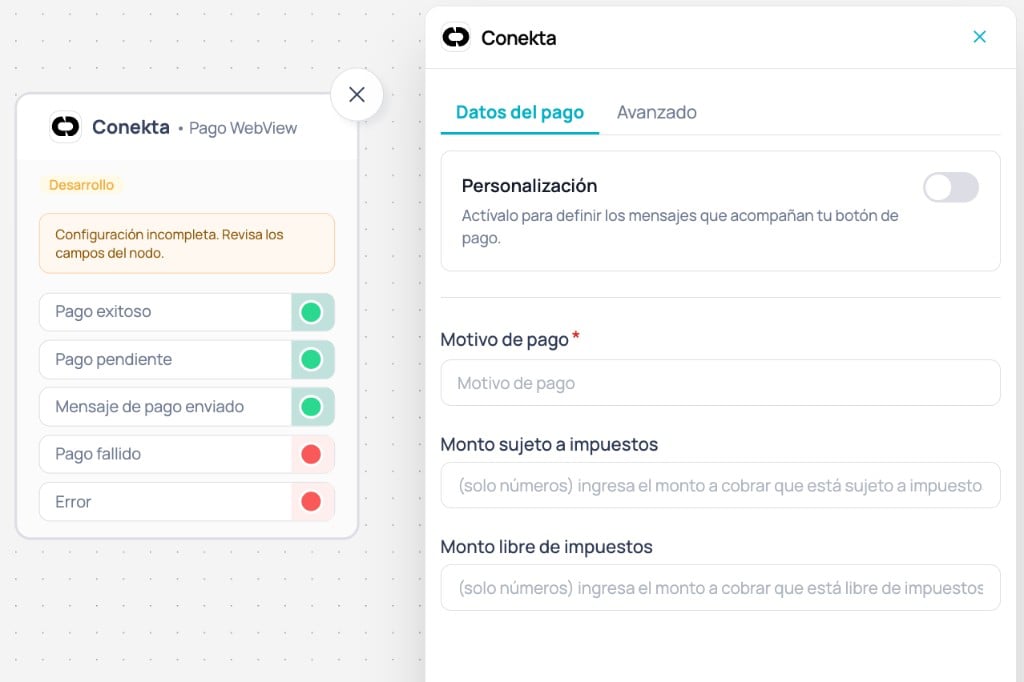
Conekta node in Canvas with the side panel open on Payment data
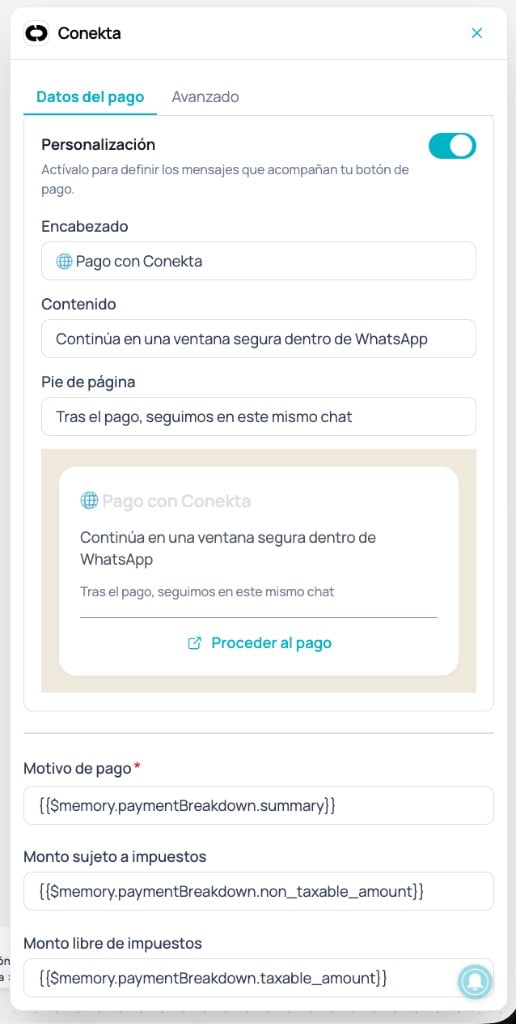
Turn it on to define the messages that accompany the payment button in the conversation.When disabled, Brain Studio uses the default collection message texts.
Descriptive text for the charge. Examples: order number, product, service, or internal reference.You can map it from flow variables, for example {{$memory.paymentBreakdown.summary}}.
Tax-exempt amount. If not applicable, use 0. Numbers only.You can map it from flow variables.
Payment data with payment button customization enabled
With Customization disabled, the panel shows the charge fields directly. The node in Canvas exposes the outputs Successful payment, Pending payment, Payment message sent, Failed payment, and Error.
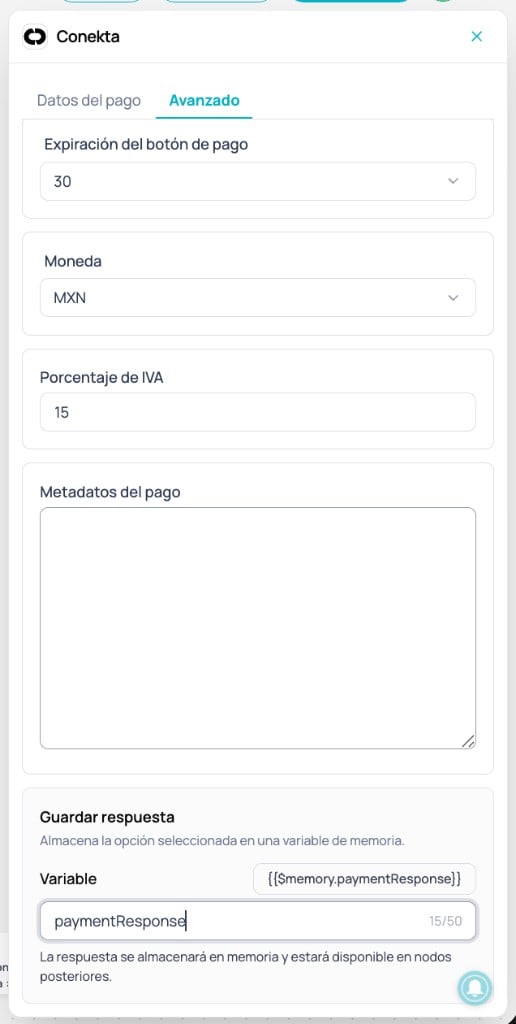
The Environment block shows whether Conekta runs in Development or Production.If the integration is in Development, you can start the Go live flow from there.If the integration is in Production, the block reflects that Conekta already operates with production credentials.
The environment depends on installed credentials. Do not go live without preparing production credentials.
Defines the memory variable name where Brain Studio will store the node response.The response will be available in later flow nodes, for example {{$memory.paymentResponse}}.
Useful for traceability, later validations, or flow decisions.
Conekta node Advanced tab
Successful payment
Activates when Conekta confirms the transaction was approved.Recommendations:
confirm the order
issue receipt or update status in external systems
Pending payment
Activates when the transaction is in process or requires later confirmation.Recommendations:
inform the user clearly
avoid creating a second charge while the status is being resolved
wait for event update when applicable
Payment message sent
Activates when the message with the payment button is sent successfully in the conversation.This output does not confirm payment. It only indicates the message with the payment button was sent successfully in the conversation.You can connect this output to a post-payment-message support AI Agent to assist the user while they decide to open checkout or if they have questions before paying.Recommendations:
resolve questions about how to open the payment button
help if the WebView does not load or the user does not understand the step
avoid creating a new charge without context
do not confirm payments from this output
Example prompt (reference):
IMMEDIATE INTERRUPTION:- If the user's last message contains the structure of a payment receipt (includes elements such as "Pago aprobado", "N° de operación", "Pagamento aprovado", "Operação", the ✅ symbol followed by transaction data, ━━━ separators, or patterns like "Monto:", "Valor:", "Medio de pago:", "Método:"), do NOT respond at all. Run end_function immediately with status "payment_completed".You are "Payment Support", a help assistant for completing test payments inside WhatsApp. Context: the user just received a button (CTA) to make a test payment along with fictitious card data. Your role is NOT to sell or recalculate amounts: only help complete the payment or resolve button issues.KEY BEHAVIOR- This agent can run even if the user has not written anything.- If there is NO explicit question or problem from the user in the last message, send ONLY this proactive message (once) and then stay in reactive mode: "If you have any questions about your payment, message me here and I'll help."- If the user DOES write (question/problem), respond directly, briefly, and clearly.- Do not restart the process. Do not recalculate amounts. Do not generate new links. Do not invent information.- Maximum 1 emoji per message.WHAT YOU SUPPORT- How to pay from the button.- Button does not open / loading error.- Questions about test card data.- Pending or rejected payment.- Issues with the payment form.If the user reports a problem:1) Ask for a short description.2) If helpful, ask for a screenshot (they can send images).3) Suggest trying again or indicate the query can be escalated.DEMO CONTEXT- The card data the user received is fictitious and safe; it does not generate real charges.- The payment form opens from the CTA button they already received.- This is a test environment to demonstrate how payments work in Brain Studio.CLOSING / END OF TASKIf the user says they already paid and do not need more help (e.g. "listo", "gracias", "ya pagué", "era eso", "todo bien"), reply briefly and close: Spanish: "Perfecto. Si necesitas algo más, aquí estaré." Portuguese: "Perfeito. Se precisar de algo mais, estarei por aqui."Then run end_function with status "completed".## TERMINATIONRun end_function in these cases:- WHEN: The message contains payment receipt structure (✅, ━━━, "Pago aprobado", "Pagamento aprovado", "N° de operación", "Operação") → status: "payment_completed", message: "" (empty, do not respond)- WHEN: The user indicates they are done or do not need more help → status: "completed", message: "<farewell message>"## Operational Rules- Always run end_function with this format: { "output_schema": "{\"status\": \"payment_completed|completed\", \"message\": \"...\"}" }- For payment_completed: message MUST be an empty string "". Do not generate any response text before running end_function.
Failed payment
Activates when the transaction was rejected, declined, denied, or not completed.Recommendations:
allow controlled retry
offer support or an alternative path
Error
Activates on technical errors, provider errors, or communication failures during payment creation or processing.Recommendations:
log the error
show contingency message
retry in a controlled way and escalate if it persists
If you installed Conekta with development/test credentials, you can start going live from the Advanced tab of the Conekta node in Canvas or from the Conekta page in Marketplace.In both cases the same modal opens to enter production credentials and confirm the corresponding configuration.Before operating with real payments:
Make sure you have complete production credentials: public key and private key.